
Greetings, one and all! I am King Man, and this is what I do best: strategy. So now I will reveal to you the secrets of battle, so that you too may defeat the strongest of navis! Now, let us begin:
Flash Man: Bright Navi "...It's not that kind of Flash Man...."
Attacks: Flash Attack, Flash Stopper (Summon Attack), Flash Thunder, Steal
Suggested Chips: Anything Wood, Barriers, auras
Suggested Styles Wood Shield Style
Suggested NC Blocks: None
|

 |
The first Navi you fight in the game. His health is very low, but his skills are not as thus handicapped. He'll start the battle by teleporting around. Then he'll do one of two things. He'll either use the Flash Attack, which is a VERY fast electric type ground traveling attack. It can change direction, so be careful. Or he'll use the Flash Stopper. The Flash Stopper makes two towers appear in your area. Destroy them quickly, because if you don't, you'll be paralyzed.
Though this can be avoided if you have a barrier or aura activated, as the penalization cannot reach you. After you're paralyzed, he will use Steal, and then activate the Flash Thunder. The Flash Thunder is a very powerful attack that affects the panel in front of Flash Man, and the panels above, below, and in front of the aforementioned panel. Just keep pelting Flash Man with Strong Wood chips, and you'll do fine.
 |
WWW Navi Battle: Flashman.exe
Condition= Ch1 boss
Navi Ghost Battle: Flashman.exe α
Condition= Ch2 hidden in ACDC3
HP= 500
Speed= fast
Defense= normal
Movement= random teleport
Objects= Flash Bulb(20 HP)
Attacks= Neon Light(30), Spark Arm(45), Time Stopper(paralysis), AreaGrab(1 stock)
The big change here is that his strategy will be more heavily aimed towards paralyzing you with the bulbs and then zapping you with Spark Arm. Hiding in the back row will do you little good as he may use AreaGrab to catch you anyway. Your best bet is to destroy the bulbs before they can go off (20 HP apiece). The strategy is otherwise the same. You win the Flashman chip.
Navi Ghost Battle: Flashman.exe β
Condition= Random encounter in ACDC2 after defeating above ghost
HP= 700
Speed= fast
Defense= normal
Movement= random teleport
Objects= Flash Bulb(40 HP)
Attacks= Neon Light(60), Spark Arm(90), Time Stopper(paralysis), AreaGrab(3 stock)
This ghost haunts ACDC2, where the napping school guard is said to sense bright lights in his sleep. There's not much difference from his previous version except he's faster and meaner. He may fire Neon Light in the regular tracking pattern, or he may try to fake you out with a zig-zagging pattern. By the time you take this one on, you'll want some good wood chips in your folder to annhilate him with.
Ultimate Battle of Light: Flashman.exe Ω
Condition= Omega Challenge Mode, hidden in Principal'sPC2
HP= 1500
Speed= fast
Defense= normal
Movement= random teleport
Objects= Flash Bulb(100 HP)
Attacks= Neon Light(100), Spark Arm(150), Time Stopper(paralysis), AreaGrab(3 stock)
It's an all elec battle with the viruses leading up to this guy including Bunny, Eleball, and EleBee. Make sure you're sporting wood, and maybe some anti-invasion chips like Slasher or BodyBurn for the bees and balls. An easy way to avoid the Time Stopper without destroying the bulbs is with a simple barrier, it avoids the effects and doesn't even get removed. Despite his sizeable upgrade, he's still not up to par with the Secret bosses you already fought to get this far. Shouldn't be much of a problem. Get FlashmanV5 for winning.
|
Guts Man: STILL a strong country guy "YEEHAW!!!"
Attacks: Shockwave (Summon Attack), Guts Punch, Panel Crack, Zeta-Punch, Steal
Suggested Chips: Panel out 3, Metal Stage, Repair, airshoes, Invis
Suggested Styles Shadow/Ground Style, any element
Suggested NC Blocks: Shadow Shoes, Air Shoes, Set Metal
| 
 |
The navi of Dex, long rival of Lan. So he should be pretty easy. ^_^ Now then, anyone who's played Battle Network 1 or 2 know the basic battle strategy of Guts Man. His basic attack is still a ground traveling shockwave, so holes stop it. He also uses the Guts Punch, though it won't be limited to the panel in front of him. It'll launch of until it runs into something, or goes of the screen. The Panel Crack will cause all panels on your side of the field to become cracked. This can make things quite difficult, though the chips I suggested above can easily counter it. The final, and most deadly, attack in Guts Man's repertoire is Z-Punch, which is exactly like the program advanced. It lasts for five seconds. Five seconds of a Guts Man firing off Guts Punches, and nothing can stop him. This is where Invis and Shadow Style are helpful. But then again, with his low health, you should be able to stop him, no problem. Also, I must note that stealing his panels is worthless, as he'll just use Steal to reclaim his lost land.
 |
Friendly NetBattle: Gutsman.exe
Condition= End of Ch1 Dex in ACDC park
HP= 300
Speed= slow
Defense= normal
Movement= all enemy panels, random teleport
Attacks= Hammer Wave(20), Guts Punch(30), Row Crack(cracks panels)
It's the same basic battle you fight early in most of the games in the series. You sidestep the waves, and when he does a Row Crack, try to get on one of the cracked panels and move left so you can be protected behind the hole. Just don't get stuck on one row by moving around too much when there are a lot of cracked panels or you could end up helpless. He'll only try to punch if you're standing in the rightmost column. Use that to draw him in close for a sword attack. Get the Gutsman chip as a prize.
Rival NetBattle: Gutsman.exe α
Condition= Ch2 and Ch4 midboss, later with Dex outside DNN TV station
HP= 700
Speed= medium
Defense= normal
Movement= random teleport
Attacks= Hammer Wave(40), Guts Punch(60), Area Crack(cracks panels)
He can now crack all your panels with one quick move, but you can still turn it to your advantage by hiding behind the holes to avoid wave damage. Winning is optional the first time, and the second time there's a folder limitation. He doesn't really get hard until the next version though.
Tough NetBattle: Gutsman.exe β
Condition= Ch7 midboss (as Copyman), Ch8 Dex in WWW Base
HP= 900
Speed= medium
Defense= armor
Movement= random teleport
Attacks= Hammer Wave(100), Area Crack(100, cracks panels), Rocket Punch(150), Zeta Punch(150x17), AreaGrab(1 stock)
He's got some powerful attacks, he now has SuperArmor, and if he uses area crack twice quickly you could be pretty screwed. You may wanna pack some repair or terrain chips, or equip AirShoes. He uses Z-Punch after the battle drags on for a while. You'll see it coming when he starts teleporting very rapidly. He'll then start tossing Rocket Punch after Rocket Punch at you while invincible. Unlike YOUR Z-Punch PA which gives you 5 seconds to work with, Guts's version lasts quite a bit longer, it'll annihilate you if you can't dodge, so watch out. Still, his HP isn't that high, if you're quick you won't have to worry about it.
Ultimate Battle of Tough Determination: Gutsman.exe Ω
Condition= Omega Challenge Mode, hidden in Dex's Homepage
HP= 2000
Speed= fast
Defense= armor
Movement= random teleport
Attacks= Hammer Wave(200, quake effect), Area Crack(200, cracks panels), Rocket Punch(300), Zeta Punch(300x17), AreaGrab(1 stock)
You should be able to handle the Met and HardHead viruses no problem, but for the Fishies you may want to pack a StoneCube or something. Guts himself has twice the attack power and more than twice the HP of the last version, and now his regular Hammer Wave attack has the quake effect. AirShoes are your friend once again. Remember to pack attack chips accounting for his Super Armor. He's not as tough as he looks though, you'll be fine at this point. Get GutsmanV5 for winning.
|
Metal Man: Heavy Metal Dude "Insert loud Heavy Metal Guitar Solo here"
Attacks: Metal Rocket, Metal Blade, Metal Punch (Summon Attack)
Suggested Chips: None
Suggested Styles: none
Suggested NC Blocks: Break Buster
|

 |
The navi of the lovely shop owner, Tamako. He is very strong. I must note that the battle begins with Metal Gears on both sides of the battlefield. It is very hard to destroy the gear...unless, of course, you have Break Buster, then you can just destroy it easily with your buster, which is highly suggested. The attacks of Metal Man are very basic, first, there's Metal Rocket, which is where Metal Man launches 5 rockets from that thing on his back, and they land in your area. The landing will be preceded by the panel it will land flashing yellow. It's easy enough to avoid this. Then he uses the Metal Blade, which is a blade that travels exactly like a Boomer; so just get into the middle row, middle or front column. The strongest attack of Metal Man is the Metal Punch, which is where Metal Man teleports to the panel in front of Mega Man, and raises his mighty fist. After about a second, he'll bring it down, cracking the panel, and causing major damage. I cannot stress how important it is to avoid this attack. This navi's attack patterns are very basic, but dangerous none the less.
 |
Hard Navi Battle: Metalman.exe
Condition= Ch2 Tamako outside Ura Inn
Hard Navi Battle: Metalman.exe α
Condition= Ch4 midboss, later with Tamako in DNN TV station lobby or later outside Ura Inn
Hard Navi Battle: Metalman.exe β
Condition= Ch7 Tamako outside Ura Inn
HP= 1200
Speed= medium
Defense= armor
Movement= random teleport
Special Field= Metal Gears slowly move back and forth across middle row on both sides of the field.
Objects= Metal Gear(50 HP, shielded)
Attacks= Metal Missiles(80x5), Metal Blade(80), Metal Fist(160, quake effect, breaks panel), Metal Gears(20)
His speed has advanced to the point he'll fire off his missiles, and then move onto his next attack while all the missiles are still firing, resulting in one hell of a frantic dodging mess. He'll also use his Metal Fist a lot, and don't count on him fighting fair, you could very well get trapped in the top/bottom row while the middle is two holes and a gear, and you'll be an easy Metal Blade target. Come prepared with Break Buster, break Charge, or a lot of breaking-type chips to get rid of the gear on your side of the field post-haste. AirShoes may also be necessary if his gets Fist-happy. Don't use any chips that'll keep you standing still too long as you'll still need to keep moving.
Cold Hard Ultimate Battle: Metalman.exe Ω
Condition= Omega Challenge Mode, hidden in Tamako's Homepage
HP= 1700
Speed= fast
Defense= armor
Movement= random teleport
Special Field= Metal Gears slowly move back and forth across middle row on both sides of the field.
Objects= Metal Gear(50 HP, shielded)
Attacks= Metal Missiles(120x5), Metal Blade(120), Metal Fist(240, quake effect, breaks panel), Metal Gears(20)
Viruses include Canodumb, WindBox, and Yort. The Yorts will be the most dangerous, particularly in combination with the Vaccuum. Objects are good for defending you against Yo-Yo, and could help with Metalman's Blades as well, though you should definitely pack plenty of breaking attacks to get rid of the Gear in your row as soon as possible. His speed and power are up, but the missiles are still only fired in rounds of five, and his HP is relatively low compared to the Secret bosses you already fought. As long as you don't get cornered by that gear or weakened by the Yorts leading up to this battle, you'll do fine. Get MetalmanV5 for winning.
|
Beast Man: Wild Beast "Grrrr...."
Attacks: Wild Slash, Wild Backslash, Corner Slash, Wild Beast Slash (Summon Attack)
Suggested Chips: Slasher, Time Freezing Chips
Suggested Style: Any Style, Elec
Suggested NC Blocks: None
|

 |
This is easily one of the fastest navis in the game. Scoring hits on him is a challenge in itself, much less dodging his attacks. Anyway, he'll start the battle by teleporting around randomly. Then he'll do one of two things. The most likely one is that he'll use the Wild Slash. The Wild Slash is where he drops in (Literally) to the column directly in front of you, and then slashes with the range of a wide sword. To avoid, step backwards. He'll then follow this up with a Wild Backslash. Which is exactly the same as the Wild Slash, except he drops into the column directly behind you. To avoid, step forward. The other thing Beast Man could do is use the corner slash. He'll teleport to one of the four corners of your area, and then slash across the middle. To avoid, step anywhere. When Beast Man is low on health, he'll start using the Wild Beast Slash. First, one of his claws will appear up diagonal, and slash down diagonally. To avoid, step forwards or backwards. Then his other claw will appear down diagonally from you, and slash up diagonally. Dodge the same. Then his head will appear at the rightmost part of his area, and move forward. To avoid, more up or down. Then he will repeat this at least once more. I must note that he does this in rapid succession, making dodging very difficult. Since he's always moving into your area, the Slasher chip will, quite literally, rip him to shreds. And use plenty of Navi chips, since hitting with anything else is difficult. Just think fast, and you will succeed.
 |
WWW Navi Battle: Beastman.exe
Condition= Ch2 boss
Navi Ghost Battle: Beastman.exe α
Condition= Ch3 hidden in SciLab1
HP= 700
Speed= quick
Defense= normal
Movement= random teleport, avoids MM's row
Attacks= Beast Ray(40), Jumping Claw(40), Wild Rush(40x9)
His Jumping Claw may come from in front or behind, careful not to be caught off-guard. He also does his Wild Rush three times in one go now, which could really get you dancing unless you put a stop to it. Turn his speed against him with Gutsman or Geddon and impede his attacks with objects. If you're prepared, this won't be much more of a challenge than before. The prize is the Beastman chip.
Navi Ghost Battle: Beastman.exe β
Condition= Random encounter in Hikari Doghouse Comp with SneakRun in effect, after defeating above ghost
HP= 900
Speed= quick
Defense= normal
Movement= random teleport, avoids MM's row
Special Field=Cracked panels in three corners on each side.
Attacks= Beast Ray(60), Jumping Claw(60), Wild Rush(60x12)
This ghost haunts Lan's doghouse, where the Progs complain that they hear beast-like growling even when people walk by slowly and quietly. That's the hint that you should equip SneakRun to find him and the Spikey viruses that moved in with him. Now he's really fast and will probably do a Jumping Claw every two moves, and if you let him do Wild Rush it'll seem to go on forever. The same tactics should work though. By this time you could try a heat style with Lavastage, Slashers to get him when he enters your area, and other advanced tactics to slow him down.
Ultimate Wild Battle: Beastman.exe Ω
Condition= Omega Challenge Mode, hidden in ZooComp3
HP= 1600
Speed= quick
Defense= normal
Movement= random teleport, avoids MM's row
Attacks= Beast Ray(120), Jumping Claw(120), Wild Rush(120x18)
His animal troupe includes Ratty, Spikey, Beetle, and Momogra. You'll want strong, accurate attacks drawn right away to deal with the rats, and at least some ground-damaging attacks to deal with the moles. Beast himself is as speedy and evasive as always, but the tactics that worked on him before will still do the trick. His Wild Rush lasts an absurdly long time but it's still a simple matter to dodge. Try to hit his head during this attack phase just to get it over with faster. Get BeastmanV5 for winning.
|
Punk: Famous Navi "You just got Punk'd"
Attacks: Punk Roll1, Punk Roll 2, Punk Reach, Punk Slash
Suggested Chips: Objects (Rock Cube, Rook, Etc), Slasher
Suggested Style: None
Suggested NC Blocks: None
|

 |
This navi is exclusive to the Blue Version. And since he doesn't give you a navi chip, there isn't really any reason to fight. But I will tell you how anyway. His attacks are interesting because he actually uses his own body as a weapon. You see those spikes he has on his body aren't just for decoration. Punk Roll 1 has him moving forward in a manner like this: ~
Basically, he'll move forward, while going up and down amongst the panels at the same time. To avoid this, you'll have to move forward at the right moment. Hard, but doable. Punk Roll 2 has Punk moving like a Boomer does, but he'll turn at the same column you occupy. To avoid this, go into the middle row, and move right when he gets into your column. He'll go by without a hitch.
Punk Reach is a move that I detest. He'll stretch one of his arms off the screen, and it'll appear right behind you, and it'll hit you. To avoid this, move up or down. Finally, the Punk Slash is his strongest attack. First, he'll disappear suddenly, and those things on his shoulders will appear. They mover in a style exactly like that of Punk Roll 2. Then he will appear in your own area, and attack with a Wide Sword type attack. Avoiding this is hard. I suggest a Slasher Chip to hit him.
As an endnote, Objects stop Punk Roll 1 and Punk Roll 2, such as rook and Rock Cube. They make this battle so much easier!
 |
Famous Navi Battle: Punk.exe
Condition= Blue Version Ch3 Mr.Famous beside Yoka power station
HP= 800
Speed= fast
Defense= shield
Movement=slides to adjacent panels in all eight directions
Objects= Shoulder(50 HP, shielded)
Attacks= Mad Roller(30), Madder Roller(30), Shield&Chain(30), Shoulder Roller(30), Double Chain(40), Rolling Shield(shielded while rolling)
Punk doesn't hold anything back in his fights as far as moves go, he gets faster and stronger with each version, but the strategy is the same. He moves around pretty quickly, and doesn't like to give you an opening to attack, but come prepared and you can leave him helpless. Most of the time he attacks with one of two roller maneuvers; either he heads straight across the top or bottom row, makes a right turn when he reaches your column, then heads back when he reaches the opposite row, or he sweeps up and down every column, zig-zagging his way forward. Either way, you're going to get hit if you don't move at just the right moment in just the right way, which is to move to the right just as he's passing into your column so that he misses you. If you try to hit him with a direct attack like a Cannon or other gun chip, he'll probably block it with his shield while simultaneously striking you from behind with his chain arm which he launches behind him...however that works. For his rarest attack, he first disappears and sends his Shoulder Rollers at you in the same hook pattern as his first rolling attack, but always in a clockwise direction. After they pass by, he'll appear in the column in front of you and strike with a WideSword-area swipe which deals more damage than usual (though running into him will do the same damage as his other attacks). You can take him out more easily by using holes and/or objects to restrict his movements. Your prize is up to 2000Z depending on Busting Level (3000 with a Team Style S-Rank under 20 seconds).
Famous Navi Battle: Punk.exe α
Condition= Blue Version Ch6 Mr.Famous beside Yoka power station
HP= 1000
Speed= fast
Defense= shield
Movement=slides to adjacent panels in all eight directions
Objects= Shoulder(50 HP, shielded)
Attacks= Mad Roller(60), Madder Roller(60), Shield&Chain(60), Shoulder Roller(60), Double Chain(80), Rolling Shield(shielded while rolling)
He's faster and stronger, but hasn't changed his tune. To combat this rolling menace, simply block his path. If he runs into a hole or object while rolling, he'll be forced to abort his attack (he won't even damage the obstacle). Use Gutsman or Geddon and his quick movements will cause him to quickly confine himself to one panel, making him an easy target. Place StoneCubes in the top and bottom rows and both his rolling attacks will never reach you. Once you've taken control of the battlefield in such a manner, you can take him out in any number of ways. The prize is still just zenny, up to 2000 or 3000 depending on Busting Level.
Famous Navi Battle: Punk.exe β
Condition= Blue Version Ch8 Mr.Famous beside Yoka power station
HP= 1600
Speed= fast
Defense= shield
Movement=slides to adjacent panels in all eight directions
Objects= Shoulder(50 HP, shielded)
Attacks= Mad Roller(100), Madder Roller(100), Shield&Chain(100), Shoulder Roller(100), Double Chain(160), Rolling Shield(shielded while rolling)
Fast fast fast. Well he's irritatingly fast no matter which version you fight so what difference does it really make? Objects and holes are still the keys to victory. This late in the game you should have everything you need to combat his fighting style. Yes, the prize is still just zenny, still up to 2000, or 3000 with Team Style.
|
Bubble Man: Surfer Dude "Blub you!!!"
Attacks: Bubble, Bubble Drone, Explosive Bubble, Crab, Bubble Wrap, Harpoon (Summon Attack)
Suggested Chips: Anything Electric
Suggested Style: Elec Guts
Suggested NC Blocks: None
|

 |
Beware the Scuba navi, for he is powerful...Well, not really powerful. He fits into the "Cute, but annoying as hell" factor (Which were held by Ice Man and Toad Man in past BN games) Anyway, I must note that the middle panel of Bubbleman's area has a hole in it, so multiple area steals won't work to well. From the hole comes Bubbles, Bubble Drones, and Explosive Bubbles. Bubbles are just that: Bubbles that cause damage when they hit you. They have only 1 HP, so destroying them is easy. Just rapid fire (Which is why I suggested Guts style) Bubble Drones are like Bubbles, except they have fish like things in them. When the bubbles are destroyed, the fish things will suddenly dash forward. So destroy the bubble, then get out of the way. Explosive Bubbles are pink, and have orange things in them. They are hard to destroy, and when they get close enough, they'll stop moving, and explode. I would concentrate on only dodging this one instead of attempting to destroy it. And now, we get to attacks that Bubble Man actually uses. Every so often, he'll throw a Crab. It'll be thrown three spaces forward, then it'll move like a ratton: it moves forward, and then turns into you. Avoiding these is hard, what with the bubbles and such. Just do the best you can. When Bubble Man gets low on HP, he'll activate Bubble Wrap. It's like a regenerating barrier. It can be taken out easily enough with the buster. And Bubble Man will launch a flurry of Harpoons. They move straightforward, hitting all in their path. Just keep pelting Bubble Man with strong chips, preferably of the Electric type, and he'll go down easily.
 |
WWW Navi Battle: Bubbleman.exe
Condition= Ch3 boss
Navi Ghost Battle: Bubbleman.exe α
Condition= Ch4 hidden in Yoka1
HP= 800
Speed= slow
Defense= cover, barrier
Movement= random teleport in far right column, avoids MM's row
Special Field= Missing panel in the center of enemy field, rock in panel directly above.
Objects= Rock(500 HP), Bubble(1 HP), Fish(invincible), Crab(20 HP), Bomb(40 HP)
Attacks= Bubble Lead(80), FishMissile(80), Depth Charge(80), Crabton(80), Aqua Shots(100x3), Bubble Wrap(1HP Barrier that regenerates)
His Depth Charges don't wait until the end of the battle to come out this time, you'll be dealing with them all the way through. He still waits until his health is really low to do the AquaShots and BubbleWrap thing. The Bubble Parade comes a bit faster in this battle. You'll definitely want attacks that can go right through or around the obstacles because trying to get a direct shot will be next to impossible, particularly with the tougher Depth Charge bubbles coming more frequently. Bubbleman chip for winning.
Navi Ghost Battle: Bubbleman.exe β
Condition= Random encounter in Beach1 when HP is low, after defeating above ghost
HP= 1200
Speed= fast
Defense= cover, barrier
Movement= random teleport in far right column, avoids MM's row
Special Field=Missing panel in the center of each side of the field.
Objects= Bubble(1 HP), Fish(invincible), Crab(30 HP), Bomb(80 HP)
Attacks= Bubble Lead(120), FishMissile(120), Depth Charge(120), Crabton(120), Aqua Shots(150x3), Bubble Wrap(1HP Barrier that regenerates)
As rumored by the navi in Beach1, the ghost of this cowardly diver will appear there to navis with low HP, along with other virus battles involving Shrimpies on a similar field. The bubbles move very fast here and he'll go into BubbleWrap mode below 300 HP. It can be hard enough just finding him with the conditions in place (low HP, and in all likelyhood you'll need to use SneakRun as well), but starting the battle with low HP puts you at quit a risk. If you're going for the S Rank, then you'll want to avoid getting hit anyway, so you may not have to worry about healing at least. Try to pack as many good chips for this guys as possible: Flashman, Lance, Lightning/Bolt if you're Elec Style, IceStage/IceBall, etc. One thing you can do to keep the bubbles at bay is put down an object like a Stone Cube in the panel just to the left of the hole, and another right above or below it. Then as long as you stay out of the row that's not walled off, the bubbles won't follow you and go around it. That can help you hold out for a while if you're going for a lower Busting Level for the V2 chip.
Ultimate Blubbin' Battle Blub: Bubbleman.exe Ω
Condition= Omega Challenge Mode, hidden in Yoka2
HP= 1800
Speed= fast
Defense= cover, barrier
Movement= random teleport in far right column, avoids MM's row
Special Field= Missing panel in the center of enemy field, rock in panel directly above.
Objects= Rock(500 HP), Bubble(1 HP), Fish(invincible), Crab(40 HP), Bomb(120 HP)
Attacks= Bubble Lead(200), FishMissile(200), Depth Charge(200), Crabton(200), Aqua Shots(300x3), Bubble Wrap(1HP Barrier that regenerates)
It's the all-aqua battle, so fry those fishes with electricity. The Shrimpy, Slimey, Pengi, and Jelly viruses shouldn't give you much of a problem, especially with that empty panel in the middle of the area to block the Jelly's waves. The challenge should all come from Bubs himself, whose Bubble Parade is faster than ever. You can't afford to worry about aiming with the relentless bubble onslaught, so use Flashman on ice, KillerEye, possibly Bolt if you've got the right style, Bamboo Lance, stuff like that. Get BubblemanV5 for winning.
|
King Man: Master of Strategy "King me!"
Attacks: Plan B, Checkmate (Summon attack) (King), Long Sword (Pawn), Stomp (Knight), Castle (Rook)
Suggested Chips: None
Suggested Style: None
Suggested NC Blocks: Break Buster
|
 |
Very powerful indeed. The fight against King Man is hard because it isn't one on one: It's one on four. Anyway, the battle starts with King Man having two pawns and a knight. The pawns have Swords that slash two panels forward. They slash whenever Megaman goes in front of them. The knight hops around your area, attempting to land on you, and sending shockwaves in front of it in the process. After a while of this, King Man will activate Plan B. Plan B will change the set up of the chess pieces. One of two Plan Bs will happen.
1. Steal is activated against you, and the pawns move forward
2. Two knights are now in your area, and a rook is in front of King Man
All the rook does is protect King Man. And he does quite well at that. The final attack of King Man is checkmate. All three chess pieces will appear in your area, boxing you in. Then King Man will jump on you! The way to avoid this is to move to the top row very quickly. Then move to the bottom row as soon as King Man Jumps. That will save you.
 |
Chess Navi Battle: Kingman.exe
Condition= Ch4 midboss
Chess Navi Battle: Kingman.exe α
Condition= Ch5 Tora in DNN TV station lobby
HP= 1000
Speed= fast
Defense= cover
Movement= teleports in far right column infrequently, only when MM is in the same row.
Special Field= Two Pawns in top/bottom left corners of enemy side, Knight in center. Pieces and placements change when "Plan B" is used.
Objects= Pawn(5 HP, shielded, regenerates), Knight(100 HP, shielded, regenerates), Rook(200 HP, shielded, regenerates)
Attacks= Pawn(60), Knight(100), Checkmate(100), Plan B(Removes chess pieces and replaces with them with a new set of three in a preset formation. May also use AreaGrab before placing the new set)
If anything, his chess pieces have the same HP as before, so if you busted them then, you can bust them now. Tora talks about a new strategy, but tactically things haven't changed. He just has more HP and his attacks do more damage. Incidently, you may be more likely to see the Checkmate move this time. As before, hit him with attacks that get around or through his chess pieces but try to avoid triggering a Plan B that involves two Knights, i.e. moving the Pawns, making the Knight jump in a hole, or breaking the pieces a lot. You get the Kingman chip for winning.
Chess Navi Battle: Kingman.exe β
Condition= Ch8 Tora in WWW base
HP= 1500
Speed= fast
Defense= cover
Movement= teleports in far right column infrequently, only when MM is in the same row.
Special Field= Two Pawns in top/bottom left corners of enemy side, Knight in center. Pieces and placements change when "Plan B" is used.
Objects= Pawn(5 HP, shielded, regenerates), Knight(100 HP, shielded, regenerates), Rook(200 HP, shielded, regenerates)
Attacks= Pawn(100), Knight(150), Checkmate(150), Plan B(Removes chess pieces and replaces with them with a new set of three in a preset formation. May also use AreaGrab before placing the new set)
Kingman really has one of the most intense battles of the game. Just trying to dodge the chess pieces probably won't be enough, you should consider packing as many Invis as possible. A strong Plantman chip at the start will clear the board for you, giving you a few seconds to pound into King without distraction. Other useful ways to get rid of the pieces include Drillman, Poltergeist, or putting an object like StoneCube on the panel they're about to move onto. It's too bad a lot of the typical breaking attacks like CannonBall or BreakHammer are useless against the Knight's speed. By this point in the game you should have enough of the right type of breaking chips to stack your folder. Repeated breaking will put King into Rook mode, but you'll have enough breaking attacks that even that won't be as much of a problem.
Ultimate Strategically Decicive Battle: Kingman.exe Ω
Condition= Omega Challenge Mode, hidden in DNN 2F Door Panel
HP= 2000
Speed= fast
Defense= cover
Movement= teleports in far right column infrequently, only when MM is in the same row.
Special Field= Two Pawns in top/bottom left corners of enemy side, Knight in center. Pieces and placements change when "Plan B" is used.
Objects= Pawn(5 HP, shielded, regenerates), Knight(100 HP, shielded, regenerates), Rook(200 HP, shielded, regenerates)
Attacks= Pawn(200), Knight(300), Checkmate(300), Plan B(Removes chess pieces and replaces with them with a new set of three in a preset formation. May also use AreaGrab before placing the new set)
His loyal subjects include Swordy, Trumpy, N.O, and HardHead. Your best defense is a good offense, i.e. very strong chips to take out the N.O. and Trumpy in one hit. Though having strong chips prepared pretty much goes without saying, especially against Kingman. At least his pieces have the same weaknesses, and you have more chips to cut through those defenses with now. If you're fast enough with the breaking and piercing attacks, you won't have to worry about Plan B. Get KingmanV5 for winning.
|
Desert Man: Shape shifting Navi "Zezu Wa!!(I don't know how to translate that)"
Attacks: Quicksand, Sand Lion (Summon attack), Stone Block
Suggested Chips: Navi Chips, Water Chips
Suggested Style: Aqua Team Style
Suggested NC Blocks: Shadowshoes
|

 |
Desert Man is a very interesting navi. And he is very hard. You see, whenever he is hit by ANYTHING, he will go underground, then reappear somewhere else, with towers protecting him.... well, ALMOST anything. If you hit him with an Aqua type chip, he will be frozen in place for a few seconds, give you the perfect opportunity to hurt him. Anyway, The biggest problem with fighting Desert Man is his hands. You see, not only are they defensive, but they are also offensive. They will follow you, staying in the same row you're in. When they get into the same row as you, they turn into a lion's head, and rush forward. The hands can be destroyed, but they regenerate after a short while. Every so often, quicksand will appear randomly in your area. It will never appear on the panel you currently stand on, but it is still an annoyance. It will cause damage when you step on it. Just don't step on it...When Desert Man reaches low health, the hands will gain a new attack: Stone Block. The hand will disappear for a moment, and then it will attempt to crush you in the shape of a block. Before the block hits, the panel you are on will have a shadow cast on it. This is your cue to move outta the way. Also, when the block lands, you will be temporarily stunned whether it hits you or not. Hopefully, the other hand won't be there to hit. Just keep hitting Desert Man with strong chip, and you'll do fine
 |
WWW Navi Battle: Desertman.exe
Condition= Ch4 boss
Navi Ghost Battle: Desertman.exe α
Condition= Ch5 hidden in Beach1
HP= 1200
Speed= slow
Defense= cover
Movement= random teleport in the two rightmost columns when hit, hands slide up and down left column to line up with Megaman
Special Field= Enemy's side is all Sand Panels, two Hands occupy left enemy column, Pillars begin in top/bottom right corners and are replaced/repositioned when Desertman moves.
Objects= Hand(60 HP, regenerates), Pillar(80 HP)
Attacks= Lion Head(80), Whirlsand(80), SandStone(120, quake effect)
The numbers have gone up, but otherwise there's not much difference. By this point you have all the chips that can make a mockery of this boss. Use a simple Bubbler to hold him for a multi-hit attack like Tornado. Use strong, single-hit attacks otherwise. Pack AreaGrabs, objects and chips that make holes to keep the LionHeads away. You could also turn his sand against him with a Wind chip. If you found the first fight with Desertman easy, this should be just as easy. You win the Desertman chip.
Navi Ghost Battle: Desertman.exe β
Condition= Random encounter in Inn Room TV Comp after defeating above ghost
HP= 1600
Speed= medium
Defense= cover
Movement= random teleport in the two rightmost columns when hit, hands slide up and down left column to line up with Megaman
Special Field= All panels are sand, two Hands occupy left enemy column, Pillars begin in top/bottom right corners and are replaced/repositioned when Desertman moves.
Objects= Hand(80 HP, regenerates), Pillar(120 HP)
Attacks= Lion Head(120), Whirlsand(120), SandStone(180, quake effect)
A Navi Research scientist in Yoka Square says the only thing he could figure out about Desertman is that he likes sand. Brilliant scientific breakthrough, that. Well the Old TV in the Inn room has lots of sand in it, and this version of Desertman will begin to haunt it along with Totems and Met3s. Now you're going for time and Busting Level so Desert shows what makes him challenging. There's now only about one second of a break between those Whirlsand attacks so you'll want to keep your eye on your side of the field to avoid walking into them every time you need to dodge. His defensive tactics of hiding behind pillars and moving every time he's hit seems a little more effective now that he has all that HP to back him up. The worst thing may be the sand though. Now that it's on your side as well you'll want to do something about it. You may want to preset a stage-changing chip.
Ultimate Battle of Desolation: Desertman.exe Ω
Condition= Omega Challenge Mode, hidden in DNN Van
HP= 2000
Speed= fast
Defense= cover
Movement= random teleport in the two rightmost columns when hit, hands slide up and down left column to line up with Megaman
Special Field= Enemy's side is all sand, two Hands occupy left enemy column, Pillars begin in top/bottom right corners and are replaced/repositioned when Desertman moves.
Objects= Hand(100 HP, regenerates), Pillar(200 HP)
Attacks= Lion Head(200), Whirlsand(200), SandStone(300, quake effect)
The Quaker and SnowBlow viruses are easy enough with conventional tactics, but make sure you have some quick close-range or ground-breaking attacks for the Momogras. For Desert himself, you could be looking at a war of attrition. His speed hasn't gone up enough to make him much harder to dodge, and the absence of sand on your side may actually make it seem easier. It's just that his HP and evasiveness are so ridiculously high. There could be a problem with his hands and pillars. The pillars in particular have gotten a hefty HP boost, so you may want to forget about smashing them and just pack attacks that can get around them. As usual, aqua is the key to keeping him in place for combos. Get DesertmanV5 for winning.
|
Plant Man: Navi of Nature "Behold Nature's Fury"
Attacks: Rose Thorn, Plant Barrier, Flower Bloom, Plant Vine (Summon Attack)
Suggested Chips: Anything Fire
Suggested Style: Heat Guts
Suggested NC Blocks: None
|

 |
This navi can be quite difficult. He starts the battle by teleporting around. Then he will unleash his attacks. The most common attack is the Rose Thorn. All it does is launch some giant thorns at you. It's easy to avoid, but beware, because he'll do it a few times. Another attack of Plant Man's is the Leaf Shield. This isn't so much an attack as it is a defensive maneuver. A circle of leaves will appear. One attack will make the leaves disappear, but Plant Man will gain health equal to the attack power that destroyed the Leaf Shield. Take it out with your normal buster, so Plant Man doesn't gain too much health. Possibly the most annoying attack of Plant Mans is the Flower Bloom. This will create two giant flowers in your area. One is Pink, one is Yellow. Every so often, the flowers will release pollen into the surrounding panels. They don't do much damage, but the cause bad effects. The pinks ones pollen causes confusion, and the yellow ones pollen causes paralysis. The flowers can be destroyed, however. It is highly suggested that you do destroy them. Plant Man's signature attack is the Plant Vine. Plant Man will stop moving, and reach his vines into the ground. They will then appear in your area, attempting to catch you. If they do get you, they will paralyze you, and hurt you. To stop this, just stun Plant Man with a strong attack. Remember: Stay light on your feet, and use the power of fire, and you will be victorious.
 |
WWW Navi Battle: Plantman.exe
Condition= Ch5 boss
Navi Ghost Battle: Plantman.exe α
Condition= Ch6 hidden in Undernet4 (though only accessible in Ch7)
HP= 1300
Speed= medium
Defense= barrier
Movement= random teleport
Objects= Vine(60 HP), Flower(100 HP)
Attacks= Rose Thorns(80), Plant Weed(40+30x3) Red Pollen(confusion), Yellow Pollen(paralysis), Plant Barrier(next attack heals him by its damage amount)
The thing to look out for with Plant's first upgrade is the Plant Barrier. It pops up quite suddenly right after sending out his vines or flowers and if you're careless enough to hit him with a powerful fire-elemental attack when it's up, you'll just end up undoing a lot of progress on your part. Make sure you know when the barrier appears, only hit it with a regular buster shot to dispel it, and then follow up with a strong attack before he can make a new one. Well-placed fire-elemental attacks will make short, easy work of him. You get the Plantman chip for winning.
Navi Ghost Battle: Plantman.exe β
Condition= Random encounter in HospComp3 after defeating above ghost
HP= 1700
Speed= medium
Defense= barrier
Movement= random teleport
Special Field= Inner column and middle panel of each side is grass.
Objects= Vine(80 HP), Flower(120 HP)
Attacks= Rose Thorns(120), Plant Weed(40+30x4) Red Pollen(confusion), Yellow Pollen(paralysis), Plant Barrier(next attack heals him by the amount it would normally damage him)
Will appear in HospComp3 along with encounters of PoofBall and Totam. I am not aware of any in-game hint for this. This field has a few grass panels around that can help Plant heal, but you can turn them to your advantage with well-place fire-elemental attacks. One thing to watch out for in any version of Plantman is the quick and unstoppable nature of his thorns. Even if you hit him with a strong attack that makes him flinch, the thorns still launch if they already appeared. With his speed especially high in this version you need to be careful not to get caught like this when attacking. Use the best fire attacks available to earn a quick win.
Ultimate Battle of Nature: Plantman.exe Ω
Condition= Omega Challenge Mode, hidden in HospComp3
HP= 2100
Speed= fast
Defense= barrier
Movement= random teleport
Objects= Vine(100 HP), Flower(140 HP)
Attacks= Rose Thorns(200), Plant Weed(40+30x3) Red Pollen(confusion), Yellow Pollen(paralysis), Plant Barrier(next attack heals him by the amount it would normally damage him)
Puffball, Viney, and Boomer viruses guard the way, but thankfully they don't take you on in large packs. Fire is your friend. Plantman himself is faster and stronger but his only move to go up in power is the Rose Thorns. Strangely, his Plant Weed is weaker in this version, except that it's faster, which might offset that as it's harder to dodge or destroy. He seems to throw the vines out more often too. As usual, burn him to ashes, but when his Plant Barrier is up only use a buster shot. Get PlantmanV5 for winning.
|
Flame Man: Burning Navi "I'm too hot for this guide"
Attacks: Flame Breath (Summon attack), Flaming invincibility, Flaming Orbs, Flaming Life
Suggested Chips: Anything Aqua, Steal
Suggested Style: Aqua Guts style
Suggested NC Blocks: As many attack+ and rapid+ blocks you can fit into the customizer
|

 |
The resident Flame Navi of this game, who is owned by the resident pyromaniac, Mr. Match. Anyway, Flame Man's attack pattern is very simple, but his high health, and those damnable candles make the fight much harder. Flameman's only attack is Flame Breath, which sends flame towers straightforward. However, when Flame Man is low on health, the Flame Breath will expand it's area, even being able to take up a whole column at once! SO beware Anyway, the candle can do one of three things: When it burns green, Flame Man will not be affected by any attacks. When it burns Orange, two orbs will appear and circle around your area. This can be avoided easily with a Steal chip. When it burns red, Flame Man will gradually gain health. The candles can be put out with attacks, but will relight every so often. This guy is an annoyance, though not unstoppable. Douse the flame, and the man will fall.
 |
WWW Navi Battle: Flameman.exe
Condition= Ch6 boss
Navi Ghost Battle: Flameman.exe α
Condition= Ch7 hidden in Undernet5
HP= 1400
Speed= medium
Defense= barrier
Movement= random teleport, does not enter right column
Objects= Candle(12 HP, regenerates)
Attacks= Flame Tower(80), Flame Blast(80), FanFlare(invincible while candle flame is green), Demon's Candle(HP slowly recovers while candle flame is red), Changkey Fire(80, while candle flame is yellow)
Not much of an upgrade for this guy. As he speeds up, it can be hard to get a hit on him unless he's about to attack, but that's all the more reason to pack lots of MetaGels. Two will confine him to a single panel and give him some nice double damage to boot. Try to get him in trapped in the middle row though, you don't want him blocking one of the candles. For as strong as this guy is supposed to be, it's not hard to render him helpless. Hammer him with water for the quick win. Get Flameman chip for winning.
Navi Ghost Battle: Flameman.exe β
Condition= Random encounter in Yoka1 after defeating above ghost
HP= 1800
Speed= medium
Defense= barrier
Movement= random teleport, does not enter right column
Special Field= 5 ice panels scattered throughout.
Objects= Candle(16 HP, regenerates)
Attacks= Flame Tower(150), Flame Blast(150), FanFlare(invincible while candle flame is green), Demon's Candle(HP slowly recovers while candle flame is red), Changkey Fire(150, while candle flame is yellow)
The navi by the water heater in Yoka1 thinks that program isn't the only reason it's really hot there. Flameman can be encountered here as well as Fishy2 (but if it's supposed to be so hot, what's with all the ice panels?). He may seem a bit more aggressive with this version. He could follow up on Flame Breath attack with another right away. He'll also be pulling out the wide-range Flame Blast more often, and right from the start. Those ice panels could make things a bit tricky when it comes to avoiding the Changkeys, take a Repair or FloatShoes or something to deal with those. With the regular Flameman strategy, you can still easily avoid damage, but with his big HP and frequent invincibility he doesn't like to go down fast. If you want to guarantee an S rank you'll want to plan ahead with some strong attacks and quick methods to bring down the green flames.
Ultimate Heated Battle: Flameman.exe Ω
Condition= Omega Challenge Mode, hidden in Undernet3
HP= 2400
Speed= fast
Defense= barrier
Movement= random teleport, does not enter right column
Objects= Candle(20 HP, regenerates)
Attacks= Flame Tower(200), Flame Blast(200), FanFlare(invincible while candle flame is green), Demon's Candle(HP slowly recovers while candle flame is red), Changkey Fire(200, while candle flame is yellow)
In this heated battle, you first go through Omega class Spikeys, Bashers, Volcanos, and Meteorod. Aqua chips are the obvious weapon of choice, MetaGels in particular, because you know how Flameman can't deal with stolen panels. Even though he has a lot of HP, he's not much harder to deal with. He'll seem exceptionally fast at first, but that won't help when he's cornered. Get FlamemanV5 for winning.
|
Bowl Man: Bowling Navi "Strike!"
Attacks: Pin Missile, Pin Set, Bowl (Summon attack)
Suggested Chips: None
Suggested Style: Guts, any element
Suggested NC Blocks: Reflect/AntiDamage
|

 |
Rank #2 of the Undernet. And for all it's worth, he is very deserving of that title. Bowlman will start the battle by teleporting around a bit, and then go to the back row of his area. He will then raise his Bowling Pin arm, and begin firing Pins at you. There are three ways you can deal with this:
1. Dodge the pins, since they come out in a specific pattern
2. Firing at the pins very rapidly, to throw them off target (Though the orange pins are a bit harder to throw off target
3. Hit Bowl Man with a very powerful attack, thus stopping the attack
After using Pin Missile two times, he'll use the pin set. Three pins will appear in your area. Nothing big. At least until he uses his final attack. His Strike attack is where Bowl Man takes out a Bowling Ball and starts, well, bowling. It'll hurt if it hits you. And if it hits a pin, the pin will go flying in the air, and will attempt to hit you! Then after that's done, he'll go back to the Pin Missile. Repetitive, but effective. Just keep on moving, and you'll be sure to win
 |
Ranked Navi Battle Blue Version: Bowlman.exe
Condition= Blue Version Ch7 midboss
Blue Version Navi Battle: Bowlman.exe α
Condition= Blue Version Ch8 Bowlman in NetBattle Comp
HP= 1300
Speed= medium
Defense= normal
Movement= random teleport
Objects= Pin Missile(6 HP), Golden Pin(50 HP), Standing Pin(40 HP), Bowling Ball(invincible, shielded)
Attacks= Pin Cannon(80x19), Pin Set(80), Bowling Bomber(80)
He's added one new thing to his arsenal. About every six or seven pin cannon shots, the pin will be gold instead of white. This pin has much more HP than the regular shots, so you won't be able to shoot it off its flight path with just your buster. On the plus side, if you do hit the golden pin with 50 damage, it'll just be destroyed rather than fly into the air and land on you like the white pins. Other than that, you're looking at the standard upgrade of enhanced speed and damage values, plus a slightly prolonged Pin Cannon sequence. Defeat him here to get the Bowlman chip.
Blue Version Navi Battle: Bowlman.exe β
Condition= Blue Version Ch9 Bowlman in NetBattle Comp
HP= 1600
Speed= medium
Defense= normal
Movement= random teleport
Objects= Pin Missile(6 HP), Golden Pin(50 HP), Standing Pin(40 HP), Bowling Ball(invincible, shielded)
Attacks= Pin Cannon(120x22), Pin Set(120), Bowling Bomber(120)
The Pin Cannon lasts so long, you won't want to spend the whole time dodging if you're going for a good Busting Level. You'll need chips that can hit him and cancel his attack but won't leave you vulnerable. Boomerangs or Navi Chips are good examples. Also pack AreaGrabs and MetaGels since his Pin Set may hinder your movement if you don't open up more space. It's the end of the game so use the best chips and combos available to take him out fast.
Ultimate Battle of Black and Blue Aspiration: Bowlman.exe Ω
Condition= Omega Challenge Mode, hidden in NetBattle Comp
HP= 2000
Speed= fast
Defense= normal
Movement= random teleport
Objects= Pin Missile(6 HP), Golden Pin(50 HP), Standing Pin(40 HP), Bowling Ball(invincible, shielded)
Attacks= Pin Cannon(200x25), Pin Set(200), Bowling Bomber(200)
His viruses include HardHead, Boomer, and Basher. You may want some breaking attacks and an aqua or two, but they shouldn't pose as much of a threat either way. Bowlman's another story. The Pin Cannon phase has been amped up to lethal proportions, you'll probably need a few attempts just to get the dodging pattern down. Better yet, prepare a good strategy so it doesn't touch you. An Invis just to avoid the first volley, and an AreaGrab to get you in range for an augmented Tornado on sand should lay on the hurt. You should target the panel you know he's going to be; he may be fast when moving and quick to the draw, but the way he predictably lands in the middle of the back column to fire makes him an easy enough target for your purposes. Get BowlmanV5 for winning.
|
Mist Man: Navi in the Lamp "Abra Cadabra!"
Attacks: Mist Charge, Mist Tackle, PoisonMist(Summon Attack), Soul Gang
Suggested Chips: None
Suggested Style: None
Suggested NC Blocks: None
|

 |
Rank #2 of the Undernet. And for all it's worth, he is very deserving of that title. Mist Man starts the battle moving randomly around his area, and having the genie come out of the lamp. If he goes into the same row as you (or vice versa), then the genie will Charge towards you. Avoiding this is simple. However, if you end up right in front of the lamp, then the Genie will punch you instead of charging at you. During the battle, clouds of Mist may appear in your area. If you stand in these clouds, then your energy will be drained, much like poison panels or Anubis would do. I wouldn't worry too much about these, except if you are in front of or behind the clouds, then the Genie will come from it, and punch. Mist Man's most deadly attack is Soul Gang. Two apparitions appear in your area, and they... well, they gang up on you. They restrict your movement somewhat, and if you're on the same panel as one of them, your energy will be drained VERY quickly. So you got energy drain, movement restriction, and punching all in one attack. My suggestion is too delete Mist Man before he has the chance to do it, because dodging is very difficult. And remember one thing: Attack the lamp, not the genie.
 |
Ranked Navi Battle White Version: Mistman.exe
Condition= White Version Ch7 midboss
White Version Navi Battle: Mistman.exe α
Condition= White Version Ch8 Mistman in NetBattle Comp
HP= 1300
Speed= medium
Defense= cover
Movement= random teleport, but never enters the leftmost column
Objects= Appearing Mistman(invincible), Tackling Mistman(20 HP), Poison Mistman(50 HP)
Attacks= Majin Tackle(80), Poison Mist(poison effect), GustPunch(80), Soul Gang(40, paralyzing effect)
As he hops around faster, it can be harder to get a bead on him, and it's a bit tougher to shoot Mistman out of his Tackle now. Use more indirect attacks that you won't have to worry about aiming. Dodging is still easy enough, but try to finish it quickly when his health gets low enough to use SoulGang. You get the Mistman chip for winning.
White Version Navi Battle: Mistman.exe β
Condition= White Version Ch9 Mistman in NetBattle Comp
HP= 1600
Speed= medium
Defense= cover
Movement= random teleport, but never enters the leftmost column
Objects= Appearing Mistman(invincible), Tackling Mistman(30 HP), Poison Mistman(50 HP)
Attacks= Majin Tackle(120), Poison Mist(poison effect), GustPunch(120), Soul Gang(80, paralyzing effect)
Try to time some attacks that make him flinch right when the purple/black wisps of smoke come out of the lamp to cancel out any Poison Mist or Soul Gang modes. If you're going for a high Busting Level, losing your health through the poison mist won't be a problem, just getting punched will. Use AreaGrabs and MetaGels to widen your area and keep the mist spread out. Stick to the same strategies as before but with stronger end-of-the-game chips and combos to take him out fast.
Ultimate Battle of Hazy White Mystery: Mistman.exe Ω
Condition= Omega Challenge Mode, hidden in NetBattle Comp
HP= 2000
Speed= fast
Defense= cover
Movement= random teleport, but never enters the leftmost column
Objects= Appearing Mistman(invincible), Tackling Mistman(40 HP), Poison Mistman(50 HP)
Attacks= Majin Tackle(200), Poison Mist(poison effect), GustPunch(200), Soul Gang(150, paralyzing effect)
The viruses include WindBox, Puffball, and Totem. You may want some breaking or fire attacks just for that Puffball since you've also got the Vaccuum pulling you towards it. Mistman is still fairly easy to dodge, the most dangerous part being the SoulGang phase where the damage could start piling on. The best way to avoid it is to just stop it from happening. Stun him with strong attacks before the black smoke can finish puffing out, then finish him quickly before he can try using it again. Get MistmanV5 for winning.
|
Drill Man: Navi with Sharp, pointy drills "I'll drill you a new one."
Attacks: Tri Drill, Tunnel Drilling, Underground Drilling (summon attack)
Suggested Chips: Shockwave series, Scuttlest
Suggested Style: None
Suggested NC Blocks: Break Buster
|

 |
Drill Man is very hard. He starts the battle by flying (Drilling?) in to the air. Then he will start Tri Drilling. Three holes will appear in each row, and 2 drills and Drill man will appear, rushing right for you! It is rather easy to dodge.... Though damaging Drill Man is difficult while he does this, due to the fact the drill guards him. After a few Tri Drills, he'll use the Tunnel Drilling. Three holes will appear, but Drill Man and the Drills won't appear. Instead, a bunch of drills will come out. And I mean a bunch! But one the holes contains Drill Man. This is your chance to make a big attack on Drill Man. Just find the hole he's in by using your normal buster, then attack mercilessly! Every so often, Drill Man with use Underground Drilling. That's where 3 panels in your area will flash yellow. DO NOT STAND ON THOSE PANELS!!!! Because Drill Man and 2 other drills will Drill upwards, breaking those panels. Then three rocks will fall into your area. Avoid them at all costs. Be very careful, because Drill man is dangerous.
 |
WWW Navi Battle: Drillman.exe
Condition= Ch7 boss
Navi Ghost Battle: Drillman.exe α
Condition= Ch8 hidden in undernet6
HP= 900
Speed= fast
Defense= cover
Movement= shoots straight into the sky then goes into attack mode. Returns to the ground momentarily when hurt or stunned.
Objects= Drill Bit(10 HP, shielded)
Attacks= Drill Missile(120), Triple Hole(120x20), Subterranean Strike(120, breaks panels), Rockfall(100)
With his speed up, you may find it harder to dodge between the drills during his most common attack phase. Having lots of Invis chips is good, it may also help with attacking him since you can let the drill part pass through you and hit his body while it's right in front of you. Sometimes it's not even necessary to get around the drill in front of him as there are brief moments while he's flying between panels where the drill and his body tecnically occupy the same panel, so if you target that panel with the right attack at that moment, you can hit both parts. That mostly relies on luck though. Otherwise use strong piercing or indirect attacks to keep him out of Drill Mode. You get the Drillman chip for winning.
Navi Ghost Battle: Drillman.exe β
Condition= Random encounter in Hades Network after defeating above ghost
HP= 1200
Speed= fast
Defense= cover
Movement= shoots straight into the sky then goes into attack mode. Returns to the ground momentarily when hurt or stunned.
Objects= Drill Bit(10 HP, shielded)
Attacks= Drill Missile(160), Triple Hole(160x25), Subterranean Strike(160, breaks panels), Rockfall(140)
Haunts Hades Isle network along with encounters of Momogro. As with Plantman, I have no idea if the game hints to this anywhere. For the battle, be wary of the high damage this guy does, though you should be trying to avoid any damage either way for Busting Level purposes. There's not much noticable increase in speed this time, nor is there a special field to throw you off, so anything you did with the last version will work just as well here. The Plantman navi chip works very well here too since it will destroy any drills heading your way as well as automatically target Drillman himself. Otherwise, Slasher, piercing, and breaking attacks, beat him back into the ground.
Ultimate Heaven-Piercing Battle: Drillman.exe Ω
Condition= Omega Challenge Mode, hidden in Undernet5
HP= 1800
Speed= fast
Defense= cover
Movement= shoots straight into the sky then goes into attack mode. Returns to the ground momentarily when hurt or stunned.
Objects= Drill Bit( HP, shielded)
Attacks= Drill Missile(200), Triple Hole(200x40), Subterranean Strike(200, breaks panels), Rockfall(180)
Lots of Mets, a couple Momogras, and a Needler help Drillman here. The Momogras are the only ones you'll probably need to be prepared for, either with ground-breakers or close range attacks to counter an invasion to your side. Those same chips should serve well against Drill too. BigWave, PlantmanV4, BurningCross, and other such strong rare chips you could only have now can really shine. Get DrillmanV5 for winning.
|
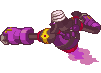
Bass: Super Navi "Time for you to be deleted!"
Attacks: Bass Shot, Bass Spread, Bass Crush
Suggested Chips: Powerful chips, northwind
Suggested Style: None
Suggested NC Blocks: None
|

 |
Bass: The ultimate navi. But he is a bit weakened here after...well, I don't want to give any plot away, so let's get on with the strategy. He has a 100 aura, so you must take it down with a strong attack, or northwind. Then pelt him with strong attacks. The Bass Shot is Bass' most basic attack. He will teleport around randomly, then get in the same row as you, and fire a single shot. After a few of those, he'll go to the back column, and charge his gun. Then he'll let lose with the Bass Spread, which is him just rapid firing like crazy. Hard to dodge, hard to block. Just hit Bass with a strong attack, and he'll stop. When Bass' energy gets low, he'll use the Bass Crush, which is where he goes above your panels, and bring down his mighty fist, breaking the panels, and causing major damage. He brings his aura down for this attack, so it's a good time to attack. This battle should go quickly, considering his low health.
Alpha: Alpha Tau Omega "Insert sounds of mass destruction here"
Attacks: Alpha Arm Sigma (White Summon Attack), Alpha Vulcan, Alpha Beam, Alpha Swipe, Alpha Arm Omega (Blue Summon attack)
Suggested Chips: None
Suggested Style: None
Suggested NC Blocks: Airshoes
|

 |
Alpha is the final boss of this game. And he is very impressive. A barrier of sorts protects the core of alpha. You can take it out with the buster, but it regenerates. Alpha's most common attack is Alpha Swipe. One of his hands will attack the same column as you, and then his other hand will attack the same row as you. Just move left/right, and then move up/down to avoid. He usually does this several times in a row. And when you're fighting Alpha Omega (The one with 3000 health) his hands can steal panels as well, so beware. A very annoying attack is the Alpha Vulcan. Those things on Alpha's shoulders will open, revealing a lot of guns. Then they will fire like mad. Just keep moving and you should go unscratched. The Alpha Beam will start with Alpha charging up. Then he will release a beam on the Middle row, front column of your area. That beam will spread, hitting you entire front column and middle row, also cracking the panels. You have plenty of time to get out of the way. Alpha Arm Sigma is a rarely used attack. You should be very thankful that it is rarely used. A giant needle type thing will come out of Alpha. Then Electricity will be released on you middle row, then your outer rows, then the middle row, etc.... This attack goes very fast. Just keep up with the pattern. Alpha's final attack is Alpha Arm Omega. A giant rocket will be released from alpha, go forward to your side of the field, then go off screen, then explode on your two back columns. Go to the front column to avoid this. Just keep hitting with strong chips, and Alpha will go down.
Proto Man: Master Swordsmen "For the glory of the Officials!"
Attacks: Guard, WideSword (Summon Attack), Reverse WideSword, Hero Sword, Sonic Boom, Delta Ray Edge (Giga Summon Attack), Steal
Suggested Chips: Navi Chips, Anti-Sword
Suggested Style: Team or Shield, any element
Suggested NC Blocks: None
|

 |
You cannot face Proto Man until you have beaten the game. If you've played the last two battle Network games, then you know Proto Man's basic strategy. The basics, anyway. The most important thing to remember in this battle is that he cannot be hurt until right before he attacks. Otherwise, he will use his shield. Though Time freezing chips are an exception to this, as he cannot raise his shield when time is frozen. Anyway, Proto Man starts the battle by moving around in the back row of his area. Then several things could happen. He could attack with a wide sword. That's where he'll go into the column in front of you and attack with the sword. He usually follows this up by moving behind you very quickly behind you and slashing with a WideSword (I call it the Reverse WideSword). Another thing he could do is fire off some sonic booms. Sonic Booms are exactly what they sound like. WideSword shaped slashes that go until the end of the screen. This is a long distance attack. Take advantage of that by going to the back column of your area, because you'll need all the breathing room you can get. After he does this, he will go to the front column of his area and attack with the Hero Sword. To avoid this, move up or down. Proto Man's final, and most deadly; attack is the Delta Ray Edge. Randomly, there will be a "Ding" sound, and there will be a lens flare on Proto Man's helmet. This is your only warning. He will then slice you with 3 Wide Sword attacks that will create a triangle shape. He only does this if you're in a panel where he can hit you from all sides, in other words, the middle, or middle-right panels, stay out of those panels and you'll be safe. On a final note, I say this: Do not steal territory from him. He will only steal it back.
 |
Ace Official Navi Battle: Protoman.exe
Condition= After beating game, Chaud in Eternal Hades
HP= 1000
Speed= medium
Defense= shield
Movement= random teleport in the two rightmost columns, enters left column to use HeroSword
Attacks= Sonic Boom(100), StepSword(100), HeroSword(100), Break Shield(shield effect)
His repertoire is mostly the same as in BN2. He'll teleport around and occasionally use a random sword attack on you with little warning. If you try to shoot him with a buster or other such direct attack, he'll use his shield to block it and immediately appear in your area for a StepSword counter. If you're not standing in the leftmost column while shooting him, then he'll most likely appear behind MM to try and stab him in the back, and he may do this even when he's just finished a regular attack, so don't think he's just an easy target while he's slashing like in previous games. Watch out for combos as he'll often try to follow up a Sonic Boom with another sword strike, or he may go for two or three Sonic Booms in a row and still follow that up with another attack. The one thing to remember about the Sonics is he'll only launch them from the top or bottom rightmost columns, so you should stick to the middle row for a chance to dodge. When you're attacking, you don't want him to block and/or counter it, so make them strong, decicive blows, preferably of the time-stopping variety. Prize is the Protoman chip.
Ace Official Navi Battle: Protoman.exe α
Condition= After beating Darkman, Chaud in Eternal Hades
HP= 1300
Speed= fast
Defense= shield
Movement= random teleport in the two rightmost columns, enters left column to use HeroSword
Attacks= Sonic Boom(150), StepSword(150), HeroSword(150), Delta Ray Edge(150x3) Break Shield(shield effect), AreaGrab(3 stock)
He was being more generous than usual in the first battle by NOT immediately cancelling out your AreaGrabs with his own. Now he's using them as expected, but only to return the field to the default even grounds, and he only has three in case you want to try outgrabbing him. He's also added the Delta Ray Edge attack to his arsenal, which he'll try when his HP drops below 975 (75%), and MM is standing anywhere in the middle row except the outer edge. It's signalled by a "ping" and a lens flare from his shades before he quickly teleports into the panel to the upper-right, then behind, then lower right from Megaman, doing a widesword slash in each spot. All three hits can hit you for a whopping 450 damage, so either stick to the leftmost column and outer rows so he never uses it, or make sure you can dodge really fast (take one step forward) as soon as you hear the "ping". Another foil for the DRE is a hole or object in the panel he needs to teleport into, he'll still "ping" and try to do it, but it will be cancelled right away. The good news is he'll only try DRE once per battle. You get ProtomanV2 chip for winning.
Ace Official Navi Battle: Protoman.exe β
Condition= After beating Yamatoman, Chaud in Eternal Hades
HP= 1600
Speed= fast
Defense= shield
Movement= random teleport in the two rightmost columns, enters left column to use HeroSword
Attacks= Sonic Boom(200), StepSword(200), HeroSword(200), Delta Ray Edge(200x3) Break Shield(shield effect), AreaGrab(3 stock)
His strength and speed have reached ridiculous levels, you'll really need a folder specially for him. AntiSword, AntiDamage, and Slasher are good ways to stick it to him while defending yourself. Pack some Invis too since you're going to need as much defense as you can get. He still only has 3 AreaGrabs to counter your own, and will still only use DRE once. He's one of the last bosses of the game, so you should be able to go all out on him to get his chips.
Ultimate Battle of Rivalry Blues: Protoman.exe Ω
Condition= Omega Challenge Mode, hidden in Hades Network
HP= 2000
Speed= fast
Defense= shield
Movement= random teleport in the two rightmost columns, enters left column to use HeroSword
Attacks= Sonic Boom(300), StepSword(300), HeroSword(300), Delta Ray Edge(300x3) Break Shield(shield effect), AreaGrab(3 stock)
Tricky virus battles leading up to this one. There's Twins, so you'll need some strong attacks that can take them both out simultaneously, and really fast Fishies so you may want a cube to block them. The Swordies aren't as bad. Protoman is the real problem, he's not the only Omega-level navi to have 2000 HP and attacks doing 300 damage, but he is one of the few fast enough to make that a genuine problem. Better make sure he doesn't successfully DRE you. AntiSword, AntiDamage, Slasher, and maybe Rook are still a lot of help. Get ProtomanV5 for winning.
|
Dark Man: Assassin of Darkness "Just a few more..."
Attacks: Flametower, Ice Wave, Sensor Line, Black Wing (Summon Attack), Shadow Axe
Suggested Chips: None
Suggested Style: Normal
Suggested NC Blocks: None
|

 |
You may only face Dark Man if you have at least 140 standard chips. Dark Man is very interesting in that he has attacks from different elements. So going in with an elemental style isn't suggested. Three of Dark Man's attacks will only occur when Dark Man is lined up with you. The attack he does depends on the color he is. When Dark Man is Black, he will use Flame Tower. It will follow you if you move. When Dark man is Blue, he will unleash Ice Wave, which is the same attack those Penguin things do. You should know how to avoid it. When Dark Man is Yellow, he will use Sensor Line, which is like what Sensor enemies use. This attack also sucks because it causes Paralysis. On their own, none of those attacks are a real threat. However, when used with Dark Man's other attacks, they become a problem. Later in the battle, three holes will appear in your area. One for each column. Out of those holes will come bats. Many, many bats, and they hurt. However, if you use Area Steal, then the stolen column won't have a hole, and you'll be safe. Later, Dark Man will start to use the Shadow Ax. If you've faced the Shadow enemies, then you know what to expect: An Ax will appear in front of you or behind, slash, then it will disappear. Then it will do it again. This'll keep up for awhile. So in the end, you can have Dark Man using his elemental attacks, Bats flying at you, and an ax trying to cut your head off, ALL AT THE SAME TIME!!!!! Finish this battle quickly. You'll be thankful you did.
 |
Dark Assassin Battle: Darkman.exe α
Condition= Secret1 boss, 140 Standard Chips in Library
Navi Ghost Battle: Darkman.exe α
Condition= After beating Darkman, hidden in Secret1
HP=1600
Speed= medium
Defense= armor
Movement= random teleport
Objects= Bat(1 HP), Axe(10 HP, shadow), Ice Wave(1 HP, shielded)
Attacks= Red Fire(150), Yellow Lightning(150), Blue Ice(150), Black Wing(75x22), Shadow Axe(150x6)
His bat a axe attacks last a little longer, but otherwise he hasn't changed in any drastic way. Use your strongest attacks to defeat him and try to avoid standing directly in front of him. Invis can help you get up in his face, except for when he's yellow because the KillersEye beam can cut right through that. Barriers or AntiDamage make slightly better defenses. You get the Darkman chip for winning.
Navi Ghost Battle: Darkman.exe β
Condition= Random encounter in Undernet6 when NaviCust is bugged, after defeating above ghost
HP=1800
Speed= fast
Defense= armor
Movement= random teleport
Objects= Bat(1 HP), Axe(10 HP, shadow), Ice Wave(1 HP, shielded)
Attacks= Red Fire(200), Yellow Lightning(200), Blue Ice(200), Black Wing(100x26), Shadow Axe(200x7)
As the cloaked navi in Secret1 suggests, "bugs help call the dark", so you'll need to put at least one glitch in the NaviCust to encounter Darkman, as well as other clear-field encounters of BlackShadow, Dominerd2, and DemonEye in Undernet6. Not sure how you're supposed to know it's Undernet6 though. Once again his attacks have been prolonged, and he's noticably faster now. Even the IceWave snowflake travels really fast now. The last thing you need in this fight is the distractions of the bats and axes, so use AreaGrab and Invis and Barriers to give yourself some room to breathe. You could slice the axe away with a sword-type attack, but it's simpler to just dodge.
Ultimate Battle of Darkness: Darkman.exe Ω
Condition= Omega Challenge Mode, hidden in Secret1
HP= 2000
Speed= fast
Defense= armor
Movement= random teleport
Objects= Bat(1 HP), Axe(10 HP, shadow), Ice Wave(1 HP, shielded)
Attacks= Red Fire(300), Yellow Lightning(300), Blue Ice(300), Black Wing(150x30), Shadow Axe(300x8)
The viruses are DarkShadow, Dominerd, and KillerEye. Pack swords, breaking, and wood attacks at the very least. The duration of his dark attacks and the speed of his elemental attacks are way up along with his attack power, putting him at least level with Bass GS in difficulty. Still, you can easily dodge Black Wing with AreaGrab, and as long as you're quick to sidestep when he appears in your row, you shouldn't have to worry about his attacks too much. Use your strongest chips to wear him down. Get DarkmanV5 for winning.
|
Yamato Man: Honorable Samurai "I shall defeat you in honorable combat!"
Attacks: Thousand Spears (summon attack), reflect, Backup
Suggested Chips: Rook
Suggested Style: None
Suggested NC Blocks: Enough to get your attack and rapid to at least 3
|

 |
Yamato Man cannot be fought until you posses one Giga Chip. His attacks are very powerful, and they hit multiple times. However, they are easy to dodge. The Thousand Spear attack is Yamato Man's signature attack, and it's a very cool move. You go two panels in front of you (Though he cannot move into your area) and unleash a flurry of spear strikes that hit all panels in the column two columns in front of Yamato Man. Then he will match up with you again for a straight strike that goes three columns back. To avoid this, move forward or backwards. Then move up or down. While Yamato Man is moving between attacks, if you attack with the Buster, he will sometimes spin his spear, reflecting the shot back. I suggest you not even attack while he's moving around, and save all of your power for when he's attacking. When Yamato Man is down to half health, he will activate backup. Little samurai soldier dude will run from Yamato Man's area, and take your area! However, they cannot take the back column. You don't need to stop all of the little samurai. I suggest setting a rook in your middle row. The samurais explode upon impact with it, and you'll still have room to dodge Yamato Man's blows. It is suggested you finish this battle quickly. Take too long, and you will soon be overwhelmed.
 |
Samurai Bodyguard Battle: Yamatoman.exe
Condition= Secret2 boss, 1 Giga Chip in Library
Navi Ghost Battle: Yamatoman.exe α
Condition= After beating Yamatoman, hidden in Secret2
HP= 1800
Speed= medium
Defense= shield
Movement= random teleport
Objects= Ashigaru(4 HP)
Attacks= Thousand Spear(150x3), Yamato Spear(200), Counter Spear(200), Backup(150x8)
Like pretty much all the alpha-level navis this late in the game, the upgrade shouldn't mark a significant increase in difficulty. Your main concern will probably be the Backup, which will be coming faster and more frequent. Shooting them all down may be easy with enough Atk+1 in your NaviCust, but that'll keep you too busy to deal with Yamatoman. A better way to keep them at bay is objects or holes. A PanelOut3 may surprisingly come in very handy in a fight with Yamato. You get the Yamatoman chip for winning.
Navi Ghost Battle: Yamatoman.exe β
Condition= Random encounter in Armor Comp after defeating above ghost
HP= 2000
Speed= fast
Defense= shield
Movement= random teleport
Special Field= Outer rows are grass.
Objects= Ashigaru(5 HP)
Attacks= Thousand Spear(200x3), Yamato Spear(250), Counter Spear(250), Backup(200x10)
Usually there's an NPC hanging around somewhere that gives you a clue about the beta-version ghost's haunting grounds. This time, I guess the only clue is that Yamato's a samurai and this is the samurai armor system. He'll start appearing in this usually Met-only zone along with encounters of Fishy3 and HardHead. You may want to take advantage of the grass on this field with a fire-elemental strategy. With 2000 HP he's got more vitality than any other beta-level navi, so you'll need your folder as strong as it can be if you're going for a good Busting Level.
Ultimate Battle of Ancient Honor: Yamatoman.exe Ω
Condition= Omega Challenge Mode, hidden in Secret2
HP= 2200
Speed= fast
Defense= shield
Movement= random teleport
Objects= Ashigaru(5 HP)
Attacks= Thousand Spear(200x3), Yamato Spear(300), Counter Spear(300), Backup(200x12)
His soldiers include Swordy, Boomer, and Brushman, and none should provide a threat if you made it this far. Yamato is still easy to deal with for the first half as his speed hasn't gone up enough to make dodging a problem. If you do get hit, you'll probably be in trouble, so just don't let it happen. As usual, the Backup is the real danger. The foot soldiers' charging speed, the duration of each wave, and of course the attack damage have all gone up to the point this can get very overwheliming very fast. Try packing Rooks and a buster with a level-5 atk to keep them at bay and just finish off Yamato as quickly as possible. Get YamatomanV5 for winning.
|
Serenade: King of the Undernet "My power...is mercy"
Attacks: Reflect, Holy Light, Holy Shocker (Summon Attack)
Suggested Chips: Powerful P.A.s, Area Stealing Chips, Panel Breaking Chips
Suggested Style: None
Suggested NC Blocks: None
|

 |
There are those that say the best offense is a strong defense. Serenade is an embodiment of that ideal. You cannot fight Serenade until you have all 200 Standard chips in the game. If you try to attack Serenade just any old time, he will spin onto a different panel, and reflect your attack right back. While this is going on, the Holy Light attack will be going on. A small ball of light will form in the front row of Serenade's area. And then it will go into your area, move amongst the rows and columns much like Punk's Punk Roll 1. It's fast enough to be a problem, but not fast enough to be an impossibility to dodge. After awhile of this, Serenade will go to the front Column, middle row of his area. Then he will raise his hand, and unleash the Holy Shocker. Thunder will rain down upon your area, breaking panels and causing destruction. However, while Serenade is doing this, he is open to attack. So unleash your powerful Program Advances on Serenade. Then rinse and repeat. However, there is another way to beat Serenade. When Serenade blocks, he must be able to move to another panel. If he cannot, then he cannot do anything. So if you were to Area Lock him to one panel, or Break all of his panels, then you could attack at will. Whatever strategy you use, one thing is certain: It's gonna be a long fight.
 |
UnderKing Battle: Serenade.exe
Condition= Secret3 boss, all Standard Chips in Library
HP=2000
Speed= slow
Defense= barrier
Movement= slides to adjacent panels in all eight directions
Objects= Shocker Blast(invincible)
Attacks= Saint Light(100), Sonic Boom(100), Shocker Force(200), Holy Shocker(100x18, may crack panels)
If you try to attack him right away, you'll find that not even breaking attacks can harm him. He'll spin around and reflect the attack straight back at you in the form of a sonic boom. He'll only let his guard down to do the Holy Shocker attack (signalled when he suddenly moves front center and flashes dark for a moment), there's another trick you can use though, he can only reflect if he has another panel he can spin onto for some reason. If you steal him down to one panel, he'll be at your mercy. His Saint Light attack sweeps your whole area and even hits you if you in Invis mode, but with good timing you should be able to get around it. When he does the Holy Shocker move, the big green blast from his hand may hit you for 200 damage which will cancel the rest of the attack, or if you stand back then the green blast will act as a windbox pushing you back while multiple explosions hit your area randomly. The little blasts are usually green, but may occasionally come in the orange variety, which does the same damage, but also cracks the panel it hits. With all the chips and skills you've acquired getting here, he shouldn't be as big a problem as he's made out to be.
Supreme Holy Ultimate Battle: Serenade.exe Ω
Condition= Omega Challenge Mode, hidden in Secret3
HP=2600
Speed= medium
Defense= barrier
Movement= slides to adjacent panels in all eight directions
Objects= Shocker Blast(invincible)
Attacks= Saint Light(150), Sonic Boom(150), Shocker Force(300), Holy Shocker(150x18, may crack panels)
You'll need to go through Omega-level AlphaBugs and Scuttles to get a shot at S, so you'll need some very strong single-hit attacks or StepCross to get through the defenses. Serenade has sped things up quite a bit, but at least that means you won't have to wait as long before he makes himself vulnerable. You'll need pretty much perfect timing to get by the quickly-sweeping Saint Light, and you can't waste a moment when he's vulnerable, you got a lot of HP to cut through. Thankfully though, his attack values haven't been multiplied quite as much as some of the other Omega Navis. Get 10000Z for winning.
|
BassGS: Evil Incarnate "I exist only to battle"
Attacks: Bass Shot (White Summon Attack), Bass Spread, Bass Crush (Blue Summon attack), Gospel Claw, Gospel Cannon, Banishing World
Suggested Chips: Powerful P.A.s, Northwind, Recovery chips
Suggested Style: None
Suggested N.C. Blocks: Undershot (Trust me, this one is a necessity), Hub Batch (Use with Bugstop)
|

 |
Take one Super Navi and one multi Bug Organism. Mix them together, and you get what is easily the hardest fight in the game. You will be dieing several times before he goes down. He starts the battle off like Bass does: Teleporting around, firing a Shot every so often. Then things get interesting. He'll use either the Bass Spread, where Bass fires off shot after shot after shot, the Bass Crush, where Bass goes above you and brings his fist down, causing massive damage and cracking panels, or Gospel Claw. Gospel Claw is a part of Bass' new repertoire of attacks. Bass will point forward, and two big freakin' claws will come from the sky and strike two different panels, cracking. This attack will rarely hit you, but when it does, it hurts. The Gospel Cannon is where Bass holds his hands out, and a small Gospel head appears on his hands, the flames will come out. To avoid this, just go to the back column of your area. When Bass' health is low, he will use his most powerful attack: Banishing World. A much bigger Gospel head will appear and fire a laser type attack. It causes mass freakin' destruction. I'll be honest: I never avoided it. All I did was follow it up with a powerful recover chip. Since Bass has a 200 Aura, hurting him will be hard. What you should do is take out the Aura, then follow it up immediately with a powerful attack. I'm thinking Bodyguard, 2XHero, or Master Style as far as P.A.s go. Just be strong, and you will succeed.
 |
Embodiment of Destruction Battle: Bass GS
Condition= After defeating Serenade and using BugFrag Trader 30 times, return to BugFrag Trader after jacking out
HP=2000
Speed= fast
Defense= barrier
Movement= random teleport
Attacks= AirBurst(300), Mini-Explosion(300x6), Explosion(300x15), Gospel Claw(300, cracks panel),
Gospel Breath(300), Earth Breaker(450, breaks panels), Vanishing World(500, breaks panels),
Life Aura(200 damage threshold barrier that regenerates)
Golly, look at the damage values of those attacks. And with attacks like Explosion, they're not only hard to avoid, but you could end up taking multiple hits. Obviously, dodging/defending is pretty damn important in this battle. At first he'll seem to fight just like he always does, but sooner or later he'll introduce you to his canine companion. When he points, a couple of giant paws will come crashing down somewhere on the top and bottom row, and then he turns his arm cannon into a mini Gospel head to breathe fire across your area. You can dodge the paws easily enough from the middle row, but for the fire breath you'll have to step up or down. The Gospel Head itself can hurt you because it forms in your right column. After his HP goes below 1000 he may follow the Gospel Claws with an EarthBreaker instead of the fire breath. Worse, after his health drops below 500 he may pull out a much larger Gospel Head in the panel in front of him, shooting out a huge Invis-piercing laser that will damage and destroy all the panels in the row in front of it, plus two of the panels above and below the beam in the second and third column ahead of it. If he fires it from the middle panel on a default field, the only safe panels will be the rightmost corners of your area. Hope you have AirShoes equipped (At least he only uses this once per battle). StepCross chips are handy for bringing down his aura, but you gotta follow it up with something good and fast before it regenerates. That BodyGuard PA comes in pretty handy here. Just pack in your best attacks and some Recovs just in case and don't screw up badly and you just might win this! You'll be granted the Bass/Bass+ Giga Chip upon victory.
Ultimate Battle of Destruction: Bass Ω
Condition= Omega Challenge Mode, hidden in Secret3
HP=3000
Speed= fast
Defense= barrier
Movement= random teleport
Attacks= Mini-Explosion(300x6), Explosion(300x15), Gospel Claw(300, cracks panel),
Gospel Breath(300), Earth Breaker(450, breaks panels), Vanishing World(500, breaks panels),
Life Aura(200 damage threshold barrier that regenerates)
The only Omega Navi battle preceded by non-omega-level viruses. The entire Scuttle family is ready for you, so have some very strong single-hit attacks ready for their auras as well as Bass's. Oddly enough, his attack values and aura threshold don't go up at all. He gets a whopping HP boost, but other than that all his upgrades are in attack pattern. He's dropped his regular AirBurst entirely, instead his most frequent attacks are Mini-Explosions and Gospel Breath. Also, those attacks were plenty strong to begin with. The plan here is to drop his aura as soon as possible and then just keep hammering away at him with attacks to keep him stunned so he can't attack or restore his aura. Bodyguard, Tornado on sand, ZapRing, Plantman, stuff like that, properly aligned, can keep him at your mercy. The same goes for just about any navi without Super Armor, really, but with this guy there's not as much choice in the matter. Get 10000Z for winning.
|
Walkthrough Main
 Annihilation
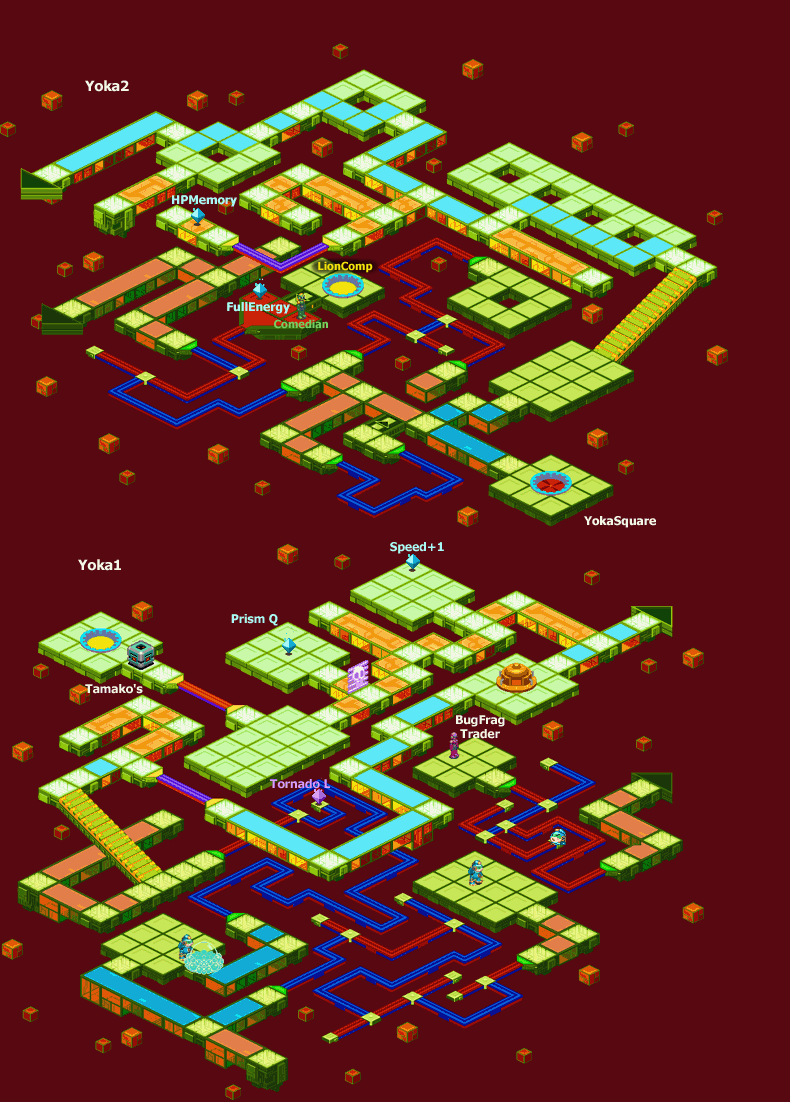
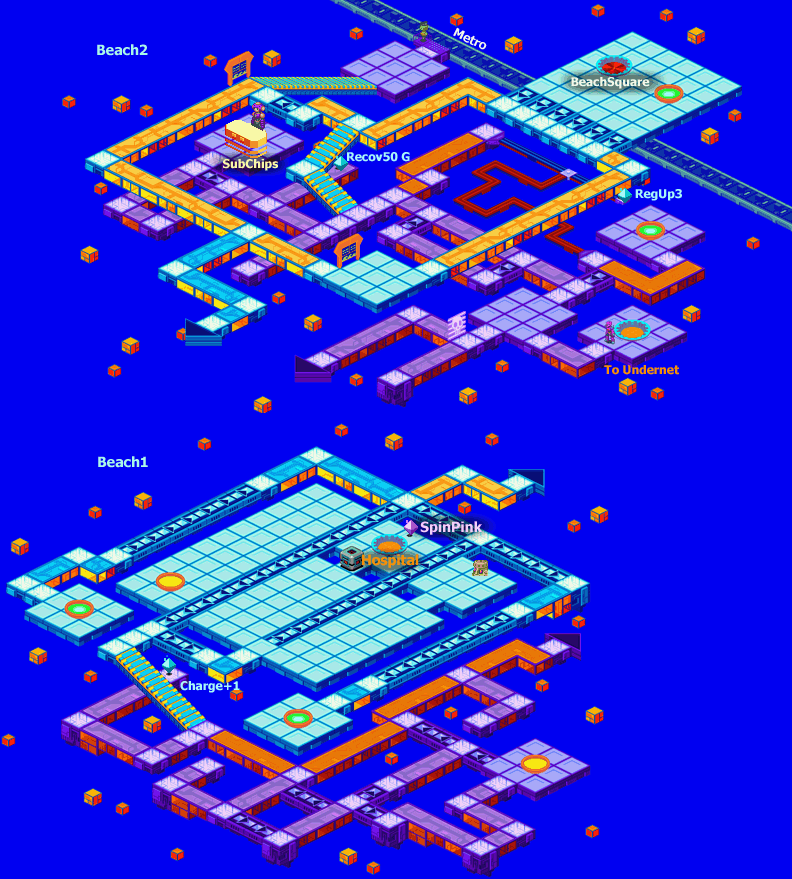
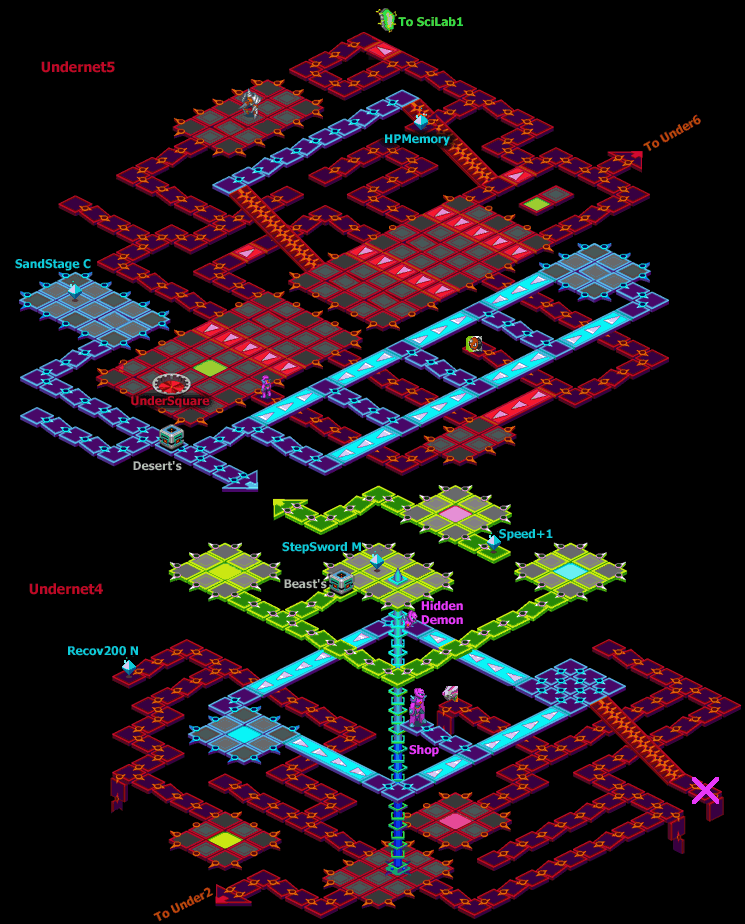
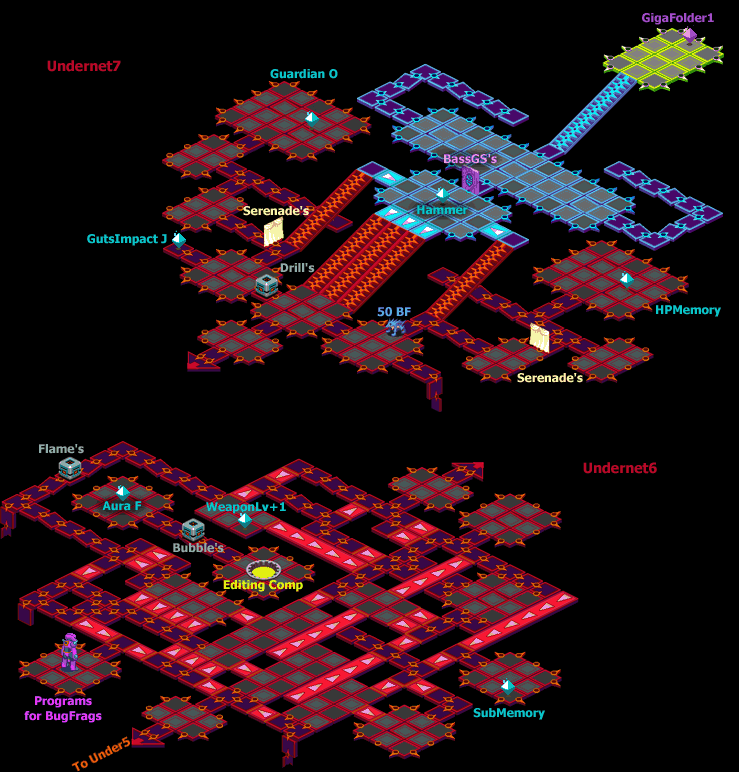
