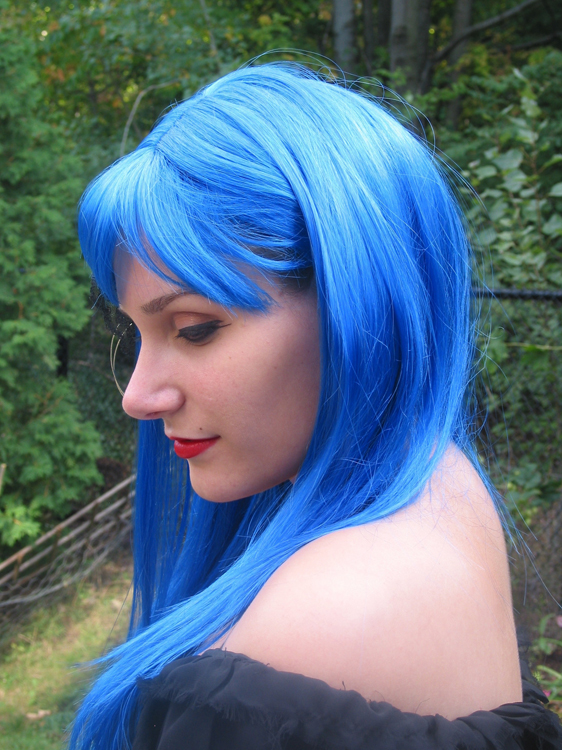
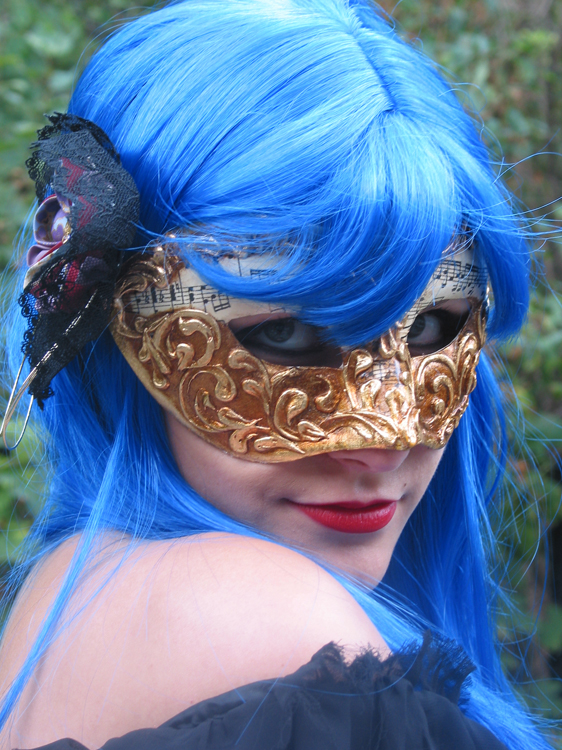
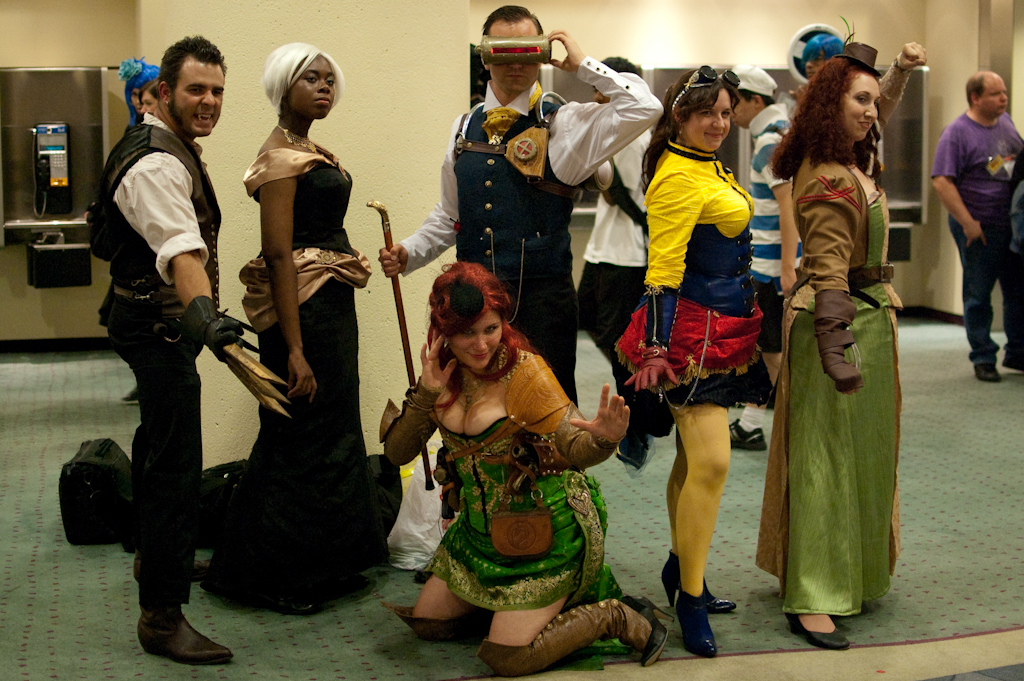
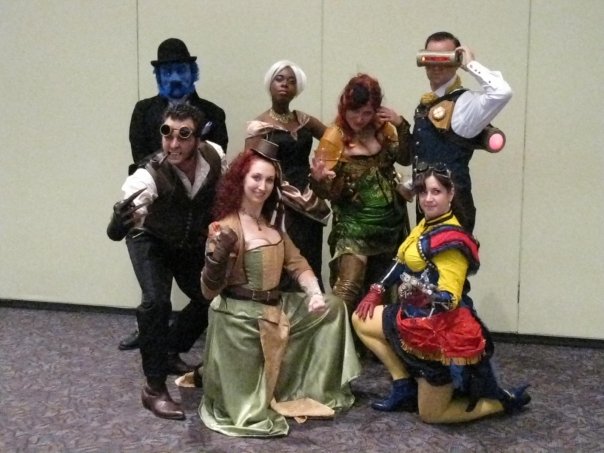
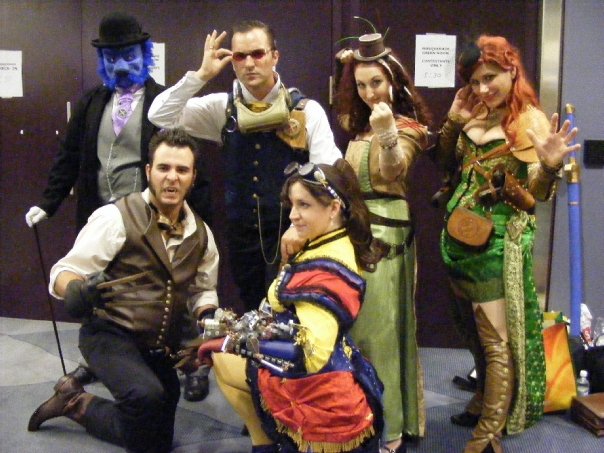
Needlegal's Cosplay
 Check
out the many costumes and sewing stuff of Needlegal!
Check
out the many costumes and sewing stuff of Needlegal!
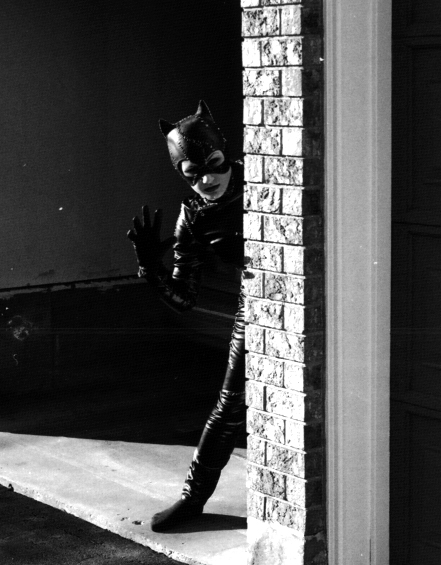
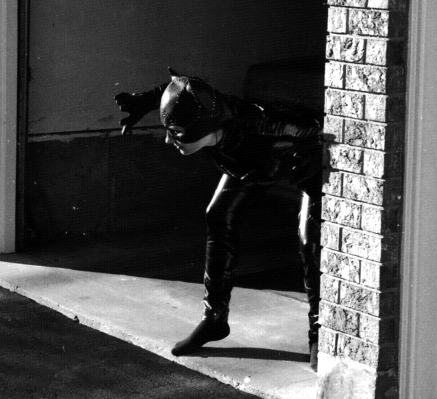
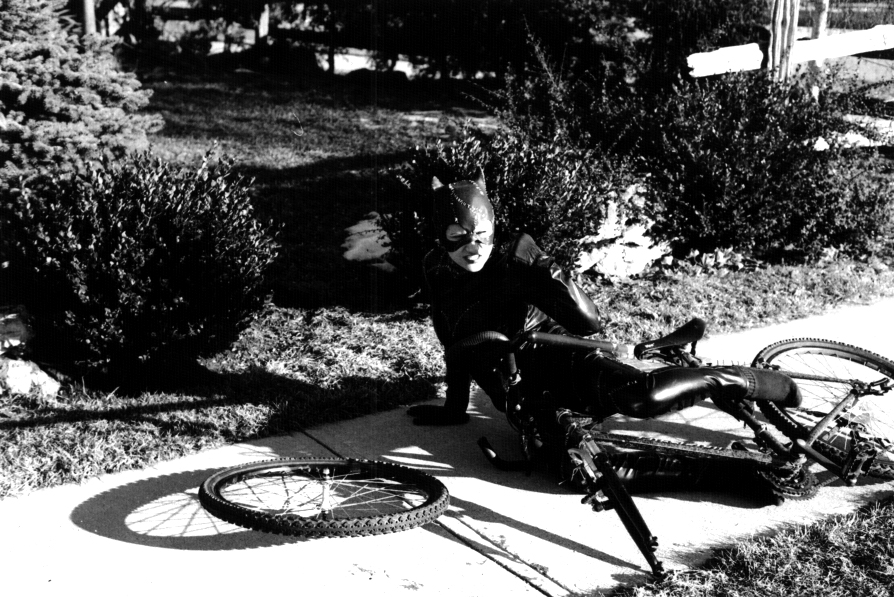
Catwoman
 |
 |
 |
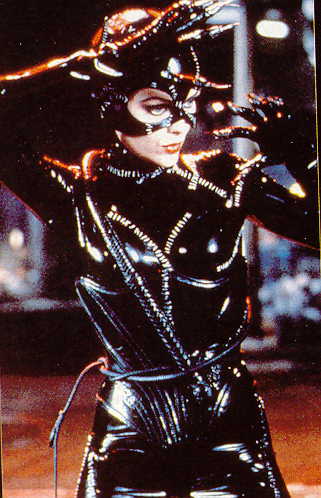 |
Source: Batman Returns.
2000
I never wore this to a con and it was before I had ever even heard
of cosplay. My mommy helped me make it and I really want to do
it over. I will eventually – I've done maybe 3 more
Catwoman corsets after this one (I think this is the first one
I ever made and it’s all sewn completely without a machine)
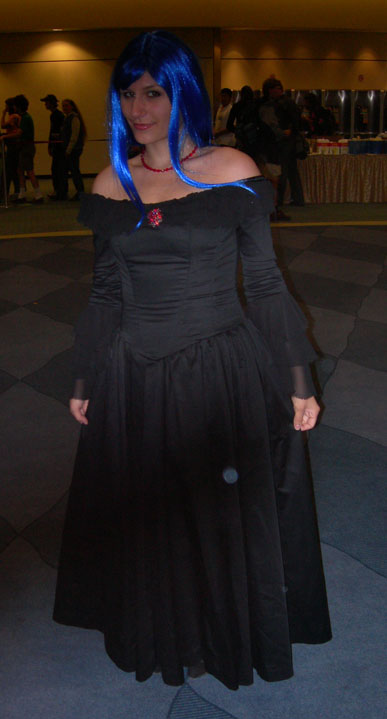
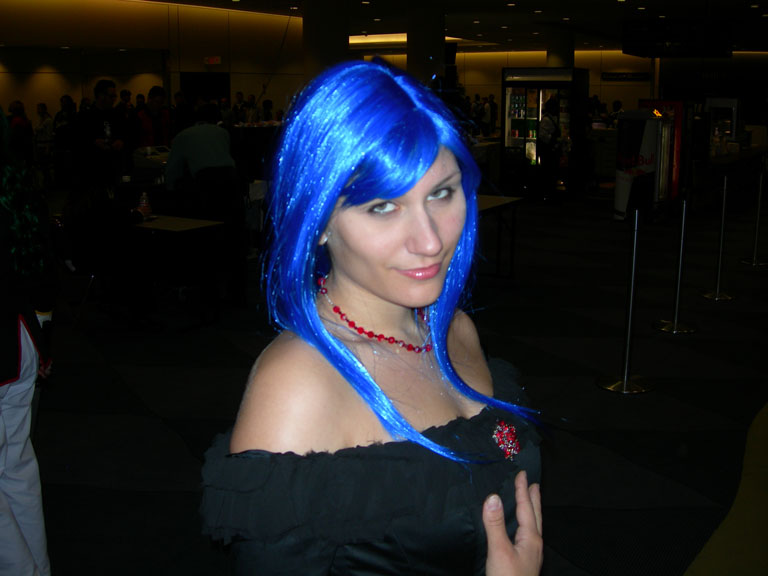
Blue Dress
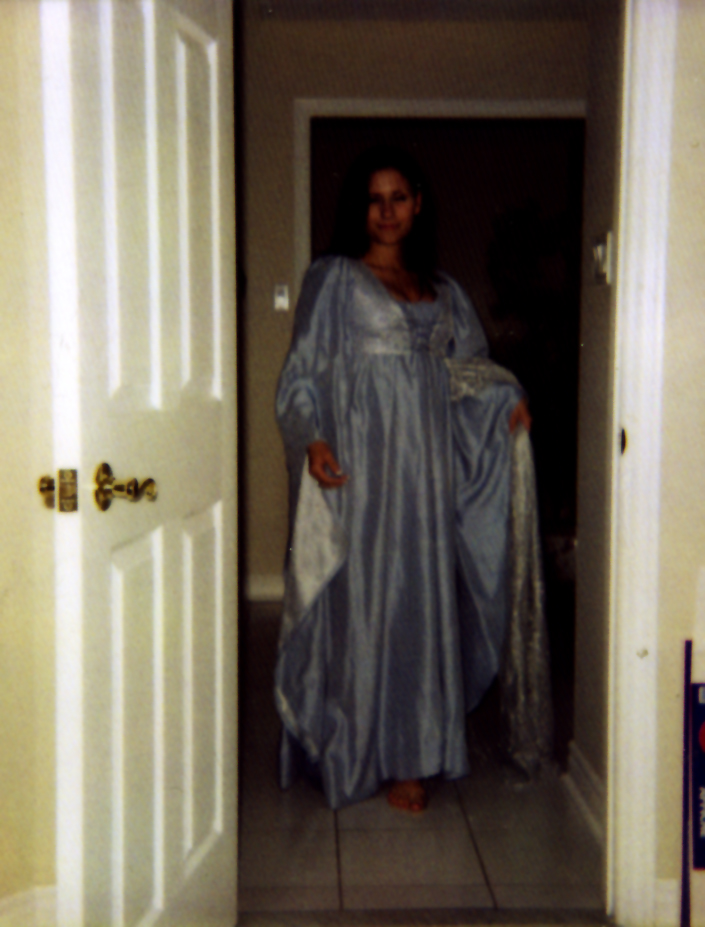 |
This dress is made from upholstery fabric and silver mesh netting. It was originally made for no good reason (Halloween) as an excuse to make something from the renaissance. I wore it later on for a Christmas Church Choir pageant in which I was the Virgin Mary. Apparently my choir director doesn't appreciate cleavage but I didn't think it was that bad…Anyways – it has a 3 meter wide hem which was annoying as hell to sew. Along with the sleeves being so long I was really irritated at having to finish and encase so many seams by the end of this one I thought if I never saw a hem again it would be too soon.
Gold dress
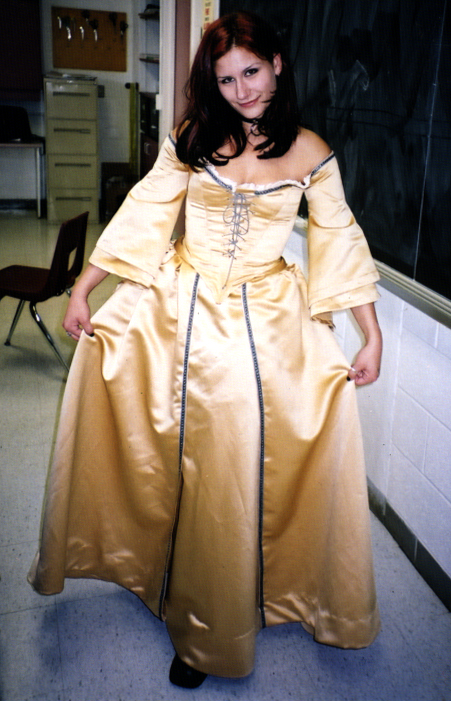 |
I made this dress for fun. The entire thing is sewn by hand so as to have no top stitching whatsoever. I really am not a fan of top stitching – or wasn't at the time. I made it for a renaissance festival but was sick and couldn't go so I never got to wear it except for this picture. I had used it as a project for my sewing class, which I only took so I could have an excuse to sew more random things.
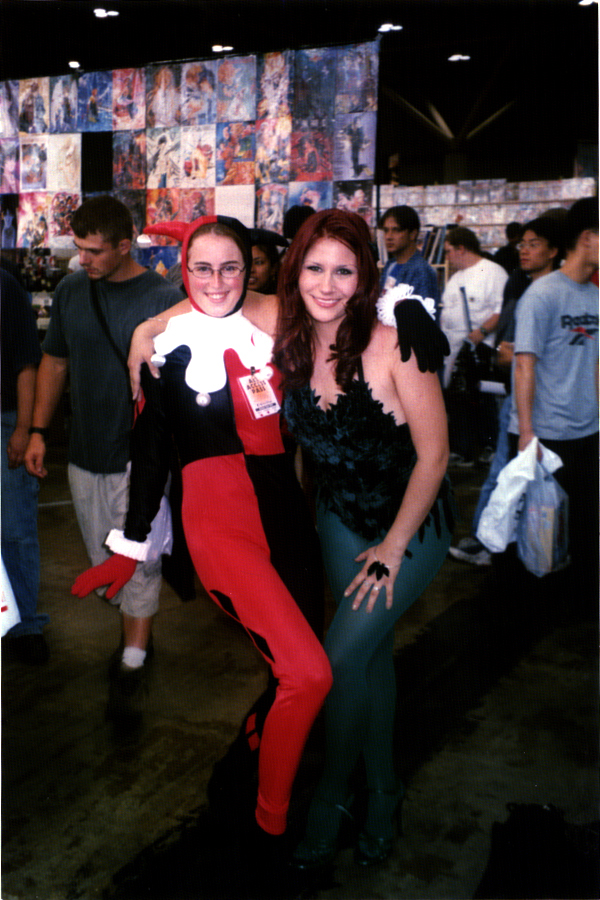
Poison Ivy
 |
 |
 |
Source: Batman (World's Finest 3)
![]() 2003:
SFX. Won best accuracy, novice division.
2003:
SFX. Won best accuracy, novice division.
I wore this costume two years in a row and it was the very first
time I had ever cosplayed. It was really nice because everyone
at the con was so friendly to me (a little too friendly at times … don't
ask) and also because everyone knew who I was. It was kind of awkward
though because there were very few people who weren't dressed
as an anime or video game character. It was so annoying to make
because I had to first make a bathing suit then appliqué more
than 300 individual leaves to it. Ugh! There must be a better way!
But I did it all in 2 weeks (thanks to horrible insomnia of doom)
Oh! And I couldn't find peter pan shoes – when I do
I'm wearing it again! Mwahaha!! I'm so lazy – I
don't wanna make anything new. Too much effort. And yet…
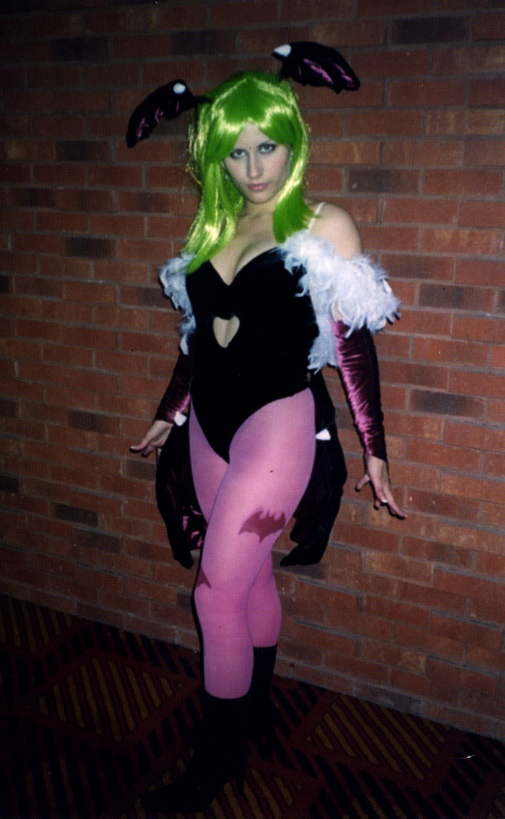
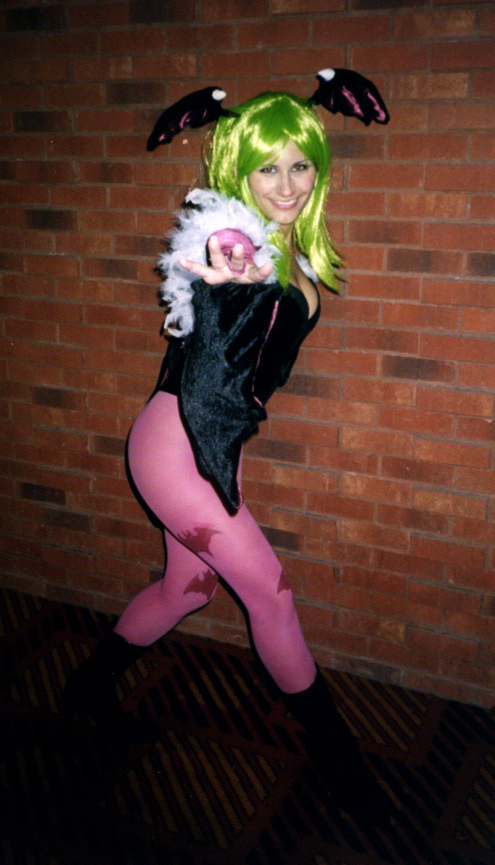
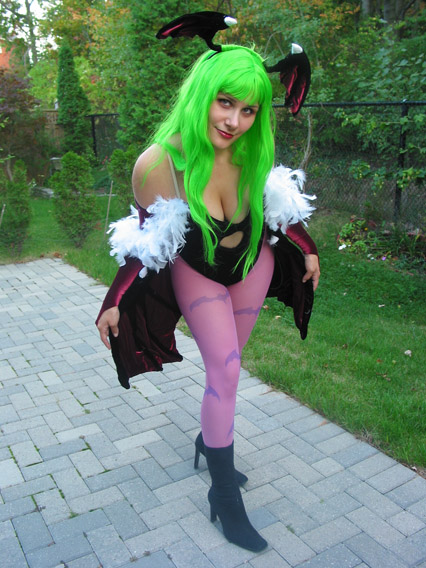
Morrigan
 |
 |
 |
 |
Source: Darkstalkers.
![]() 2004:
Anime North. Male appreciation (Grrr...).
2004:
Anime North. Male appreciation (Grrr...).
![]() 2004:
SFX. Best recreation (the creator of the character was on the judges
panel, so this was very flattering).
2004:
SFX. Best recreation (the creator of the character was on the judges
panel, so this was very flattering).
I loved wearing this costume. It was great – so comfy and easy to move in – except for the shoes but I'm sooo short I really needed the added height. I wore this twice and got 2 awards for it – one was “male appreciation” from anime north which disappointed me because I tried so hard to look like Morrigan and lost a whole bunch of weight for the costume and took weight training (but on the other hand I felt a lot less self conscious about the way I look afterwards.)
The second award was from CNanime and it was best recreation which was awesome!! I was so very, very happy about it because of the trying so hard and stuff.
It was really annoying to make the tights because I stayed up all night dyeing them and in the morning I had to get my boyfriend at the time to draw them on for me – at the con. How embarrassing. And there was another cosplayer who made snide comments about not being prepared but she was old and wrinkly so maybe that’s why she was so mean. I really don't like mean cosplayers!! And my wings were hinged too and they could move and I was so proud of them because I sliced open my hand making them. I'm really clumsy. The easiest part of this costume was probably the gloves which I just serged together.
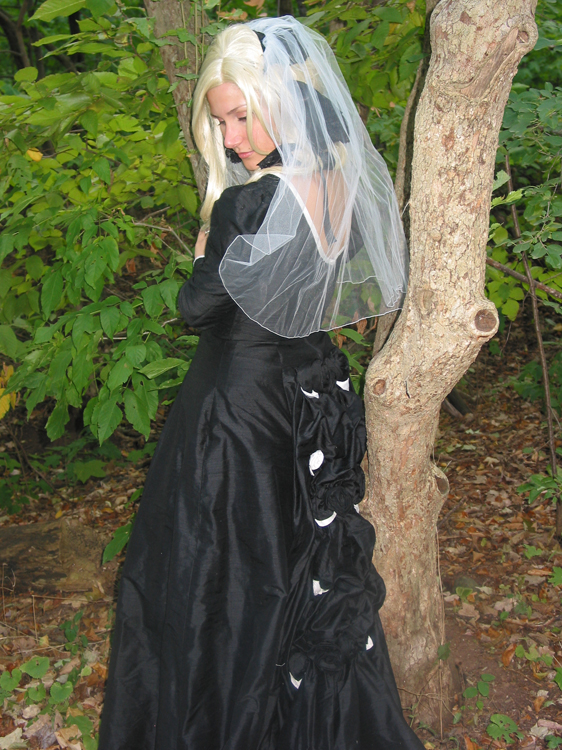
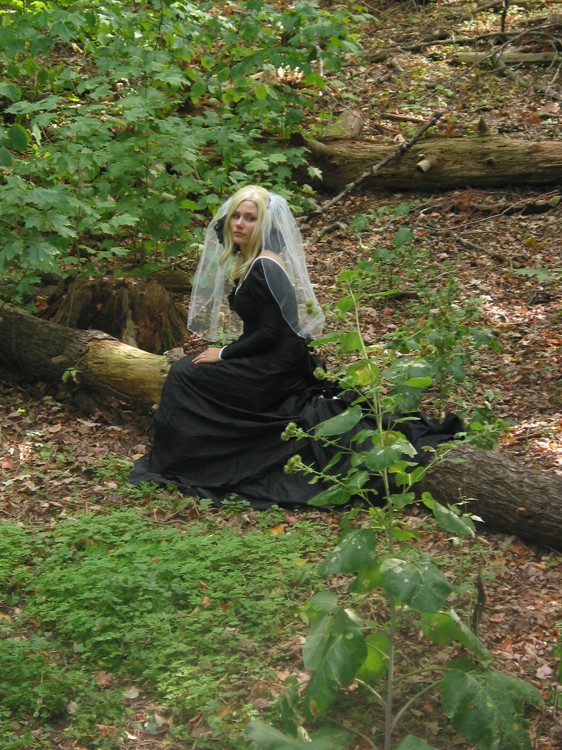
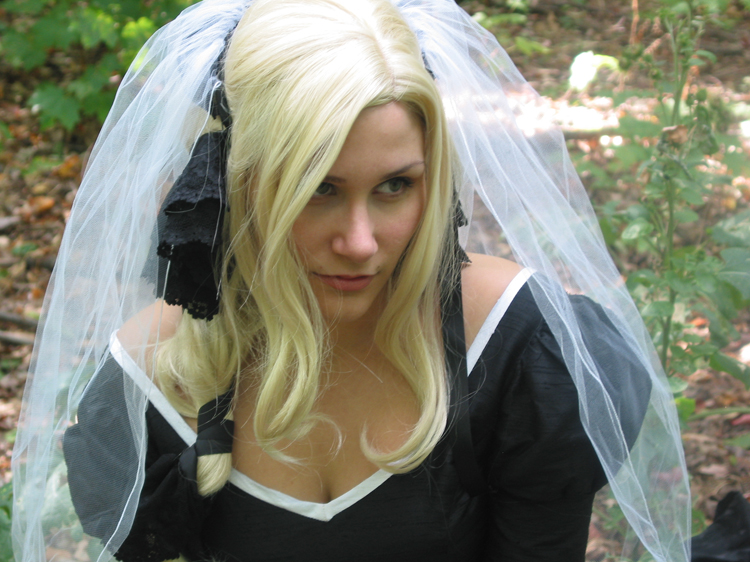
Red Riding Hood
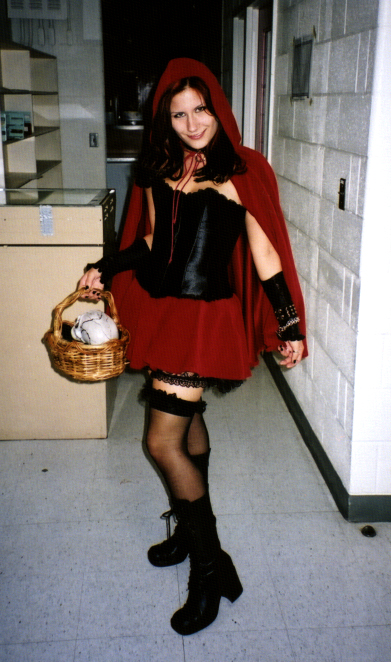 |
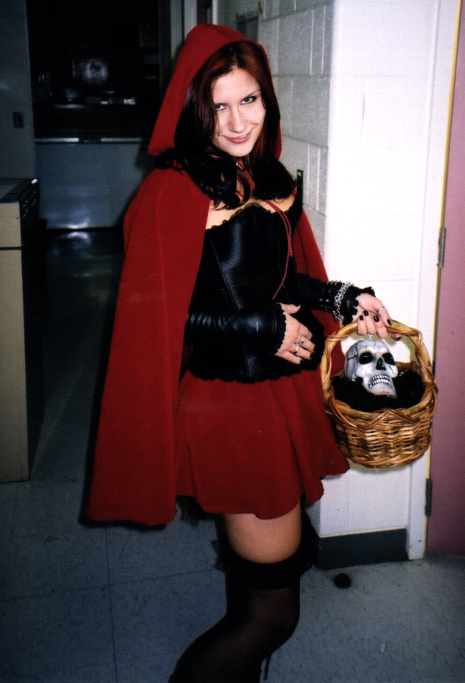 |
This costume was made for Halloween for no good reason.
The corset for this costume is a store bought one that I took apart to reshape it because I lost a lot of weight over the summer previous. The hood and skirt are both made of faux suede which had satin on the inside of the fabric. The inside seams of the cape are encased. It took me a month to get the hair for the outfit but it was lots of fun. The arm warmers were also purchased from a store that went out of business shortly after, sadly.
I loved this costume because I got to carry around a basket of candy to randomly give away and my grandmothers skull. Which I would talk to…she was good company!
Little Miss Muffet
 |
 |
This was so much fun to make!
There is actually two versions of this top – one that’s longer and one that had a peak. Neither are boned – they were made from an aristocratic French gown (like Marie Antoinette) and the skirt was just a knee long pattern that I messed with and gathered. The crinoline with spider web lace was made by me but the white one was store bought. I also made a top hat for my spider so we’d match. I wore this for a photography project and for Halloween!
The lace around the cuffs of the arms works best when you gather each layer separately and sew them on one at a time. The hooks in the front were all sewn on by hand because my machine can't handle them. This was also made from upholstery fabric which is incredibly easy to work with as it has no stretch. The lace around the neckline is two layers of the same spider web lace I used in the crinoline and sleeves heavily gathered and ironed to stay down.
Robin
 |
 |
Source: With Hunter Robin
2005: Anime North
Awww - this is one costume I never got to enter a masquerade with. I didn't even get to take a picture of myself in the costume (my camera’s battery died) so I had to search the internet for someone with a picture of me. I really liked how it turned out though. I look so pale!! I'm not even naturally pale! And it’s not makeup or light exposure either. It’s all because I had pneumonia at the time. You know that you’re a real anime fan when you go to a con despite a fever of 103 and dizziness lol. I really liked making the shirt because I had no pattern for anything (other than the long skirt) and I had to have puffy sleeves and ooh – it has covered buttons!! Yay!! Buttons are cool.
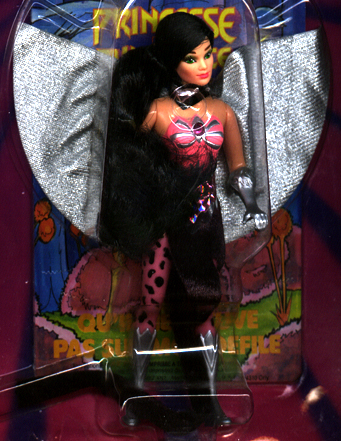
Shower Power Catra
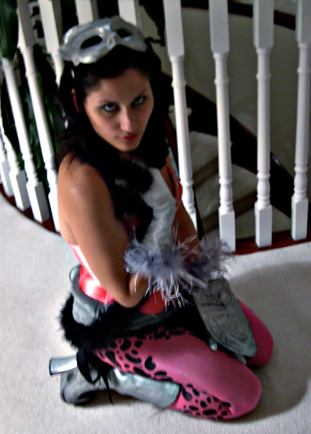 |
 |
 |
 |
||
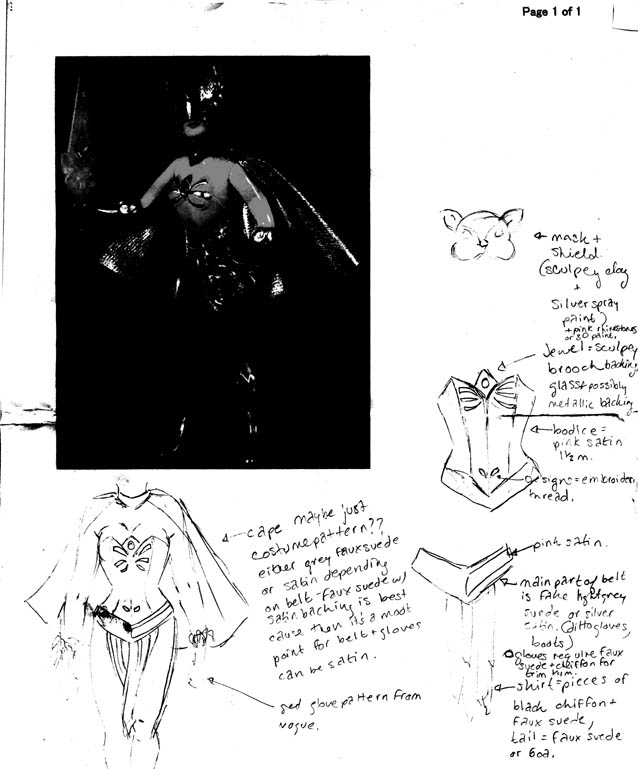 |
 |
||||
Source: She-ra: Princess of Power
2005: SFX
This costume has been the most troublesome to put together. Do you have any idea how difficult it is to find a gray feather boa? I tried to dye white boas to the color I needed but it didn't work. Well it took me a good month to find one and when I finally did I had to pay 50 dollars for it! I felt so bad because I knew I was only buying it to cut it up. Aww…this costume was so expensive! The gloves were also really hard to find I had intended to make them myself but couldn't find the right fabric!! That’s also why there isn't a cape which I had wanted to make. I actually managed to find tights of the right color so I wouldn't have to dye them but then I had to draw on the spots and well – I had to try to do it myself because I didn't wanna ask anyone for help. Because I'm stubborn.
I made the shield, mask and headband all out of sculpey clay which I just discovered about 7 months before making this. Sculpey clay is a wonderful, wonderful thing. It really is. Every cosplayer should be informed of its existence. If I had known about it before I think my costumes would have had more accessories.
The corset was the easiest part to make because I've made so many – beading it was kind of a pain tho because I was going to sew on these appliqué thingies that were on sale at fabricland but it looked bad so I had to remove them a redo it all. Dear God! I spent a whole day and a half doing it. I've always wanted to be Catra…
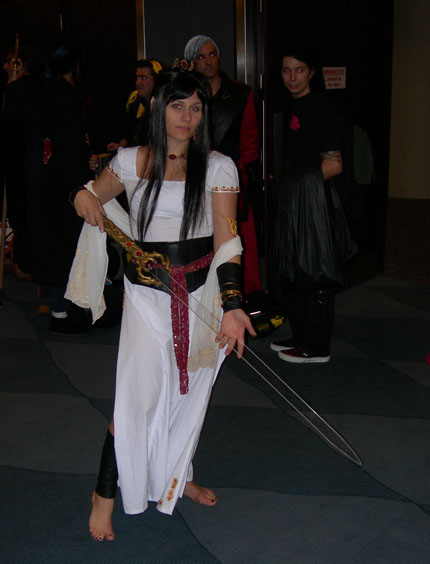
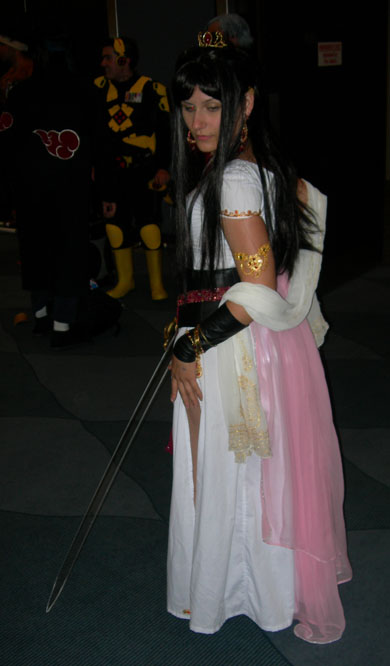
Odille
 |
 |
 |
 |
||
 |
 |
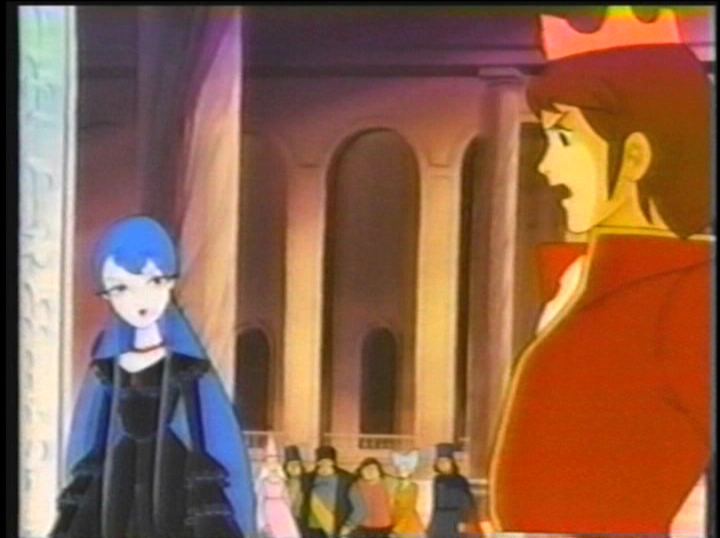 |
 |
||
Source: Swan Lake (Hakucho no Mizumi).
2006: Made for the Anime North masquerade ball. Didn't compete.
This costume was a lot of fun to make because the character is from
this really old anime I saw when I was a kid - actually the first
one I ever saw. It was a version of Swan Lake made in 1978 so I thought
it'd be fun to cosplay something obscure. The dress is based on a
wedding gown pattern that I had but changed in some ways to match
the anime - the ruffles along the collar, the lacing of the back,
the way the lining went also had to be changed because the pattern
was actually backwards instructionally. I find this is a common problem
with some patterns - like put on the lining before embellishment …*sigh.
The bodice is lined with light spiral steel boning - also known as
dancer's boning to help it stand up - the suggestion on the pattern
was plastic but that stuff tends to warp.
The necklace is swarovski crystal which I made just because its so
glittery and ads interest to an otherwise relatively plain costume
- I bought the brooch from a wedding store that was going out of
business which was so lucky cause it matched my beads so well. I
was originally going to make the brooch like a round starburst of
the same beads - maybe next time.
I have yet to wear this to a masquerade - I actually made it for
a masked ball at anime north but the line up was so long I couldn't
get in - I also repainted and redecorated a Venetian mask to match
the costume. Hopefully I'll get some better pictures when I finally
do wear it to the ball.
Ashura
 |
 |
 |
 |
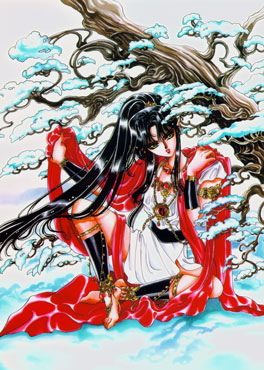 |
 |
Source: RG Veda
![]() 2006:
Anime North. Best details. Artisan division.
2006:
Anime North. Best details. Artisan division.
![]() 2006:
SFX / Fan Expo. Same deal.
2006:
SFX / Fan Expo. Same deal.
This dress has been years and years in the making. I started on one
version of it 5 years ago which I completely scrapped - it was originally
a sort of satin - like crepe back satin I think and it had pretty
embroidered ribbon and glass beads in that - but my beads were stolen
out of my sewing kit at school so I couldn't finish the trim and
I had to quit the costume for a while. *sob! This version is actually
made out of some old bedsheets I had in a closet, some beads from
the old costume - the gold ones were taken off that and put onto
the sleeves. I found a pink veil at a second hand store for 10 dollars
so that's what the train is, also the white embroidered one I found
at winners - I thought it looked like the art book illustrations
and I had to do my own spin on her outfit - more fun that way I think.
The belts around my waist were also embroidered by me and the beads
started to fall off!! People in the convention were fiddling with
them so much I don't think it could have been helped
Anyways - I'm really happy with this because I even got to make a
sword - I cut the plexiglass and the hilt I carved by hand out of
wood - the blade goes right to the end of the hilt - this makes it
all really sturdy. All the jewels on the sword are glass beads I
had to hunt down. The topmost one I covered with translucent nail
polish because stain glass paint peels off. The golden texture was
made by a base coat of straight black acrylic with two types of gold
paint overtop.
All the jewelry - including the tiara and necklace was made out of
different gages of beading wire and craft wire twisted together and
wrapped with gold and red beads. (shades of red, like really dark
red, cardinal, hot pink etc you cant tell in the photos)
The arm warmers and leg warmers are both made out of some lambskin
I had in the basement from another project.
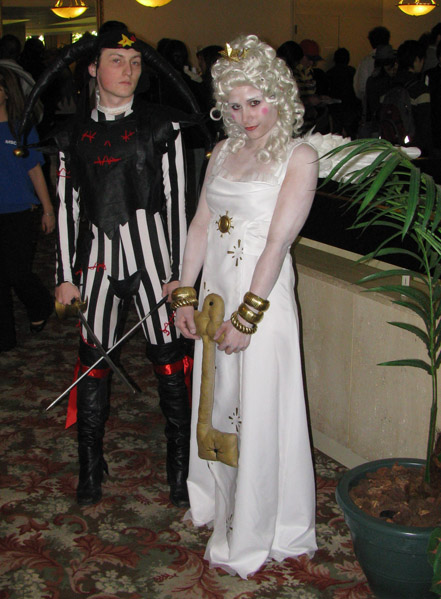
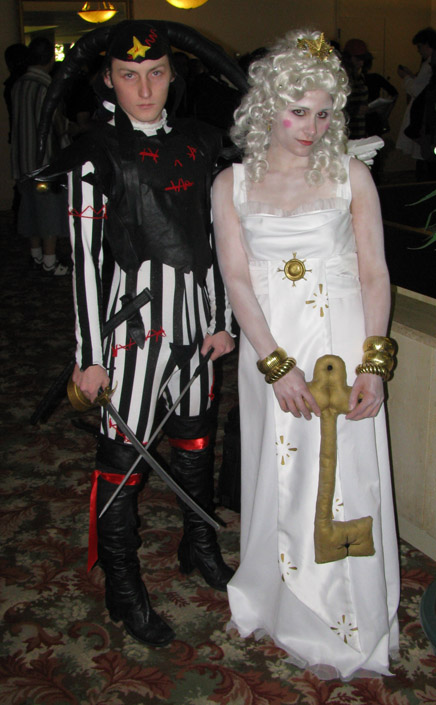
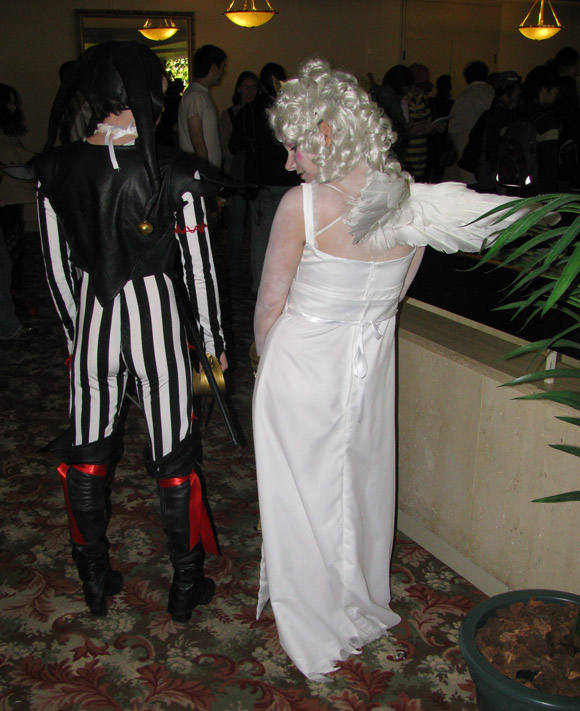
Lisa Tepes
 |
 |
 |
 |
 |
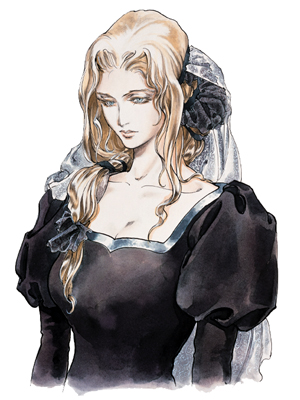 |
Source: Castlevania: Symphony of the Night
2007: Anime North (made in the summer of 06). Didn't win.
I've always wanted to cosplay Castlevania but something tells
me I’d be a terrible Alucard. My dear Ken said he wanted
to cosplay it too so I got the opportunity!!
This was based on the only picture I have of the character – a
headshot the shows her dress to her waist. The bottom and back of
the dress have nothing at all to do with anything I saw in that picture – as
they weren't shown anywhere at all – so they're just sort
of…random …well – its like this because I like
Victorian dresses and I thought it’d look pretty.
The bustle in the back has three dozen silk roses I made from the
same fabric as the dress. The bustle was all done by hand in
such a way as I thought looked cool – I honestly would have
loved a pattern for this cause it was a lot of trial and error – pinning
it different ways – the sleeves were also mcguyvered and I
had to redo them a few times.
The gown was not puffy enough so I had to make a massive petticoat
to go underneath which took more time than the construction of the
dress itself because of all the tiers of tulle ruffles.
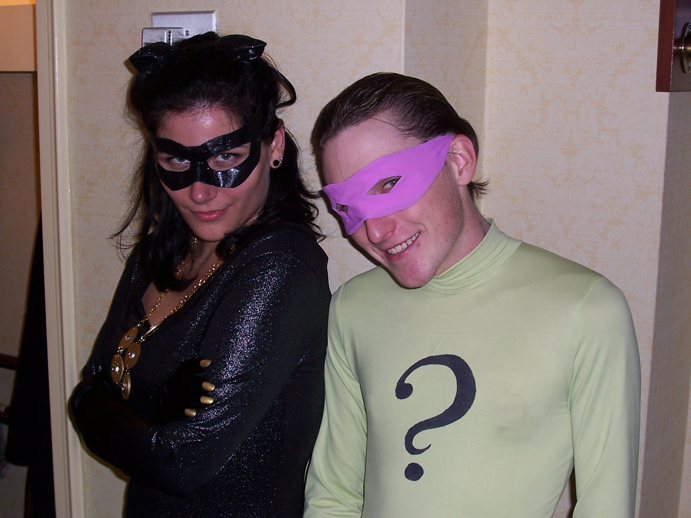
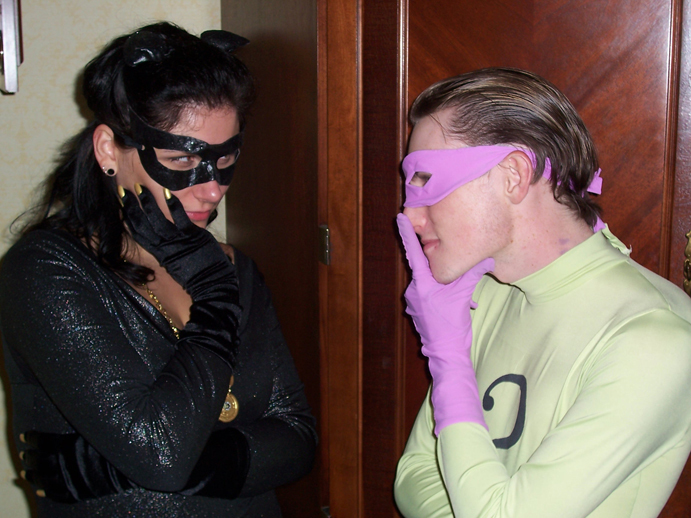
Catwoman
 |
 |
 |
 |
 |
 |
 |
 |
Source: Batman 60's TV show, Julie Newmar / Lee
Merriweather version (but mostly Julie Newmar)
![]() 2007:
Fan Expo. Best comic book related costume. Journeyman division.
2007:
Fan Expo. Best comic book related costume. Journeyman division.
This costume is actually the second version of the bodysuit. Bodysuit number one looked ok but wasn't shiny or sparkly and in the show Julie Newmar's outfit was all glittery so I re-did it. I Do not buy cheap spandex - 2 dollars in price difference makes a lot more difference than you might think. You would not believe the range of stretchy fabric you can find out there - call around and hunt and you will find something perfect - if it takes 5 hours like it did for us (to find pastel green was hard) It will be worth it.
I bought the black gloves years ago and glued on some fake long nails which I had gold-leafed on both sides. The nails had problems staying on though even with super glue so in the future I would recommend other cosplayers using this technique to carry extra pre-done nails with them. Also, to rough the undersides of the gloves with sandpaper so they will have better adhesion.
The necklace was made from sculpey clay - I used cookie-cutters to make the perfect circles and ovals and pin heads to make the details in their faces. The necklace was gold lefed and double sided- with jewels and gold leafing on both sides - I did it because it turned a lot. I used actual metal chan and links between the parts of the necklace so it wouldn't look too fake.
The ears were made of this crayola product - colored foam. It wasn't fun foam just craft foam. It was really fun to shape but I needed to use scissors to shape the outer parts of the ears. It was incredibly light and was therefore the easiest to wear headpiece that i've ever made. I glued them with hot glue and super glue to the headband which had teeth so it pulled my hair back like Catwoman's in the show. Then I pinned my bangs and the longer pieces of hair on the sides to the back of my hair to cover the hair band. The hair band was never shown in the tv show so I wanted to be accurate, lol
The belt was purchased on ebay but it was 7 inches too big for me so I had to make it smaller but I lost 3 inches on my hips after day one of the con from all the walking!!
Since it covers a seam (the waist seam that couldn't be avoided, sigh) I had to safety pin it on the inside to my waistline.
The shoes were also purchased at the bay (they were on sale for $40) and were exactly like Julie's from the show. 'nuff said.
The best part of this costume was that I didn't need a wig. It was so comfortable in the spandex - not too hot - but I froze my ass off in the greenroom before the masquerade!!!!! I had to borrow a jacket from a very cute bomberman. It was awesome. And the storm troopers seemed to like the outfit, lol. That's why you cosplay...for the attention of men with plastic muscles....sigh...
Anyways - I highly recommend working with stretch fabric - I used to be afraid of it but I have a surger - which isn't nearly as hard to thread as people will tell you - you just need to practice - and not get discouraged by the complications of day one. Just never - never attempt to sew gloves - small gloves - on a serger. World of anger and pain.
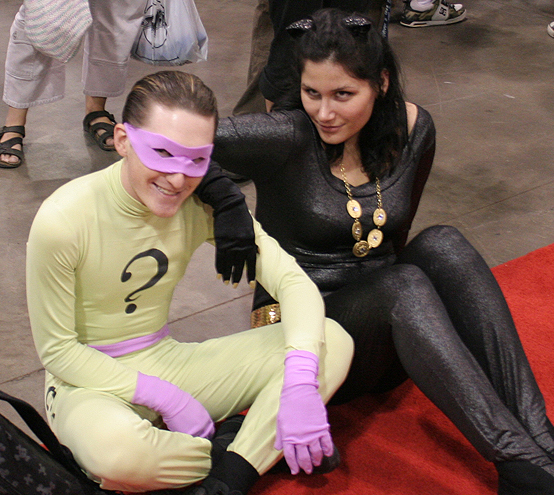
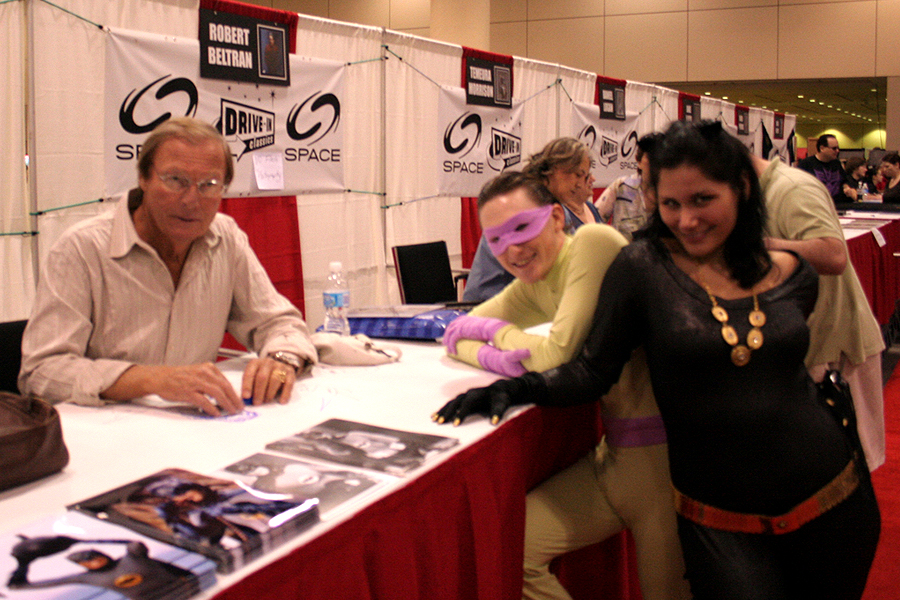
Dave was the Riddler - I also made his bodysuit and his question marks were made by sponging on fabric paint through a stencil we had cut out of photo paper. His mask was double layered purple spandex with interfacing that was very thin foam. It was really comfortable and it breathed. Spandex breathes.
This costume won best comic book related costume in the Artisan category and it was the last award I needed to become a master!!
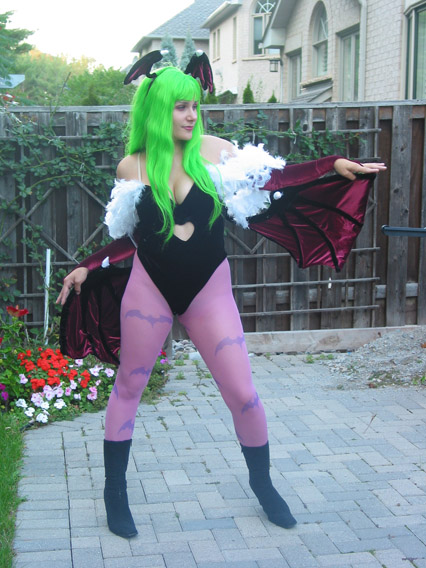
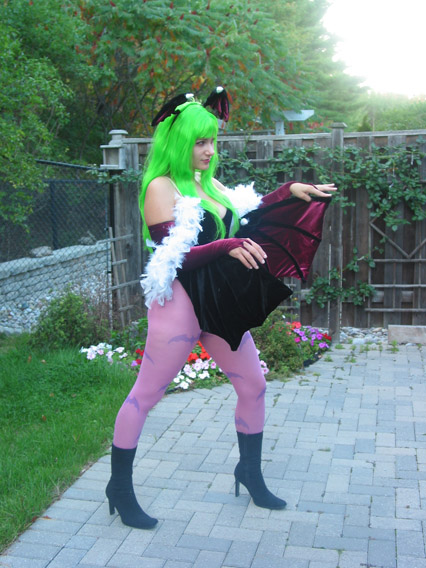
Morrigan Mk 2
 |
 |
 |
|
Source: Darkstalkers
2007: Anime North.
This is the same base bodysuit and gloves that I made originally but with more feathers. The difference is that I tore apart my old wig for the hair extensions to wrap around the headband so it would be less noticeable. I also got a new wig and trimmed bangs into it – it’s a skin top and looks more like it could be my own hair (even though its bright green). The tights were bought for me from Japan and it was nice to not have to draw on my own bats this time. I got a lot more new makeup in brighter colors to go with the hair. I also made a new way of attaching the wings to the bra in the back so they turned less – which was a huge problem with the original.
Also, I found these things in home depot that with open flame (from a lighter) shrink onto the wire I used to make bones inside the wings which greatly reduced poke-through which was also a major problem with the original.
Snow Angel
 |
 |
 |
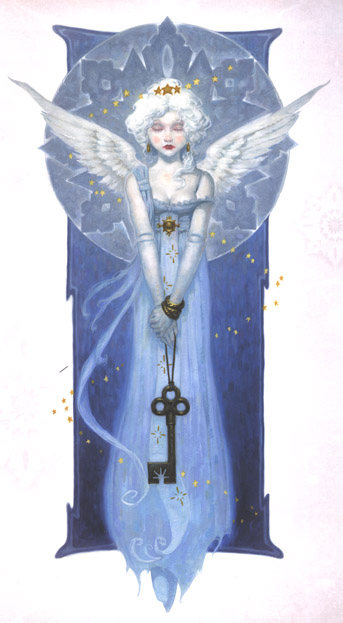 |
Source: The Plucker (By Brom)
2007: Anime North.
The dress was made from matt satin with netting on top - the ruffles are just gathered netting. The bodice is 5 layers of satin to be as un-see through as possible, and the bottom was cut and hemmed very carefully with a satin stitch so it wouldn't fray, and yet retain the tattered look from the Plucker. The sash was separate, and the panel in front was painted very carefully using a stencil as a guide before I sewed the front to the back for neatness (it looks sloppy when I try to paint a finished garment so I like to paint only on the flat pieces). All visible skin was painted white with makeup Forever flash color in white - which didn't come off at all - not even after an hour in the tub with soap! I highly recommend using flash color if anyone ever wants to paint their faces and/or bodies - it lasts all day and breathes - just invest in a good makeup remover.
The tiara base was purchased (it was a whole child's tiara with crystals and
such) and I bought a paper mache giant star for the center and two smaller
pre-cut wooden ones from loomis and michael's respectively. Then I painted
them gold and varnished them and painted them again - it wasn't gold enough
the first time. Then I glued 170 tiny swarovski crystals to it to make it
sparkle. I also had jewels in my hair which attached to my hair with a
little pieces of velcro which I glued onto their backs.
The key was made from white twill and sewn like a pillow - then painted with
gold acrylic craft paint. The black parts are buttons covered with black
sateen (scraps from odille)
The brooch was made from sculpey clay painted gold with a brooch backing.
The bracelets are from H & M and street vendors. I bought the wig on ebay
(it was called southern belle).
The earrings were made with individual gold plated beads and a simple
earring backing all from michael's.
The wings were an accident. I tried to make poseable ones soldered with a lot of wire to give them a skeleton - they were too heavy for me. So! I cut out very simple teardrop shapes out of cardboard from a box of nature valley bars and one thin rectangular piece to connect the two and glued them with school glue. I don't like working with regular boxes because they are way too thick. I then placed some thick wires along the top and bottom edges of the wings where they connect - each piece was about 5 inches long. The feathers were glued on with a hot glue gun.
This dress was so much fun to wear I felt like a princess all day - but I never recognized my own reflection so I kept startling myself! so I would stare thinking "she looks familiar...hrmmmm". I loved the wig I used - it was so thick it completely covered my black hair underneath it, always a concern for cosplay. I had a lot of issues with people standing on my train when I looked at tables - but at 5"3 I don't think I can complain. Also, people crashing into my wings got really old - it was as if no one ever heard the word "dodge" before - at least I used a lot of glue and reinforcing wires in the base so they held up against the abuse.
If there is one thing I want my fellow cosplayers to take away from my experience, it's this: Bring a repair kit. I used a coboodles-ish box, kinda like a tackle box. It had everything I would need to fix my costume - like makeup for touch ups, hot glue sticks and a gun (outlets are everywhere) sewing thread that I used for my costume, many needles, good scissors, an X-acto knife, krazy glue, the fake jewels I used on my hair, pin backings with adhesive tape pre applied if my brooch broke (it did), red ribbon and duct tape!!! (White and black so it would blend with the costume - it comes in so many colors its really, really useful for mishaps, like boot covers that slip down - be creative!) bobby pins that matched the wig were also a godsend - they prevented it from slipping backwards without looking like a mistake.
Jack
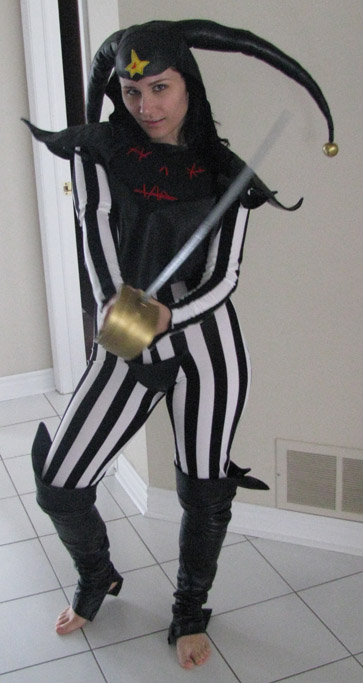 |
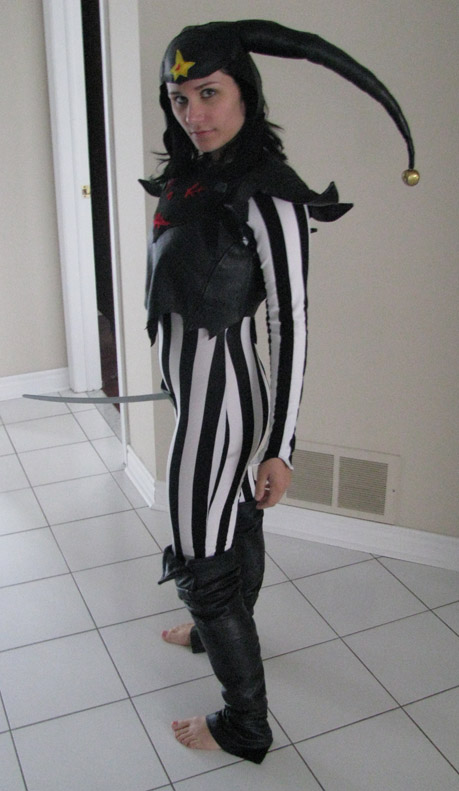 |
|
|
|
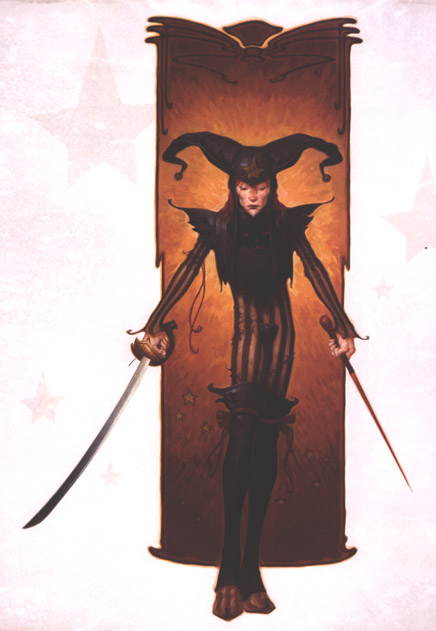 |
Source: The Plucker (By Brom)
2007: Anime North.
This was a modified bodysuit from kwiksew which I gave an empire waistline
so the seam would be covered by the vest. The ends of the gloves had a
facing on the other side so they would keep the shape of the jester peaks.
All leather was from a pair of pants and a skirt I bought at a second hand
store for $5.00 total, along with some scraps I have lying around.
The pattern for the hat was made by draping fabric on a mannequin head and
making lots of trial versions out of cheap fabric before I attempted to make
it out of leather. The hat pieces were all irregular to give the same
patchwork look as in the book - so it ended up having very asymmetrical
seams. I then used an awl to poke holes big enough to pull the yarn through
with a crochet needle.
The ears of the hat are also leather stuffed with synthetic cotton batton
with wire inside so they could be posed.
The vest is also an original pattern based on the pictures in the Plucker,
and underwent a lot of alterations during the process - I ended up sewing
all edges of the leather down to avoid bulky looking seams - I also had no
leather glue to work with so sewing was necessary. The shoulder pieces were
lined with very stiff veggie leather and topped with real leather,
interfaced with armature wire, with a thicker gauged wire in the outer
seam - since it was all encased I didn't have to worry about anything
showing.
The boot covers were the pants with an added cuff I threw on that was double
sided. They did up with invisible zippers and an elastic that went around
the buttons, which are pleather covered steel buttons, covering the buttons
with real leather was impossibly difficult so I tried it with the thinner
synthetic alternative and I was very happy with it!
This costume was a little disappointing because no one recognized it and I went to such pains to make it dead on accurate to the book - even going so far as to sew in armature mesh to make the shoulders stand up. However, one woman working at a book booth knew who he was and went crazy (the book was on display at her booth!!)- her enthusiasm alone was enough to make everything better.
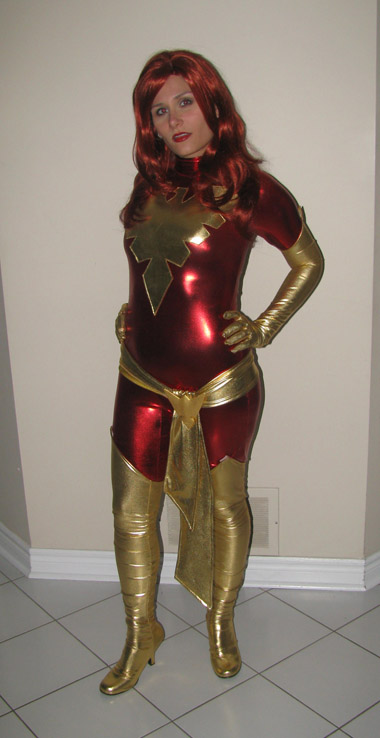
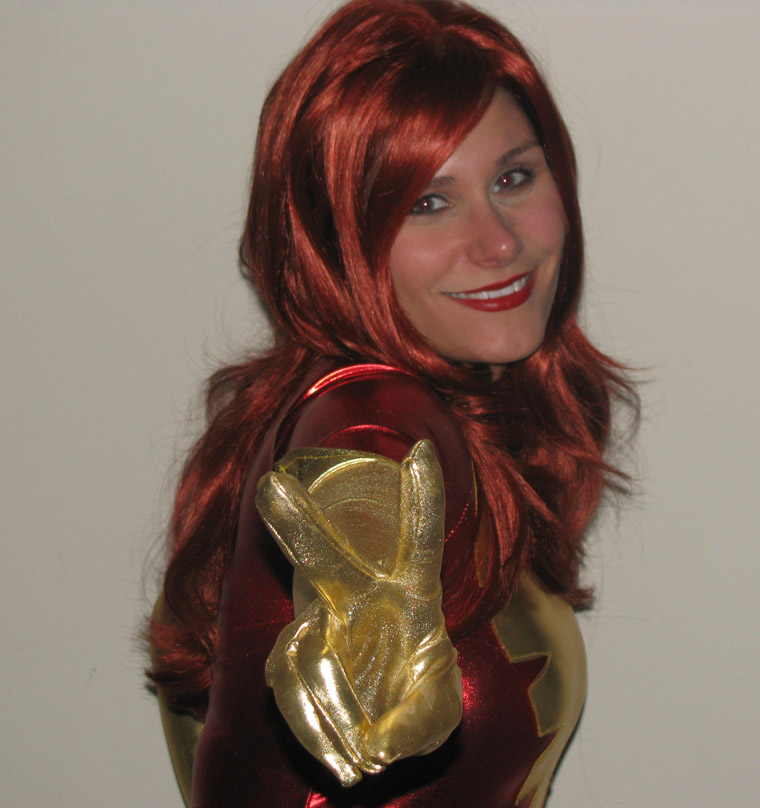
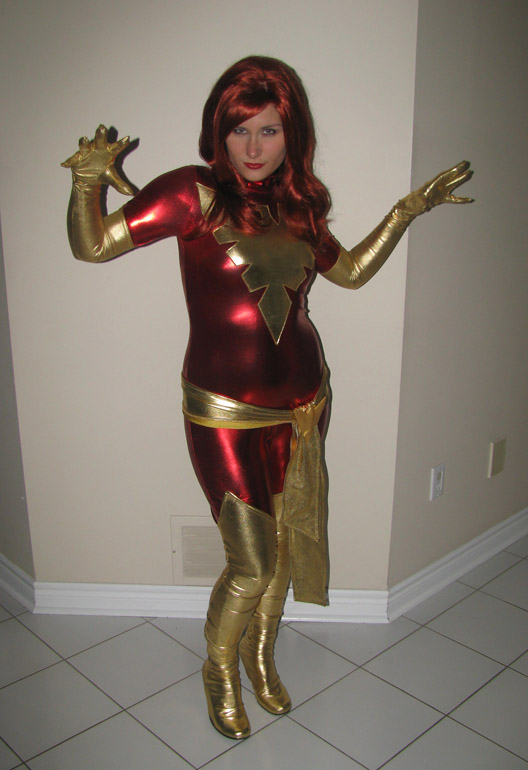
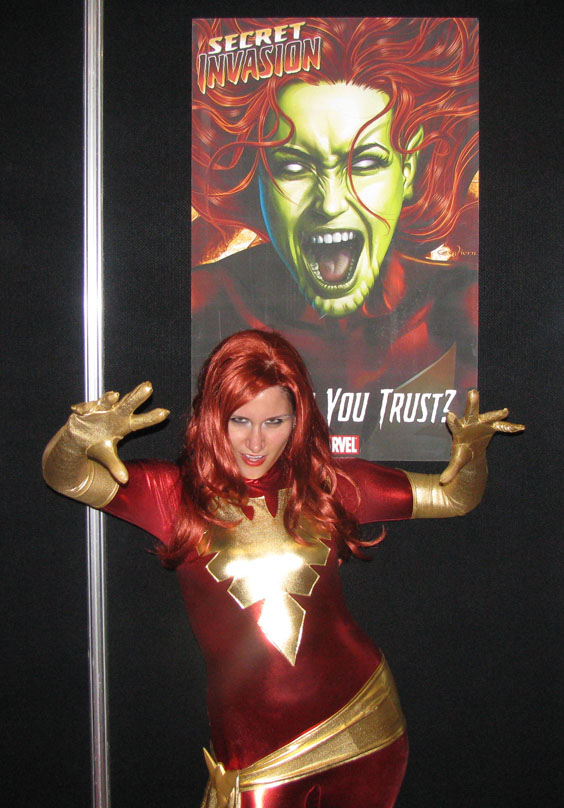
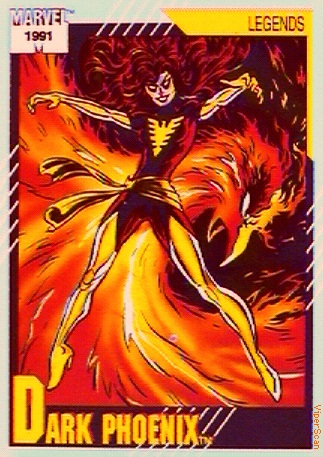
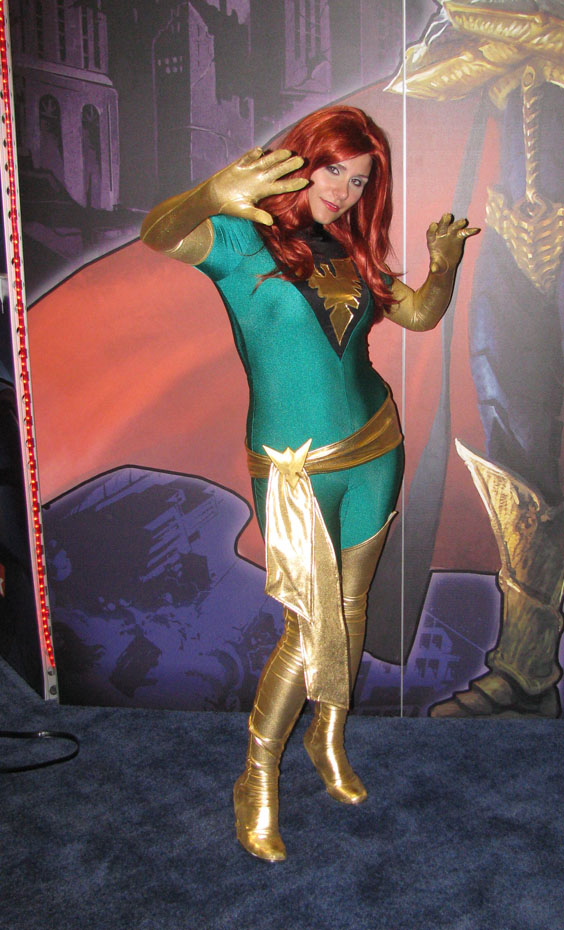
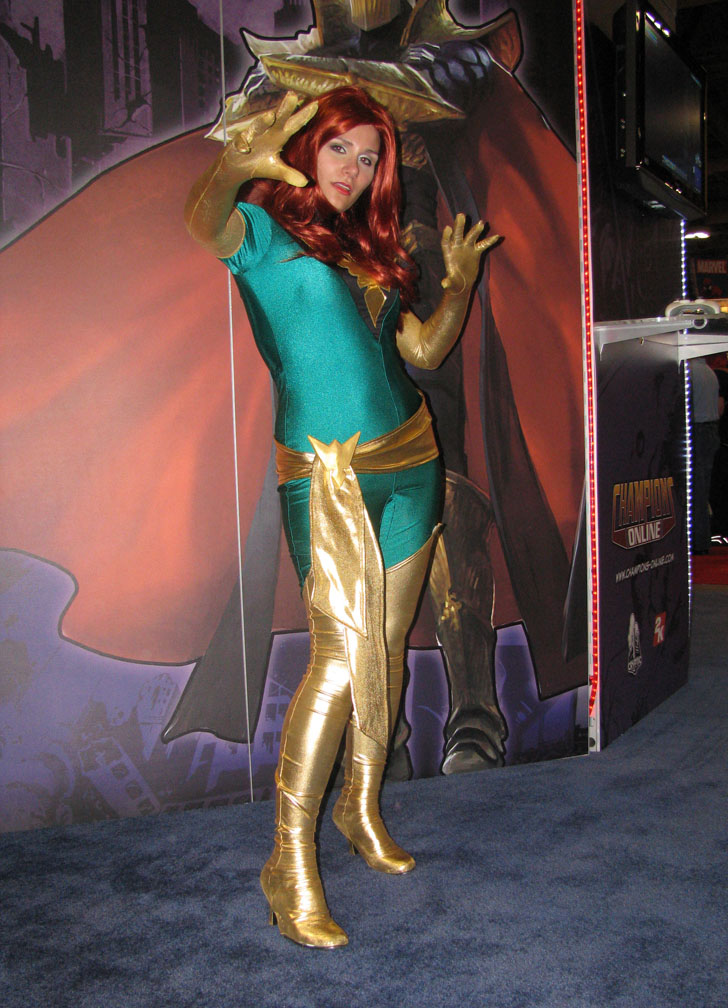
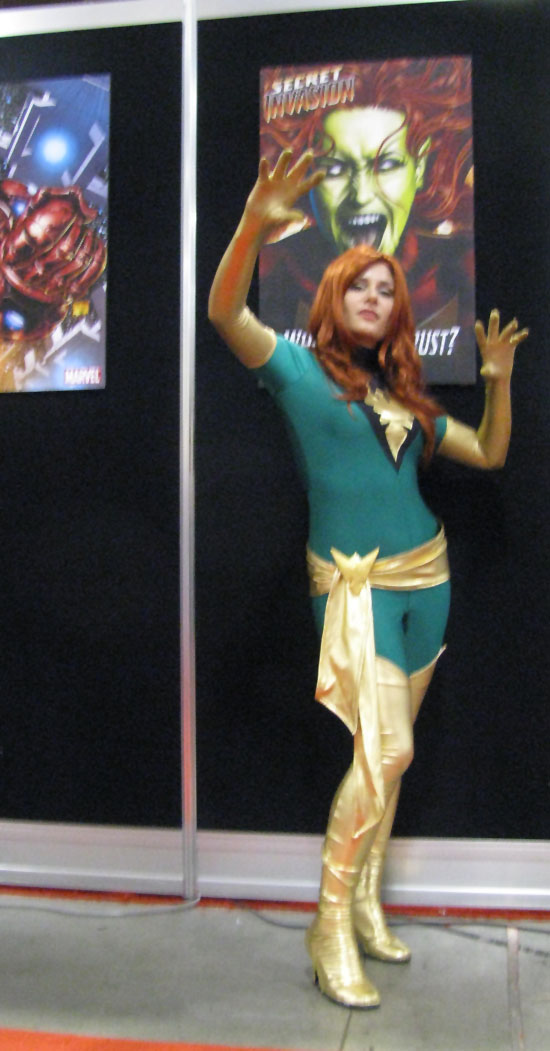
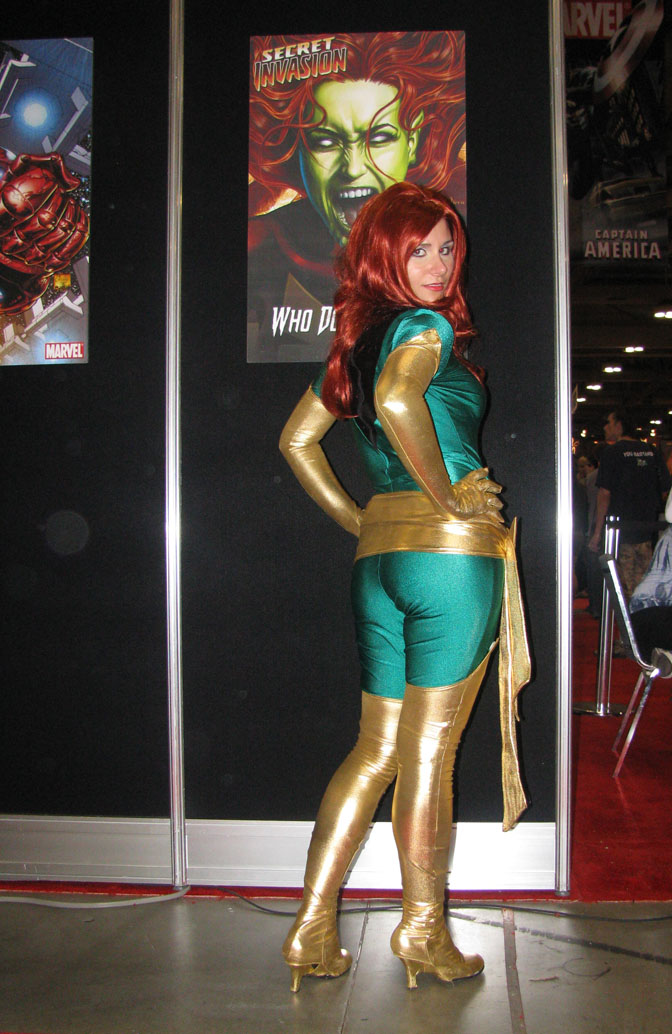
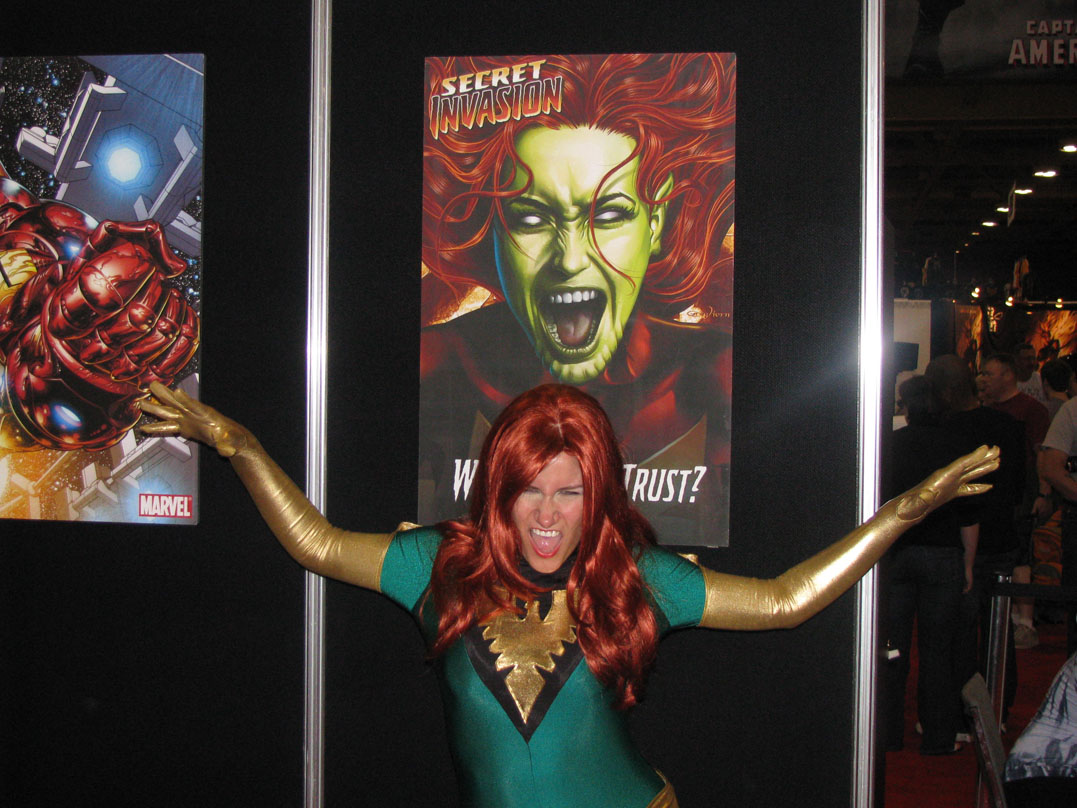
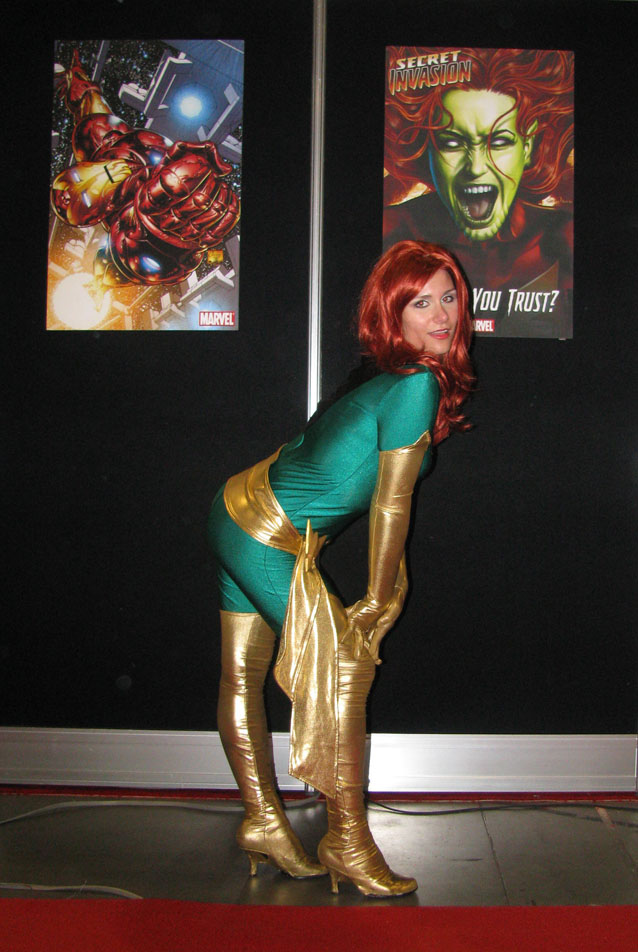
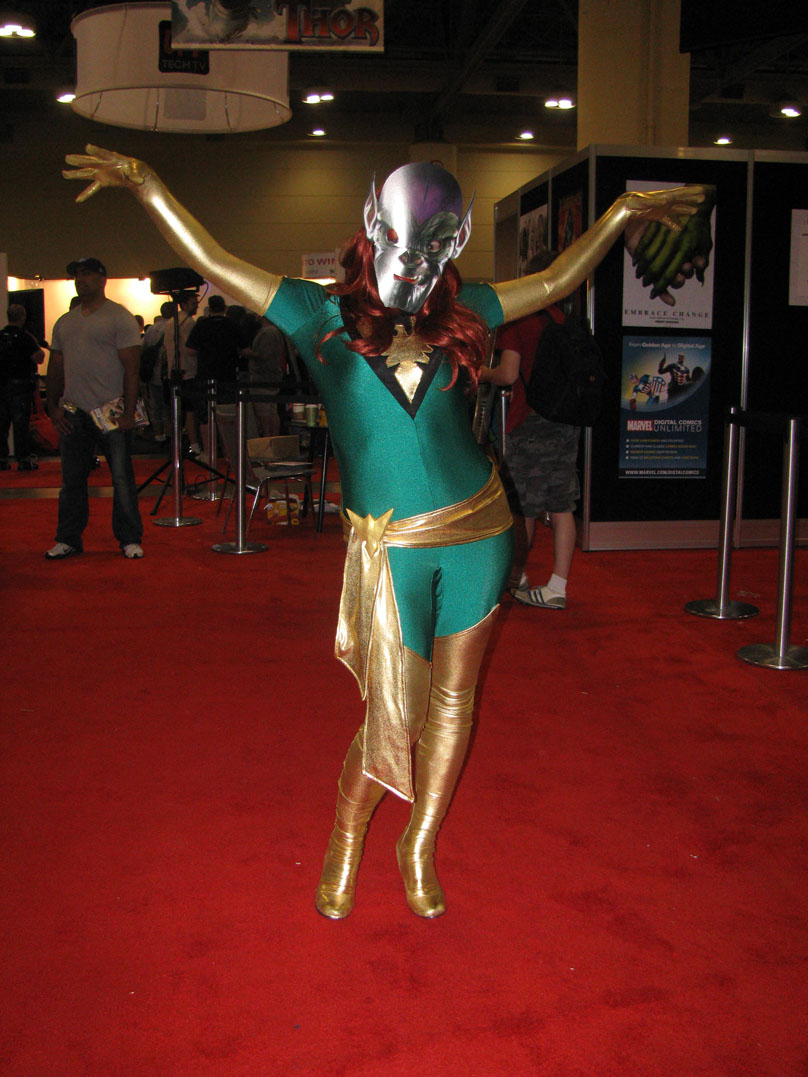
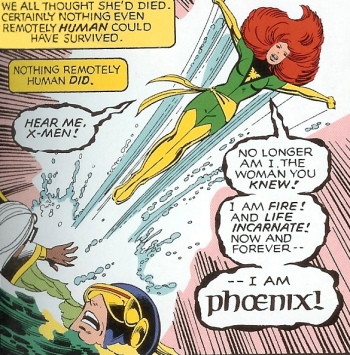
Dark Phoenix / Phoenix
 |
 |
 |
 |
||
 |
 |
 |
 |
||
 |
 |
 |
 |
 |
|
 |
 |
 |
 |
||
Source: X-Men
2008: Fanexpo.
This fabric was the most happiest find in my cosplay history! Never before
have I ever just entered the first store on my fabric hunting day and seen
exactly the fabrics I need standing next to each other! But they were
ungodly expensive, even at "affordable fabrics" which is actually one of the
most affordable places for interesting fabrics in Toronto (they're on queen
west just after spadina)
The bodysuit was concocted with arms from one pattern (catwoman) and a new
bodysuit that didn't have a center seam - I hate bodysuit patterns with
center and waist seams in the front - especially for characters like this.
They just complicate things. (like how do I get this belt to cover the waist
seam? drop the seam a hell of a lot??)
The gloves are my proudest achievement - I've never made gloves all by my
lonesome before and I think these ones turned out really well. If I could
have I would have purchased the gloves but I didn't think i'd easily find
some with peaks at the tops and in the exact fabric I was using for the rest
of the gold - and I hate it when things are meant to match but don't in
cosplay - its a scary pet peeve that's cost me many hours of extra work but
I think making your own is worth the extra effort.
That said - the boots! they were so much fun to make. I had found a few
tutorials on google - one by sarcasm-hime which I found to be pretty good,
however they involved a center front seam so I just flipped her ideas around
and traced my leg head-on so i'd get seams on the sides (to match up with
the seams of the bodysuit) . I made three prototype versions of them - incorporating a strange system to get them to fit over heels. They ended up
being three pieces plus one piece made to be glued onto the heel of the shoe
with all purpose adhesive I got from my shoemaker.
The peaks of the gloves and shoes stayed up on their own but slipped after a
while of wear so I cut small triangles of velcro and stuck them on my suit.
Velcro helps soo many costumes defy gravity!
The brooch is made of sculpey clay and painted with gold metallic acrylic
paint with varnish on top. It was sculpted in two stages, a back piece which
was flat as a board with a groove to fit in my pin backing to avoid it being
visible from the side - this was put in the oven and baked, cooled, then I
made another layer of sculpey on top which was rounded all over to look more
sculptural and for added strength cause this stuff cracks very easily - many
people overestimate the durability of sculpey.
The belt was very simple, very wide, and pleated on the edges - I don't like
the look of knots so I simply sewed a round belt to slip on with a separate
piece for the ties that fall. The brooch gives it the look of being tied
without adding a lot of bulk.
The green version of this costume was made second. It was made from the same pattern, and I later added a center seam down the tummy in the front because I did have some technical difficulties making it work, but it seemed ok in the end. I added some velcro at the tops of the gloves and boots in case they slipped but I wish I hadn't - because of the texture of the fabric they didn't slip like they did with the glossy red stuff, so they were superfluous.
This was such a popular cosplay, I was actually very surprised so many people like it. I was trapped at the Marvel booth for so long people thought I was paid to be there - It gave me many opportunities to play with the skrull masks they had sitting on their tables (the things made my day - such glee was derived from cardboard masks...). OOh and there was this little girl who thought I was the little mermaid who was just about the cutest thing I ever saw. I just wish I had left my wig out a few days in advance because it wasn't behaving when I wore the red costume on saturday but it was perfect on the sunday. sigh. You live and learn.
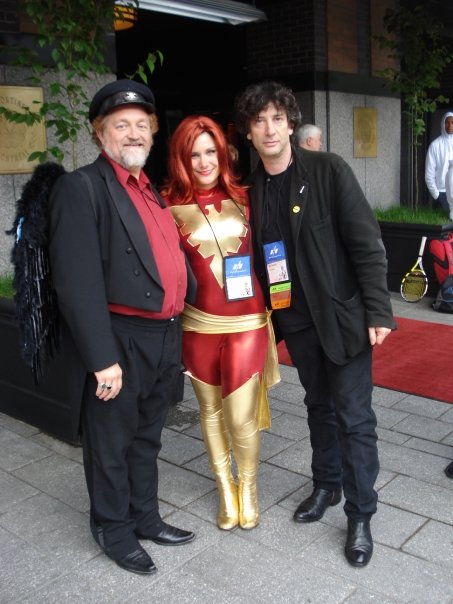
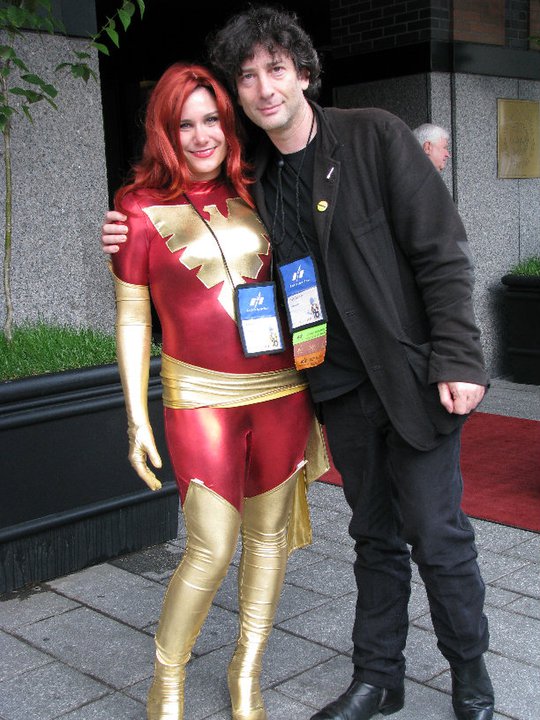
Worldcon 2009 Update
So – This costume is officially the most epic of all cosplays in all of my experience and I’ll tell you why.
When walking with a couple friends to Worldcon (2009 in Montreal) I noticed Neil Gaiman just standing on the sidewalk outside of his hotel. I am far too shy to say hello to my favourite author; though paradoxically not too shy to wear skin-tight metallic spandex – a serendipitous combination which works in my favour. My friends turned to me saying, “You just got checked out by Neil Gaiman” and in a fit of squee I turned around to see Neil gesturing me to come. What would you say if he said: “I love your costume, can I have a picture with you?” – maybe “I love everything you write may I have a picture with you?” – and so, most flattering experience of my life = best cosplay EVER.
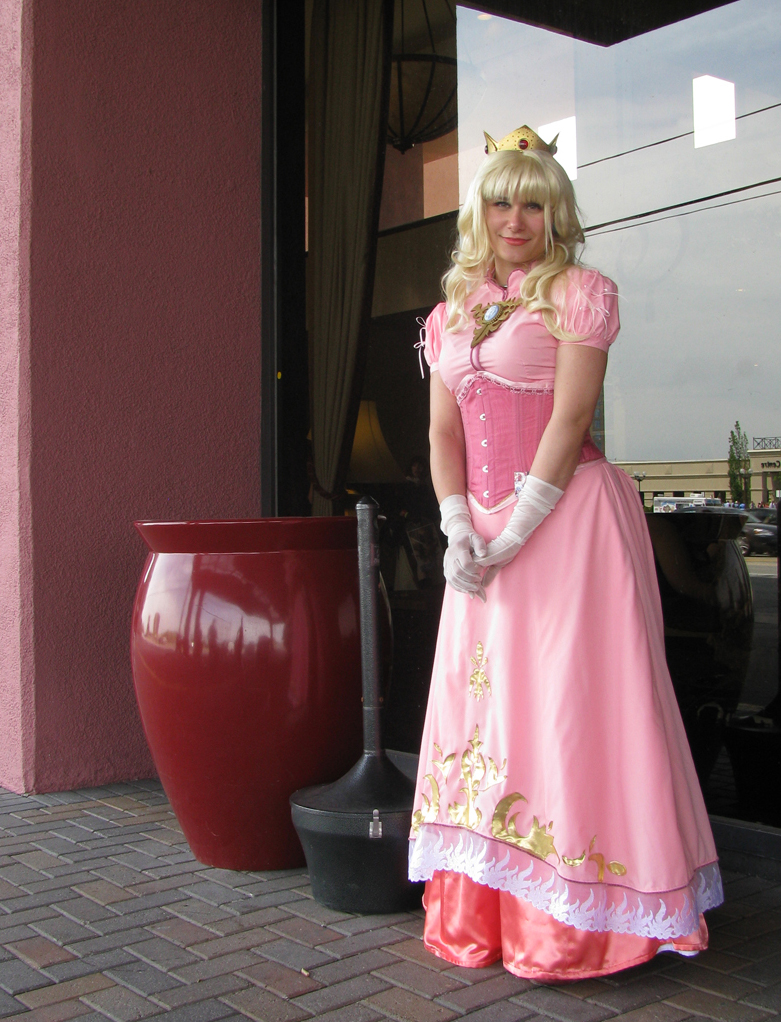
Princess peach
 |
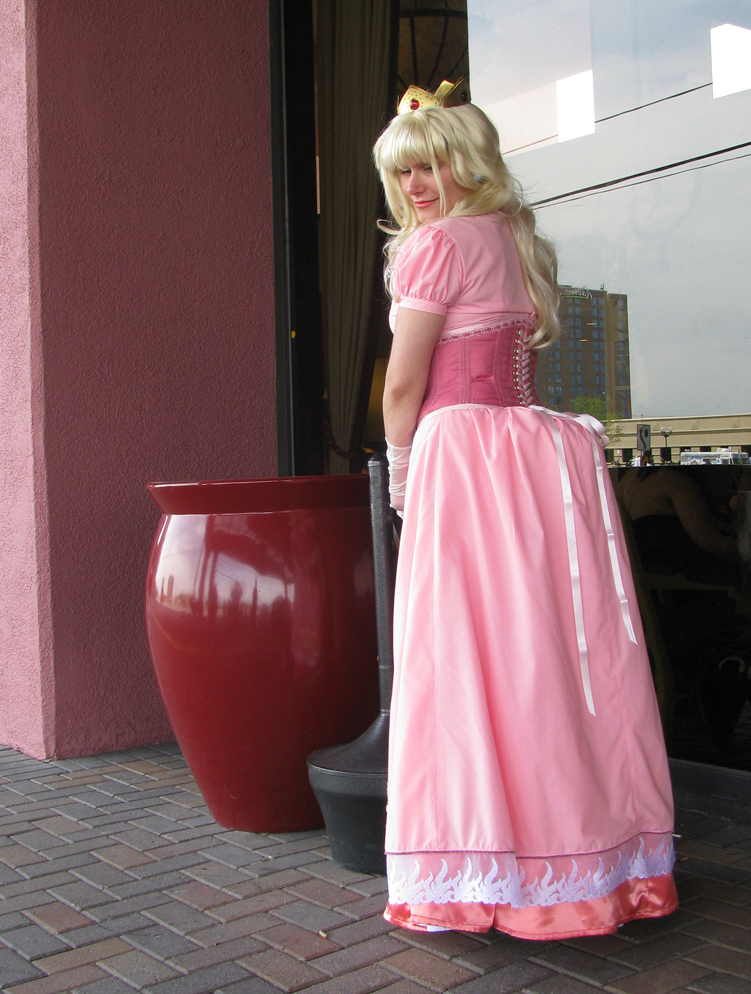 |
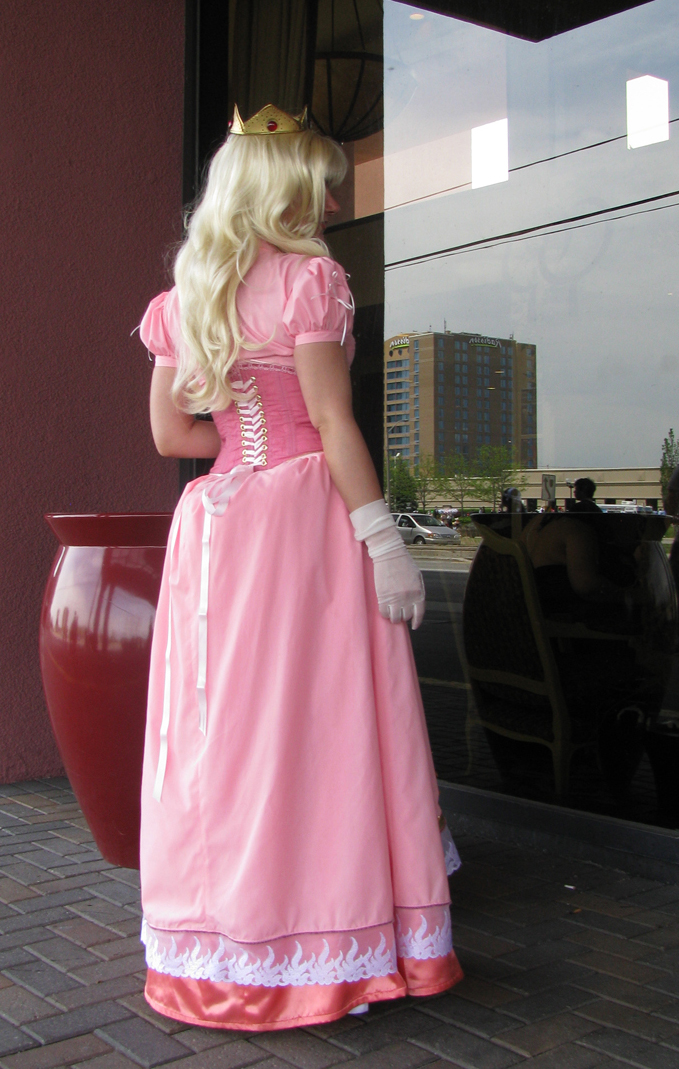 |
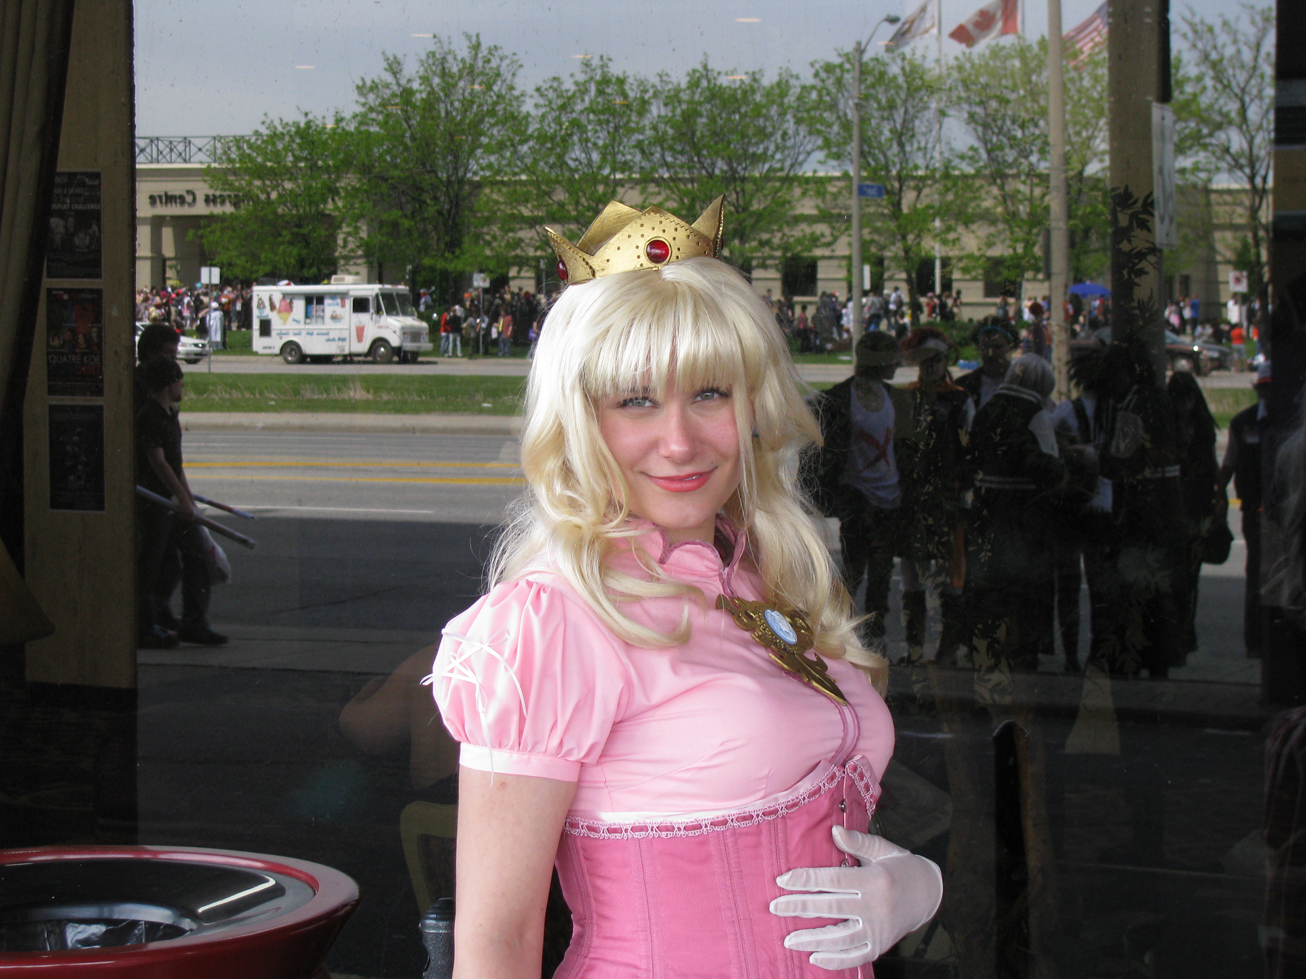 |
 |
|
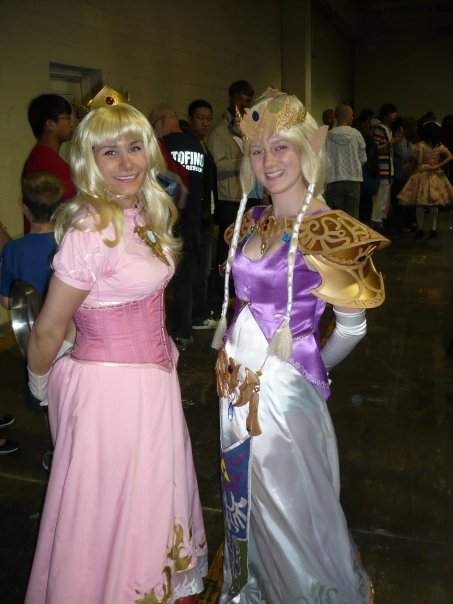 |
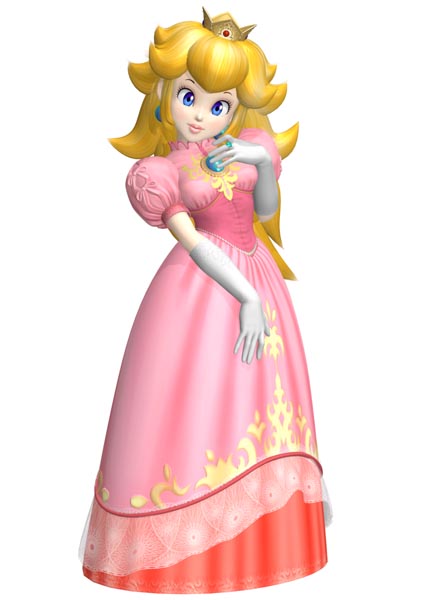 |
||||
Source:Super Smash Bros.
2009:
Anime North
I’ve always wanted to cosplay princess Peach ever since I played Super Mario 2, but I thought that there are sooo many other cosplayers out there who do the same old thing so perhaps it’d be fun if I made her Victorian. Pillow bustles are fun! Pillow bustle + underbust corset = much more fun!
The whole costume is broadcloth, but the corset has 4 layers with an interlining of twill and casing for the steel boning and a proper busk as well as velvet piping and trim everywhere. The gold on the skirt is applique.
Amazonia Wonder Woman
 |
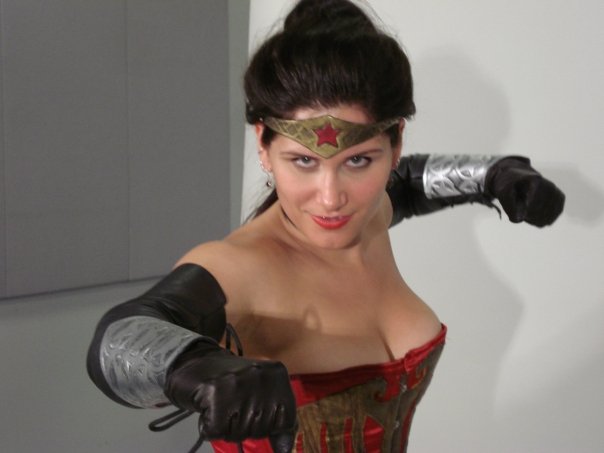 |
 |
 |
 |
|
 |
 |
 |
 |
 |
|
 |
 |
 |
 |
||
 |
 |
||||
Source: Amazonia
![]() 2009:
Worldcon. Excellence in Corsetry.
2009:
Worldcon. Excellence in Corsetry.
I began my comic collection with Wonder Woman at the tender age of 9. I have always identified with her but never quite had the confidence to cosplay her all-spandex – leaves nothing to the imagination - bathing suit. The opportunity to cosplay a version of her that involves some figure-altering corsetry was a dream come true.
I learned a new skill with this costume: Leather tooling. The bracelets are my first attempt, and the headband is my second. They were both first dyed, and then painted with metallic wax (the kind used for faux finishing wood- watch out it never dries and had to be sealed again with beeswax).
The Corset was fairly straight foreword. After the individual layers of the corset were sewn, the eagle (which is leather with the same gold paint) was sewn onto the top layer before the layers or boning channels were sewn.
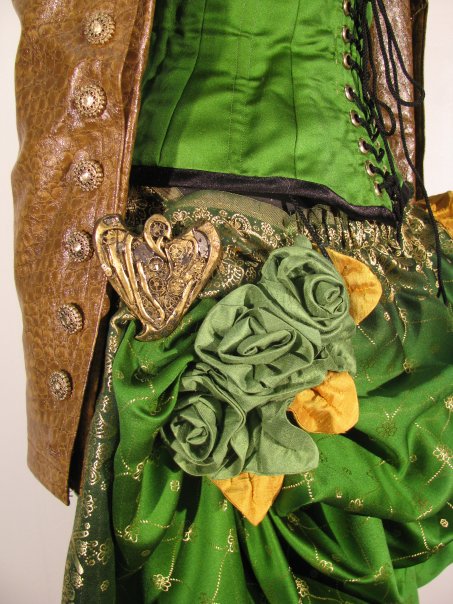
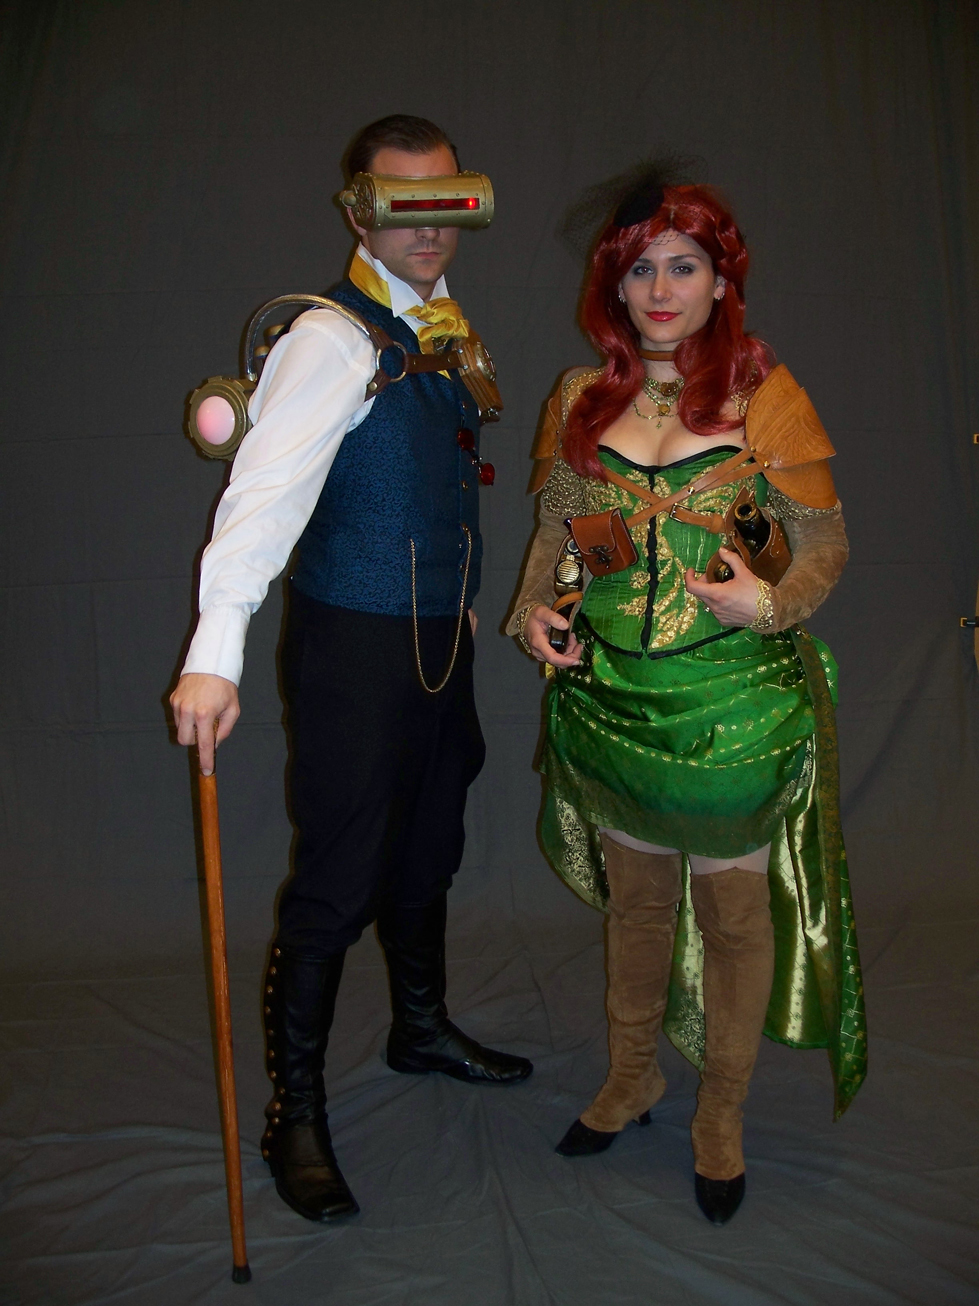
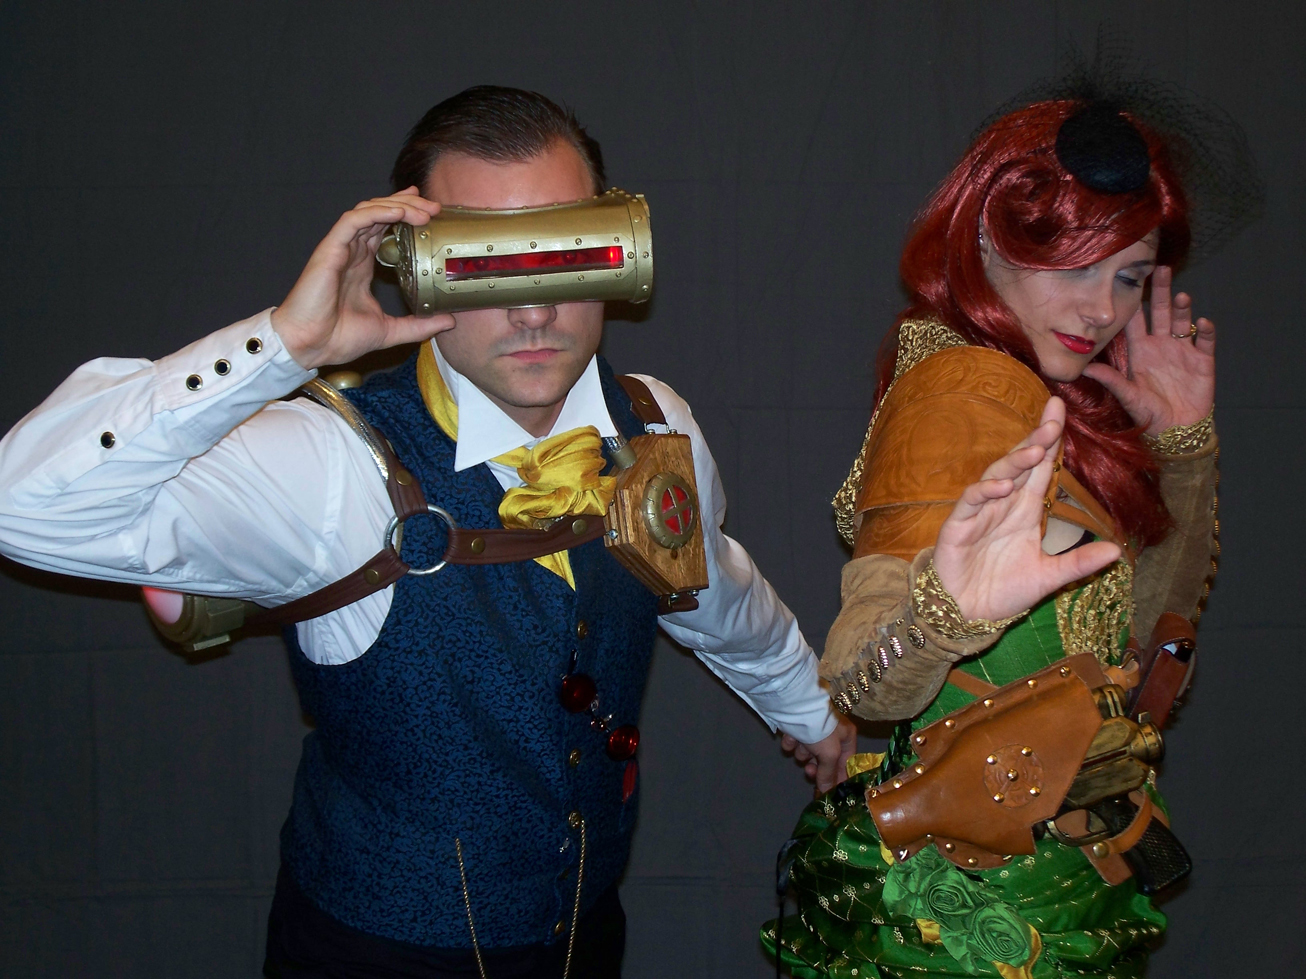
Steampunk Phoenix
 |
 |
 |
 |
 |
 |
 |
 |
 |
 |
 |
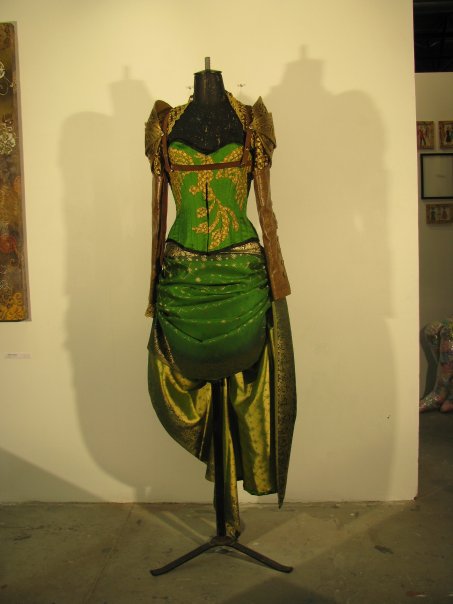 |
 |
 |
 |
 |
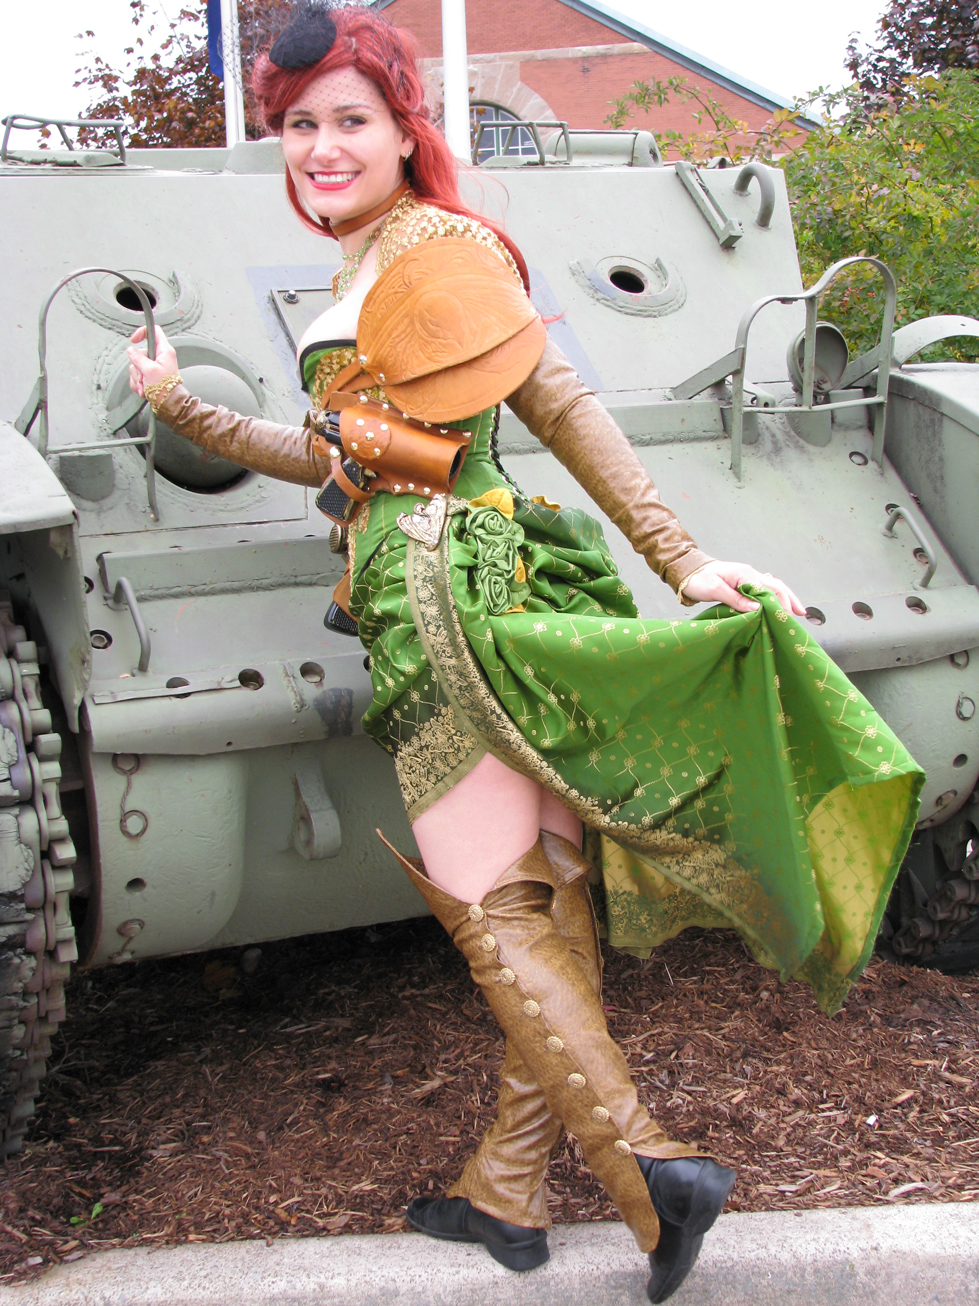 |
 |
 |
|
 |
 |
 |
 |
 |
 |
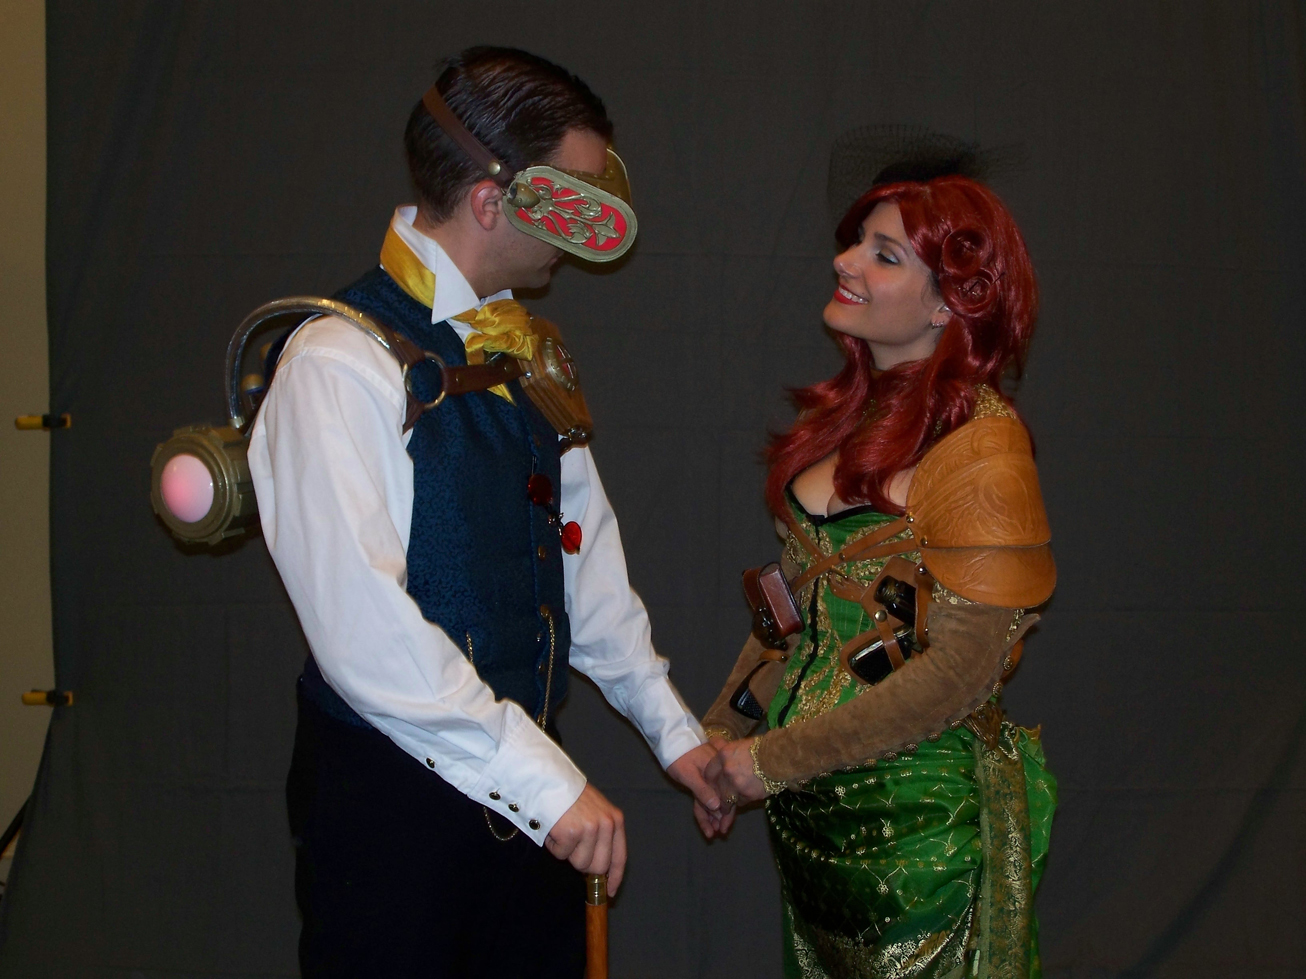 |
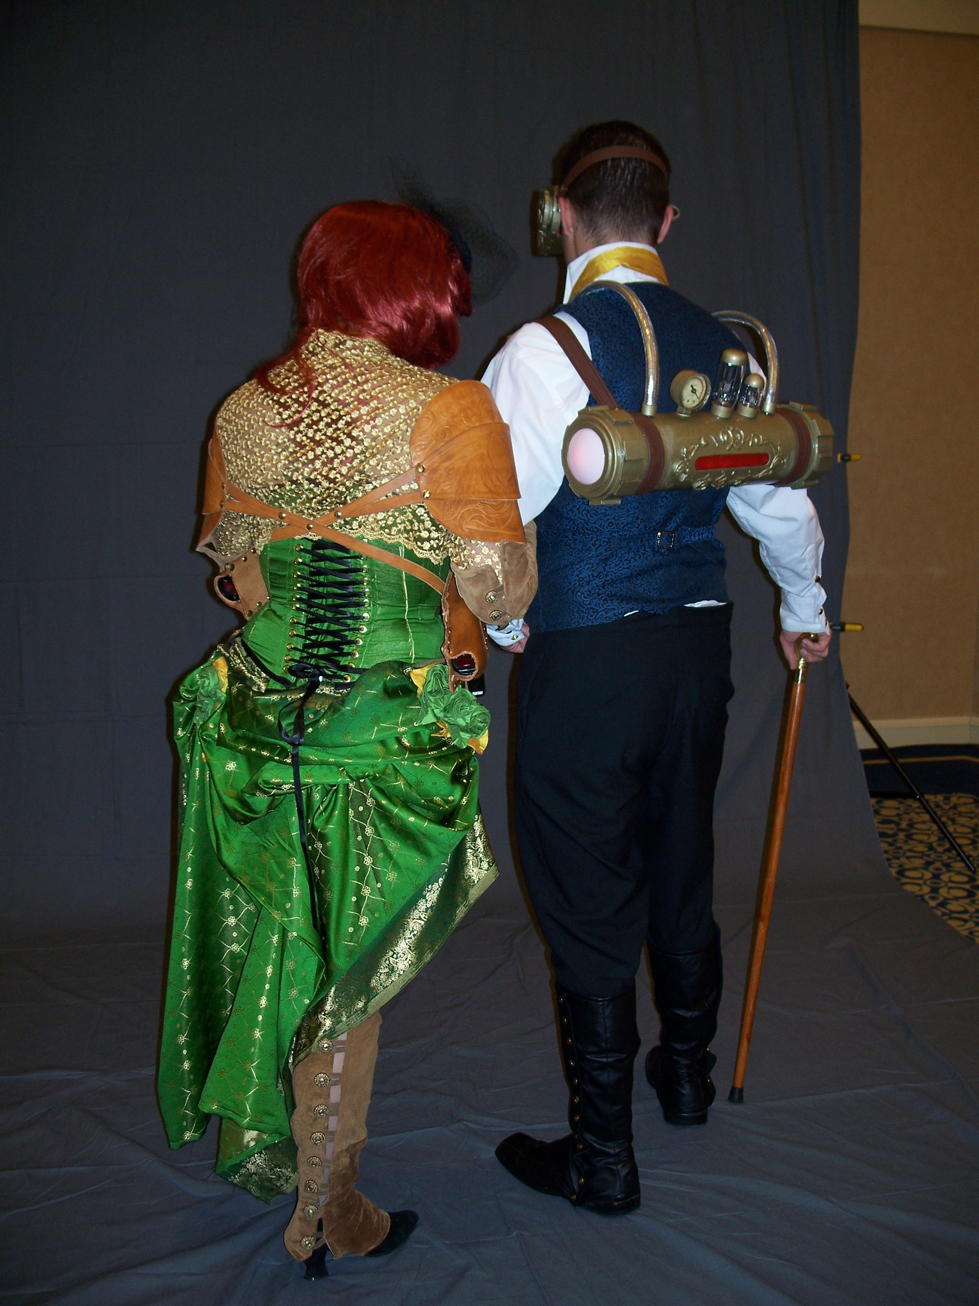 |
 |
 |
 |
Source: Original design based on the X-Men.
![]() 2009: FanExpo. Best in Show.
2009: FanExpo. Best in Show.
![]() 2010: AdAstra. Most Ingenious.
2010: AdAstra. Most Ingenious.
This was possibly the most time consuming project I have ever taken on. Some parts were made, finished, and re-made out of completely different materials because I simply was not satisfied with their look. This happened with the shoulder armour, the arm warmers and spats, even the wig was changed from its original short, spiky incarnation to a more classic version to make it more recognisable as Jean Grey.
The Brooch was made with black sculpey, painted gold, and fitted with tiny gears. It’s very important to me that any costume of the phoenix includes a brooch because it’s a lovely little detail that is so often forgotten, but so easy to include.
The corset was made from a laughing moon pattern (tailored to fit me of course) and involved two layers of appliqué. The first was a gold silk fabric, the same type of fabric as the main body of the corset, which is Sari silk and terrible for corsetry, if I could bear top make this again I would have chosen a Dupioni as Sari fabric cannot handle the pressure of tightlacing. Then I decided to make a shrug to go with the costume and took my scraps from that project and appliquéd them overtop of the original silk to tie it into the ensemble.
The bustle is 2 meters of Sari silk which I created by draping it on a Judy, pinning it to pieces of ribbon underneath, and sewing later. I didn’t even have a plan. I just kept tucking and draping until I liked how it was falling. The main part was having something that resembled the Phoenix’s gold sash on the left side, onto which could be pinned the Phoenix brooch.
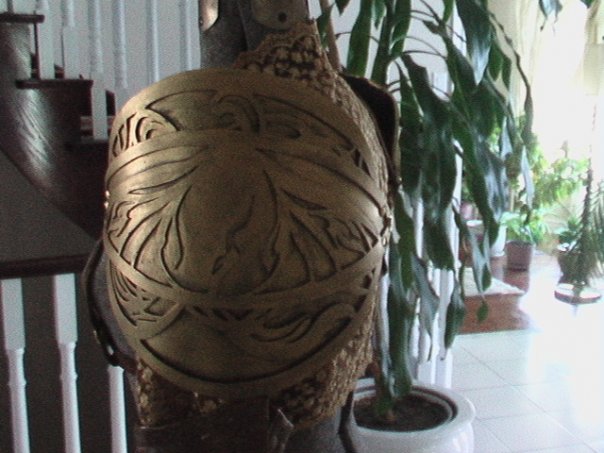
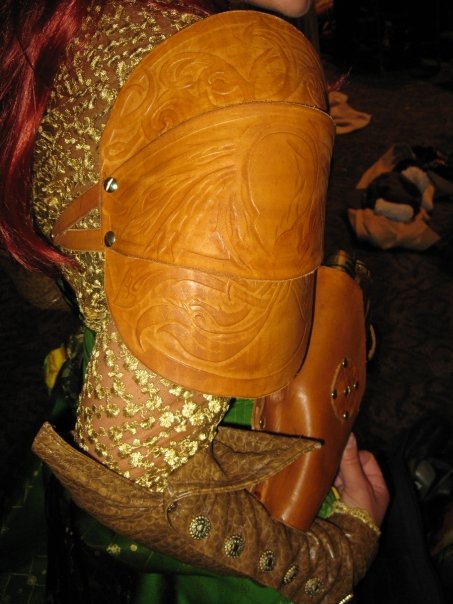
The armour started out as a craft foam creation which looked lovely, but felt like it was too delicate or precarious to withstand a convention. After I learned to tool leather (for Wonder Woman) I re-made it using the exact pattern I used for the craft foam (sacrificing one of the craft foam spaulders to do it). It’s amazing how different they turned out!
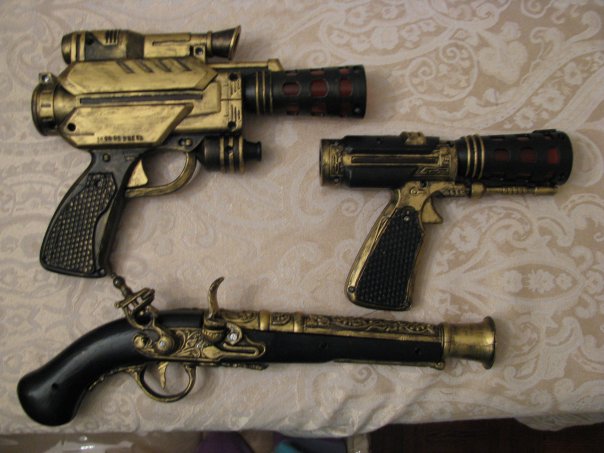
The holsters and belts that attach to the armour were later additions. They include tooled “X” medallions. I had hoped to have a blaster of some sort just because the theme meant I could, but after I found some I liked I had to figure out a way to make holsters so I wouldn’t have to carry them around all day. First I made paper patterns, and then cut them out of really thick un-dyed leather. These pieces were soaked in warm water and draped over the guns and massaged into position until they held the desired shape. I dyed all pieces after they were moulded. I also made one extra belt and holster that I didn’t wear as it interfered with my bustle.
The two guns in my crossed holsters were found at a Toys ‘R Us – they lit up and had sounds. I took them apart and re-painted them. The Extra one that looks rather piratical was a Halloween monstrosity that I re-painted and filed down in many places as it was a terrible mould, but what can you expect for $1?
The arm warmers and spats were originally made out of vinyl meant for upholstery and had no stretch whatsoever. I re-made them for AdAstra out of some suede which I cut out of a pair of pants and a skirt I found at a second hand store. I had to completely re-think the pattern since I had to deal with the seams of the garments but dealing with this small issue was a nice challenge. I cannibalised the buttons from the originals for the second version.
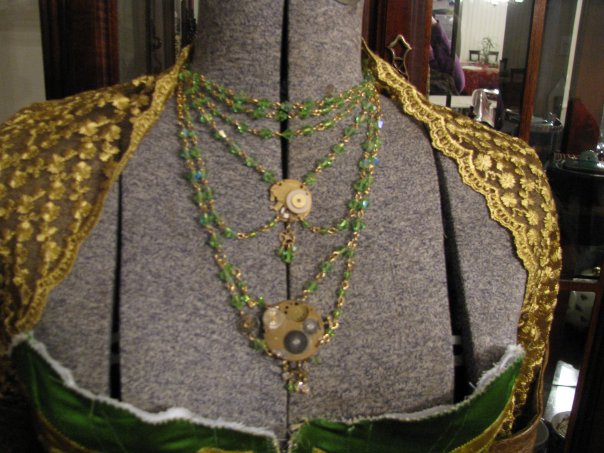
The necklaces are both made with swarovski crystal beads and pieces of watches that I smashed, as I have no talent when it comes to taking clocks apart. I didn’t follow a pattern; I just kept beading until it seemed done.
Liliana Vess
 |
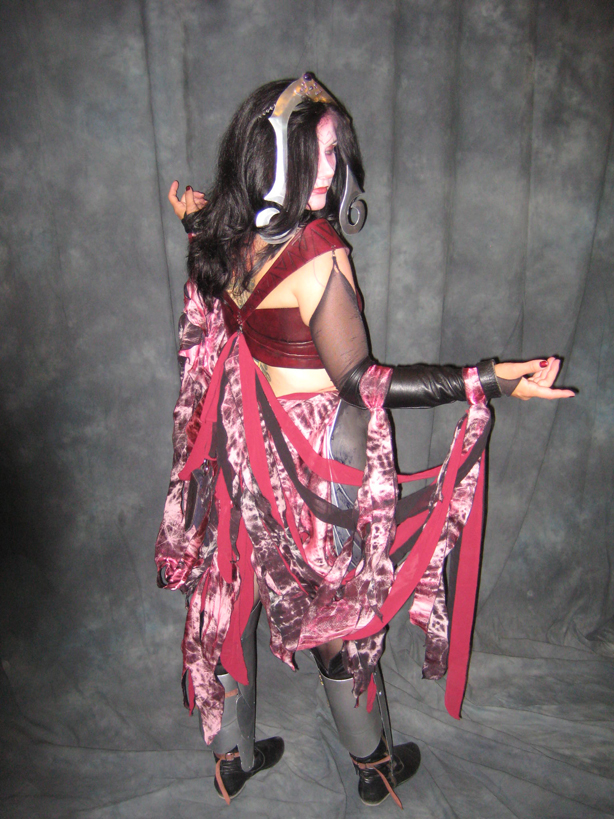 |
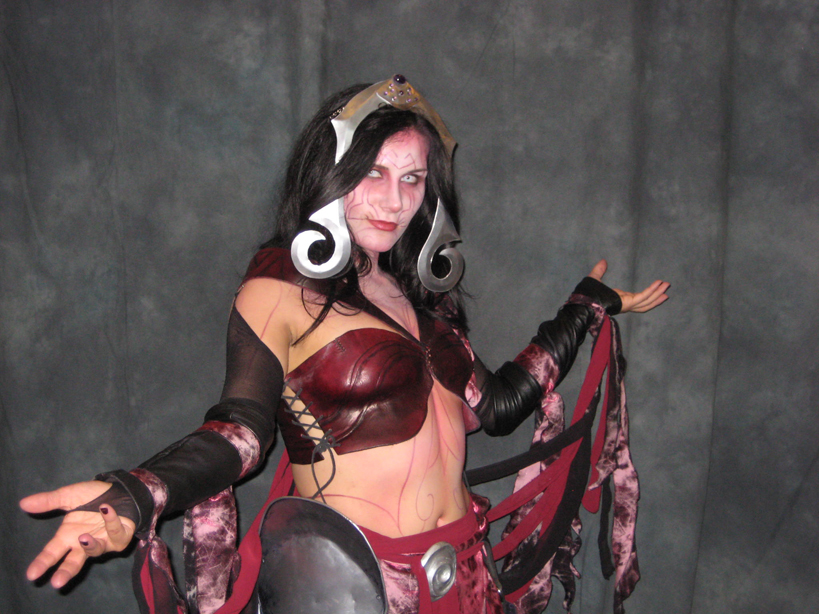 |
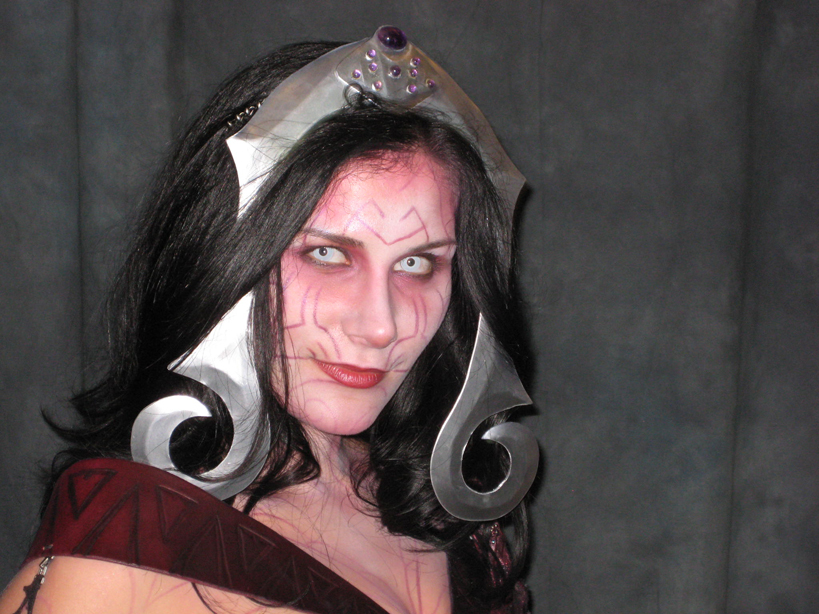 |
 |
|
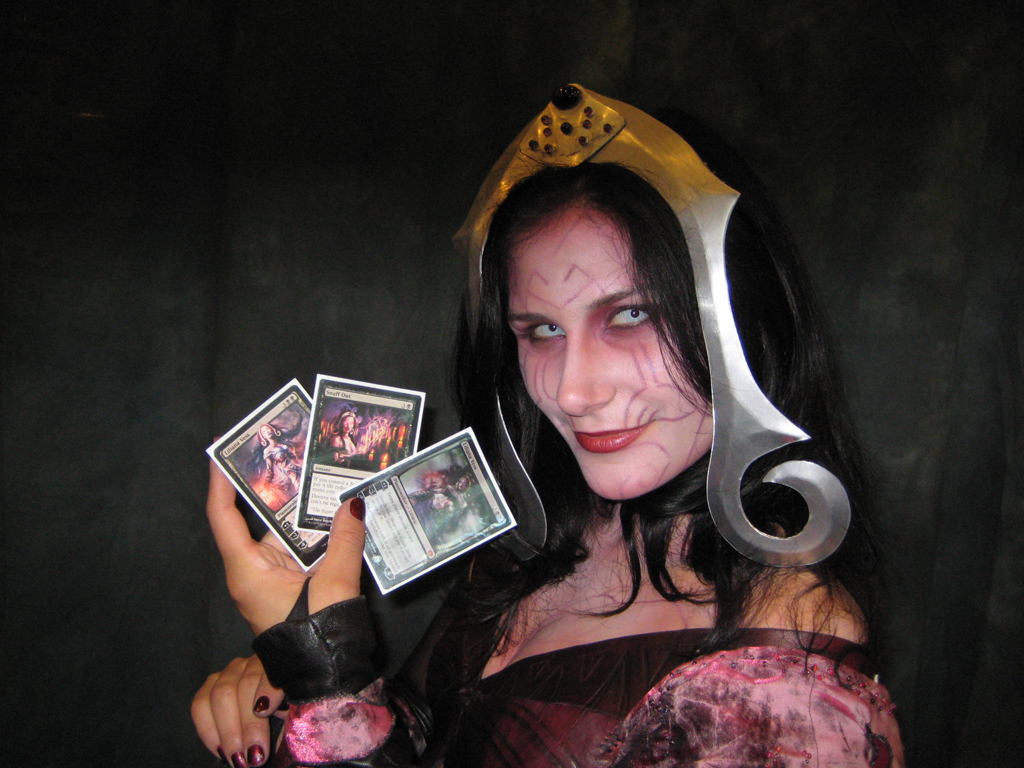 |
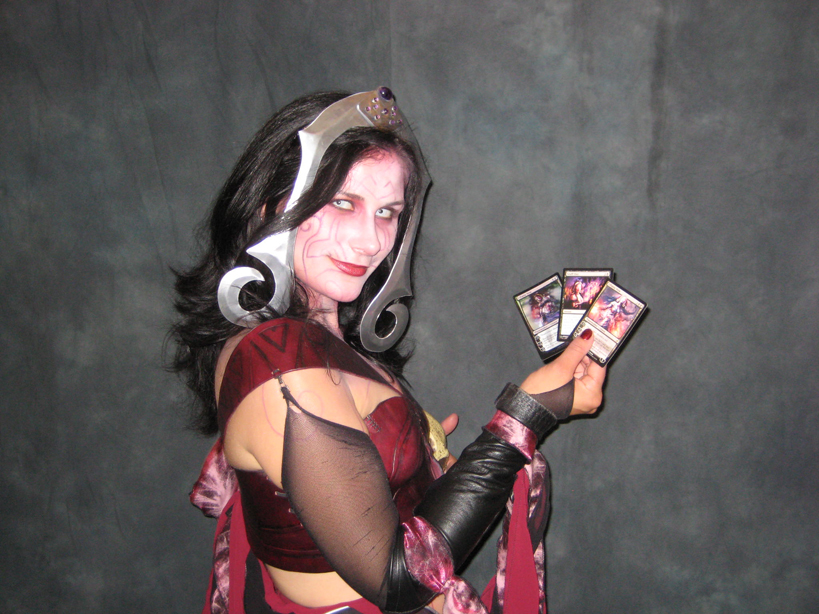 |
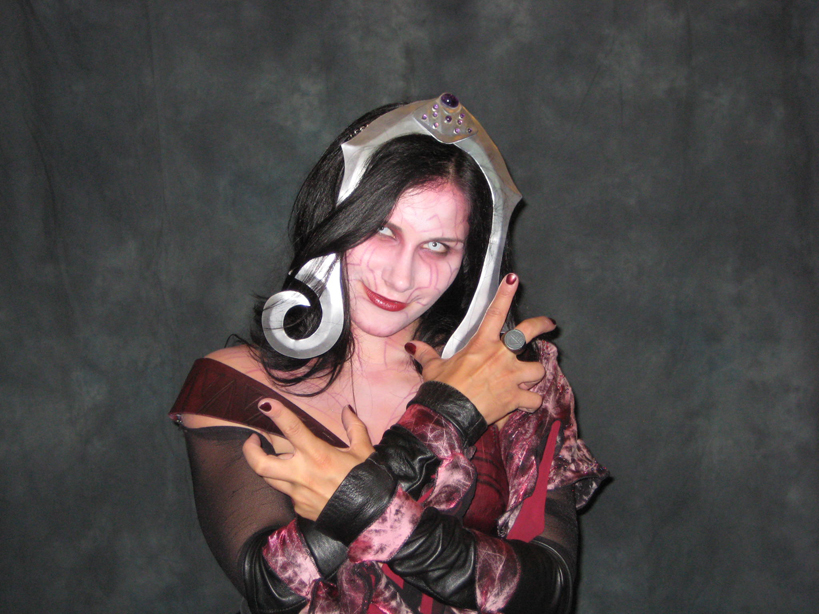 |
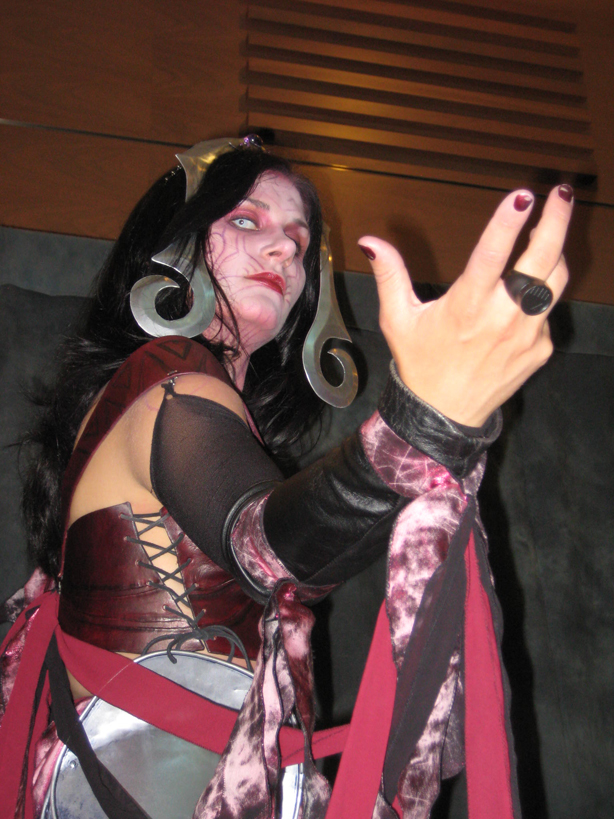 |
 |
|
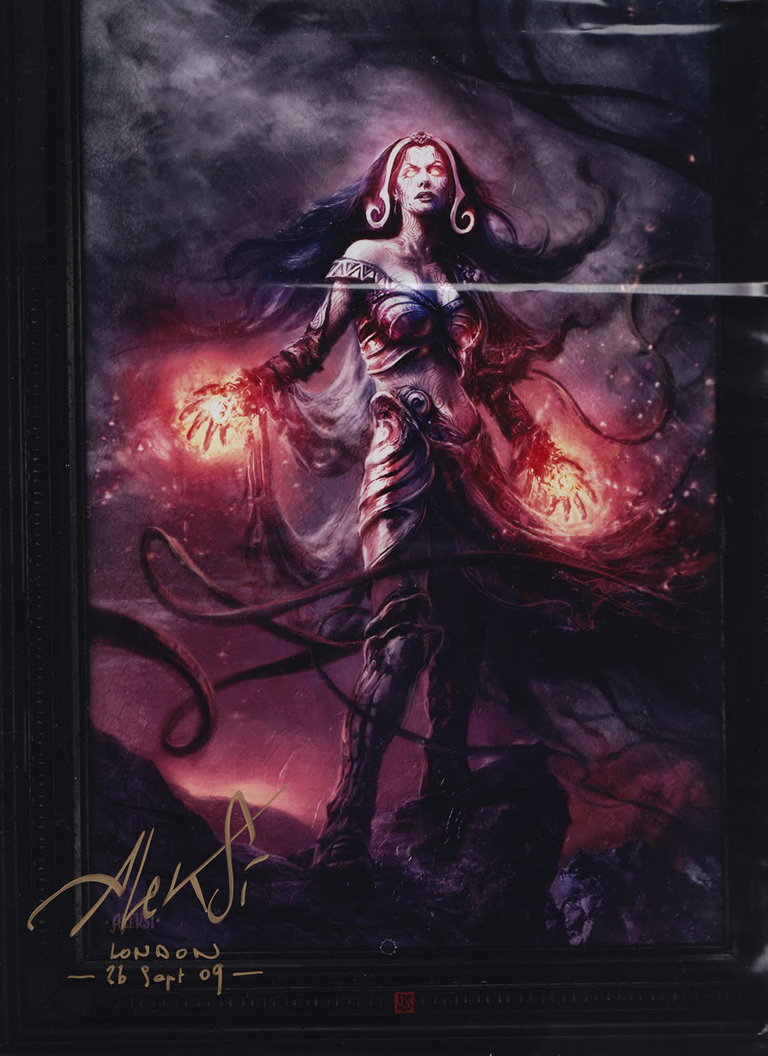 |
|||||
Source: Magic the Gathering.
![]() 2010: FanExpo. Best Master, Best Workmanship in Show.
2010: FanExpo. Best Master, Best Workmanship in Show.
I had no idea who Liliana is when my friend Ken first told me I needed to make her costume. He sent me one photo and I flipped. The new art on snuff out looks eerily like me – and so, epic cosplay was born. Little did I know at the time that it would take all of my strength of will to get it done.
The bodice was made out of hardened leather. First I made a plaster mould of my body, then I finished the plaster positive with flooring wax so the plaster wouldn’t come off on my leather. I stretched and shaped the leather, with help from a friend, over the mould, and tied it in place to dry overnight. The bodice had to be re-shaped a couple times to get it to look right. After it was shaped I then tooled it, with it still on the mould as I needed something solid to place it on.
The dye job took many steps. First I dyed the entire thing maroon, four times to get it deep enough. Then I painted black dye in the crevices of the tooling marks. Then I put some dye on a sponge and transferred a bit onto a soft cloth to shade in the low areas..
The skirt was made with irregularly shaped triangles of maroon chiffon overlaid overtop each other for the underside, and some strange metallic fabric I found at a designer’s shop – I don’t even know what it is – they said it was a silk/acetate blend that they hand dyed.
The sleeve was made in the same overlaid manner as the skirt, and covered with hundreds of glass beads of various sizes.
The Bracers are soft leather taken from a skirt. The streamers are strips of the fabrics from the skirt along with some black chiffon to give it more contrast.
The armour was hammered out of aluminum on a tree stump with various tools. If anyone tells you that aluminum is easy, understand that this took months to do. To describe exactly how each shape was made would take far too long. After it was all done I glued real amethyst cabs onto the tiara which was also attached with wire to a headband. The rest got smeared with black shoe polish to make it look less brand new – she is a necromancer after all.
Star Trek TOS Uniform / DS9 Dax
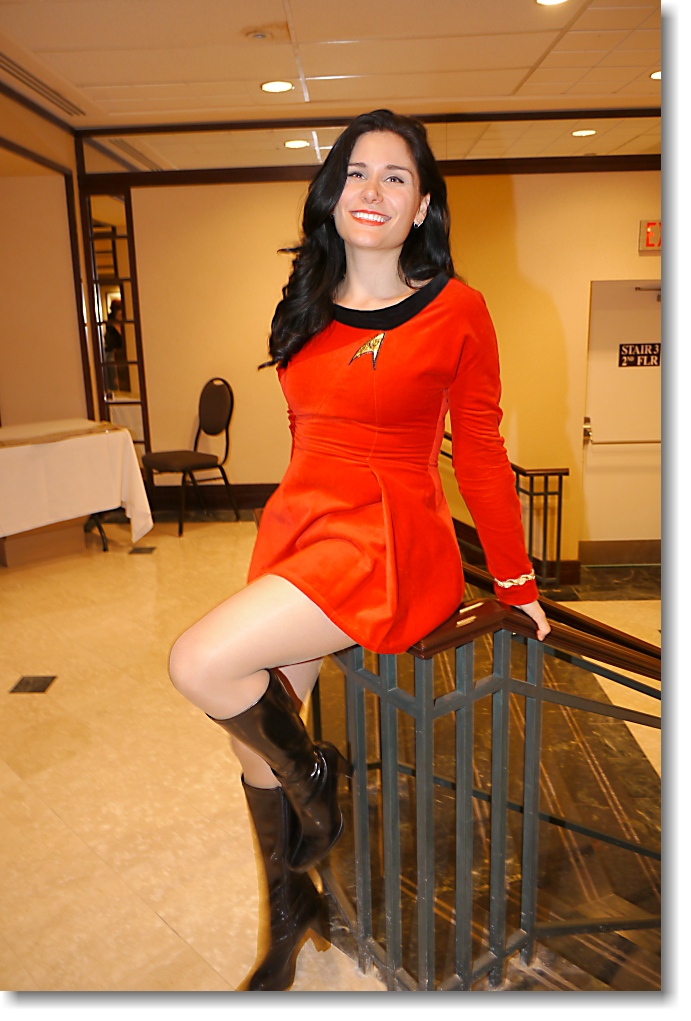 |
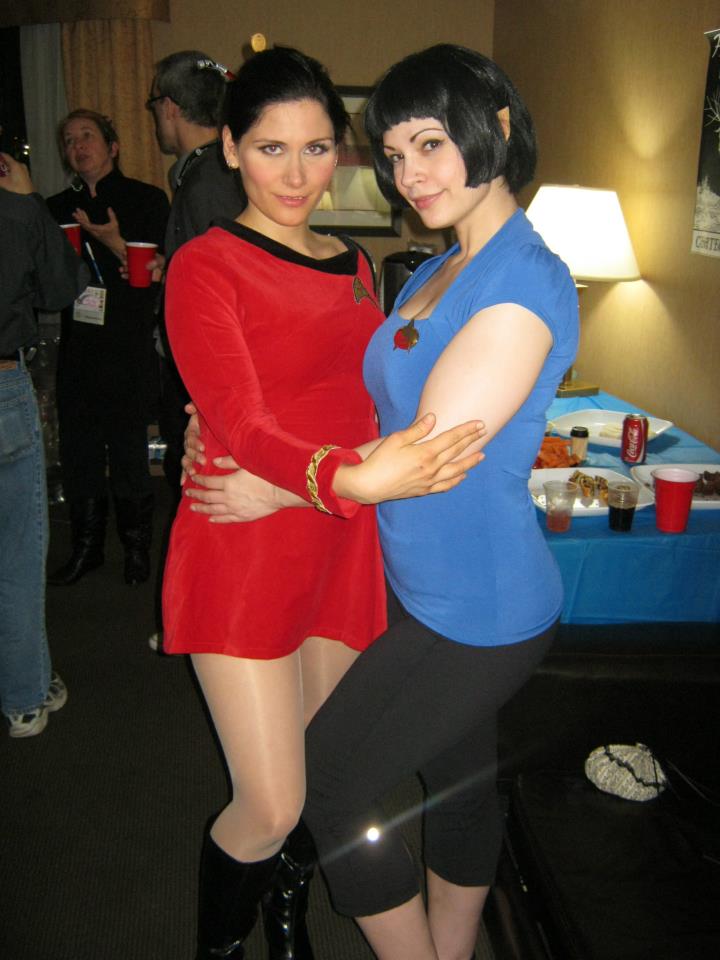 |
 |
 |
Source: Star Trek TOS / Deep Space 9
2011/2012: Polaris
I have wanted a TOS uniform ever since I saw that episode of DS9, Trials and Tribble-ations, where Dax and Sisko went into that infamous episode of the original series.
The pictures that are up are of version 1 and verison two. Note that they are entirely the same! The first met with a sad fate on it's maiden voyage at Polaris 2011. A friend tried to abscond with me, and as she pulled my arm over her shoulder I didn't have enough time to voice the warning in my head "velour doesn't stretch". That is now my battle-damaged red skirt costume! I love recycling!
That being said I just think I should make it clear that this has to be the most godforsaken pattern I have ever come across. There are so many seams across the body – the pleat in the back makes no sense at all – and the worst part has got to be putting the damned zipper in! The zipper …*shudders*…it was not a good scene.
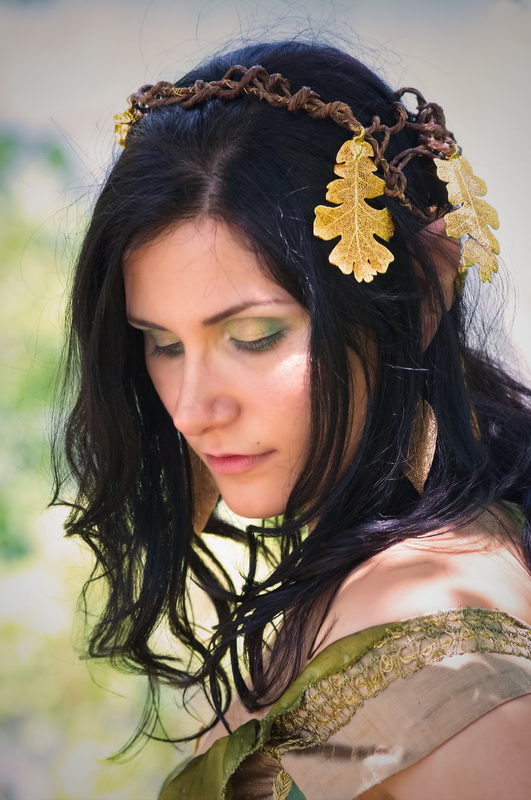
Dryad
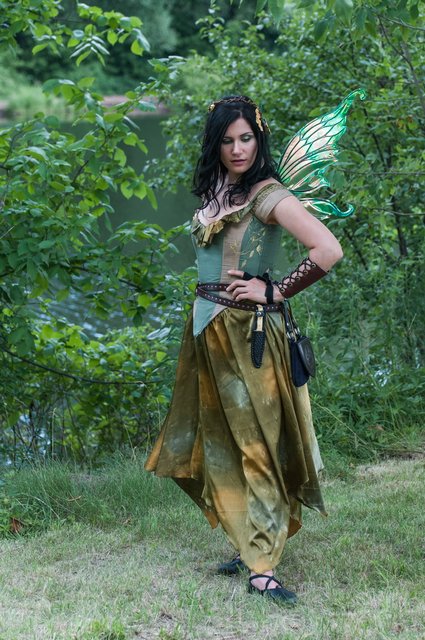 |
 |
 |
2012: Faery Fest: Enchanted Ground
This costume has led me to believe that all things have a purpose. Apparently the purpose of this was to doodle in gold all over the side of the bodice. Every so often I do free-hand swirls all over swatches of fabric to keep my hands busy, and this is what it usually looks like. I'm pretty happy with how it turned out! The best part about making original creations is that you can keep adding to them – there's really no end to what you can do!
This costume all started with the headpiece. I had found some gold-plated oak leaves at a gift shop and thought they were so beautiful that I had to design a costume that would allow me to wear as many of them as possible! Don't ask why – sometimes I'm just neurotic about shiny things. The headpiece is made up of Brown straw wrapped jeweller's wire that I wrapped in places with gold beading wire. It was then coiled around itself into a loose net and every so often I wove leaves and acorns into it. I have to say it was very hard on the hands and without two pairs of pliers I couldn't have done it!
The skirt is made out of some crazy irregularly dyed fabric I found at Fabricland. The bodice is silk with steel boning, pieces of gold-plated leaves, gold embroidery, and metallic lace trim.
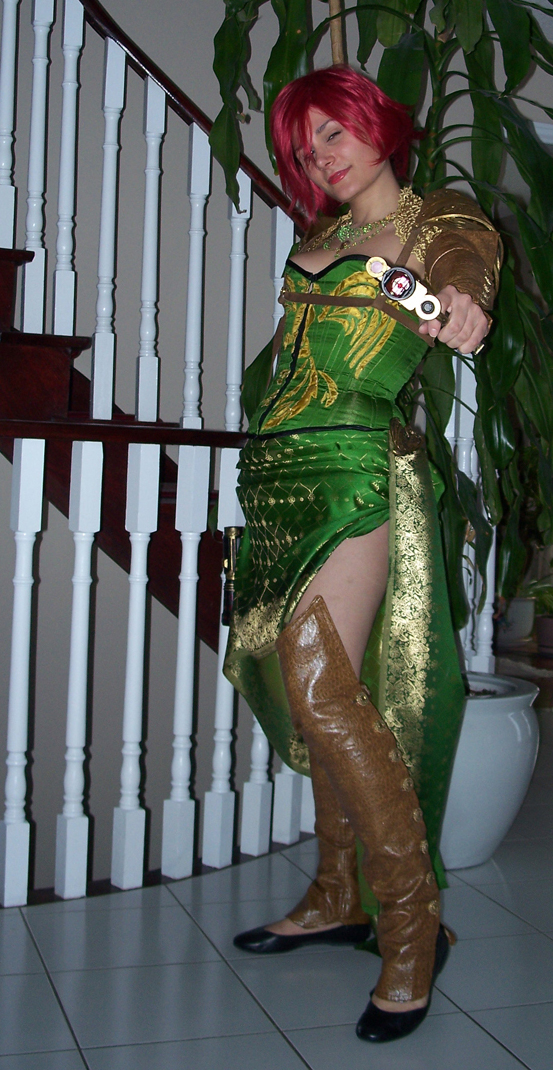
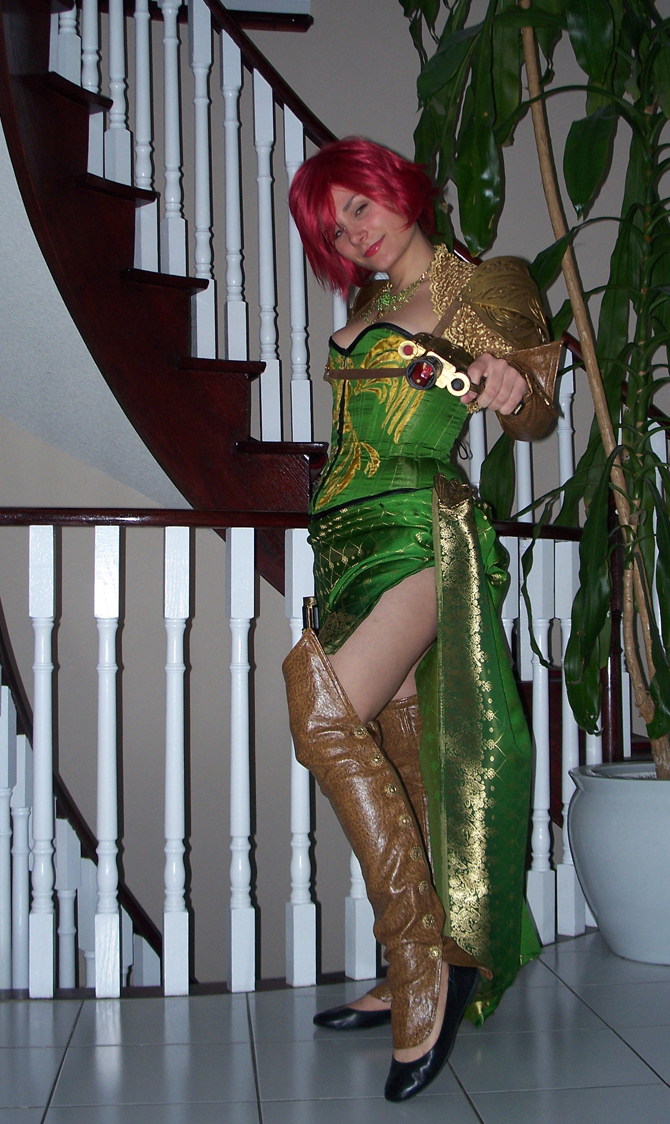
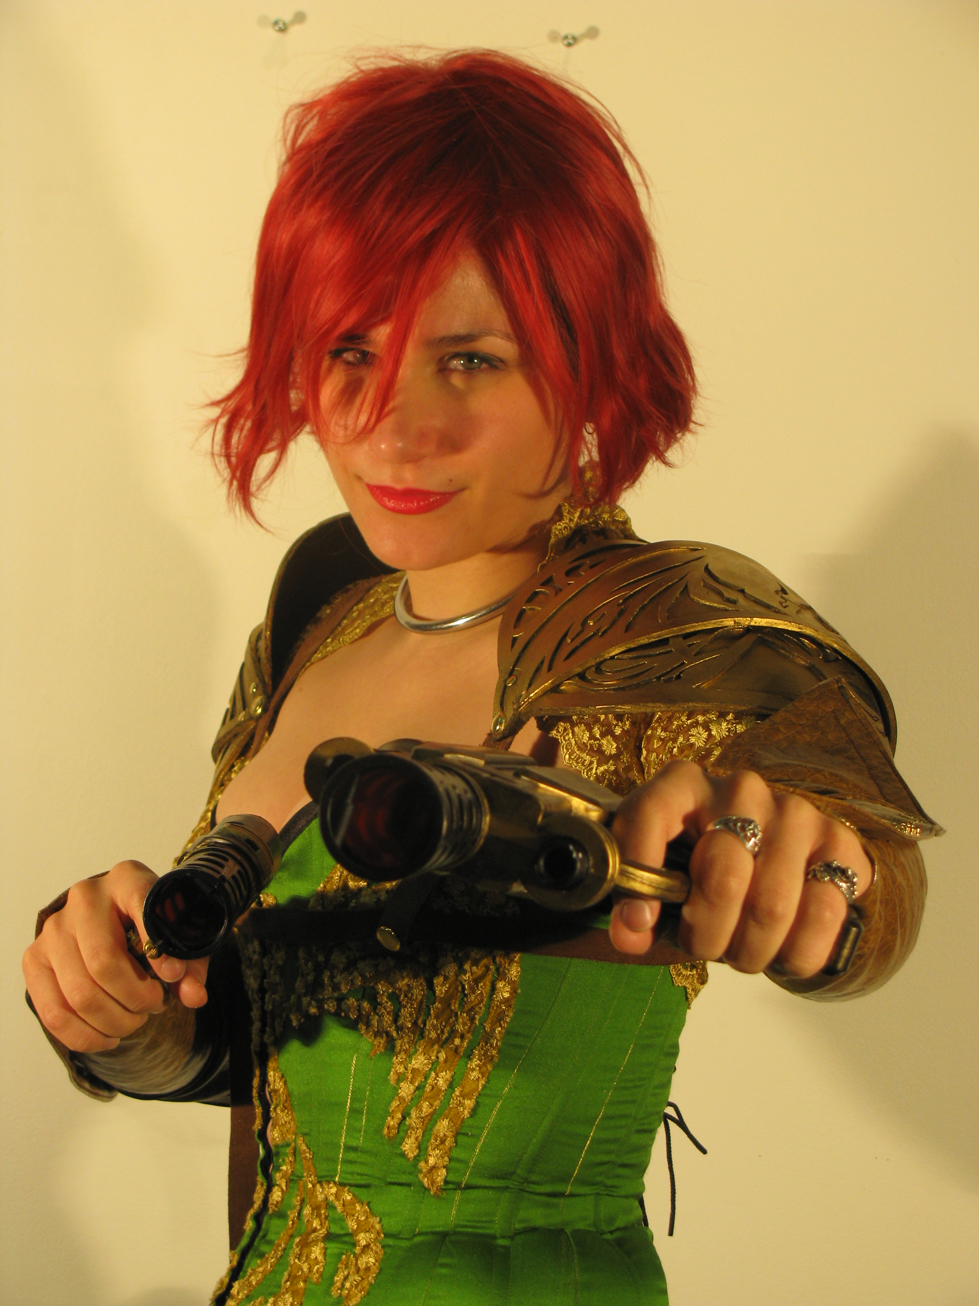
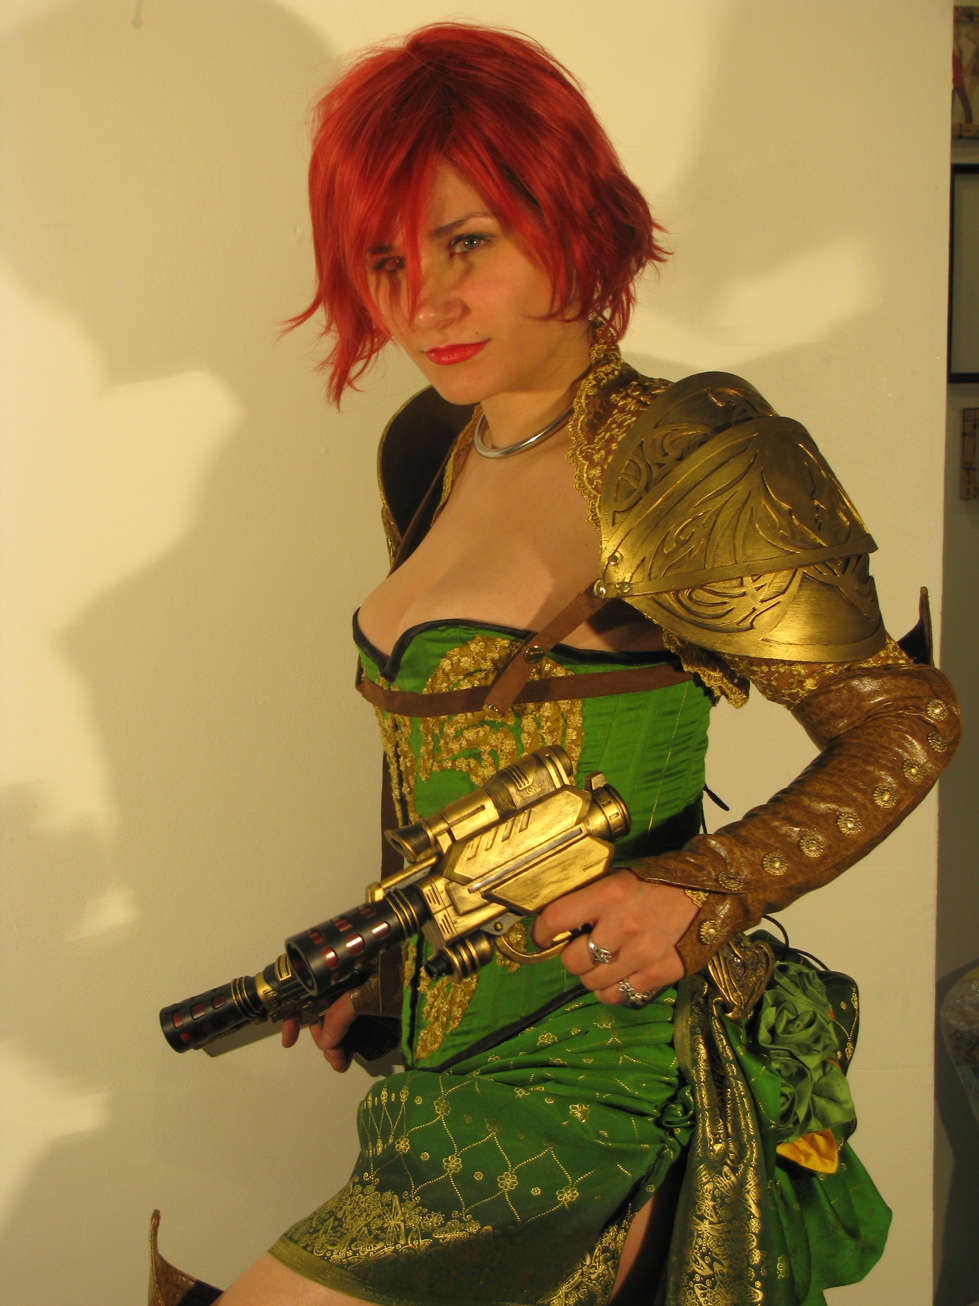
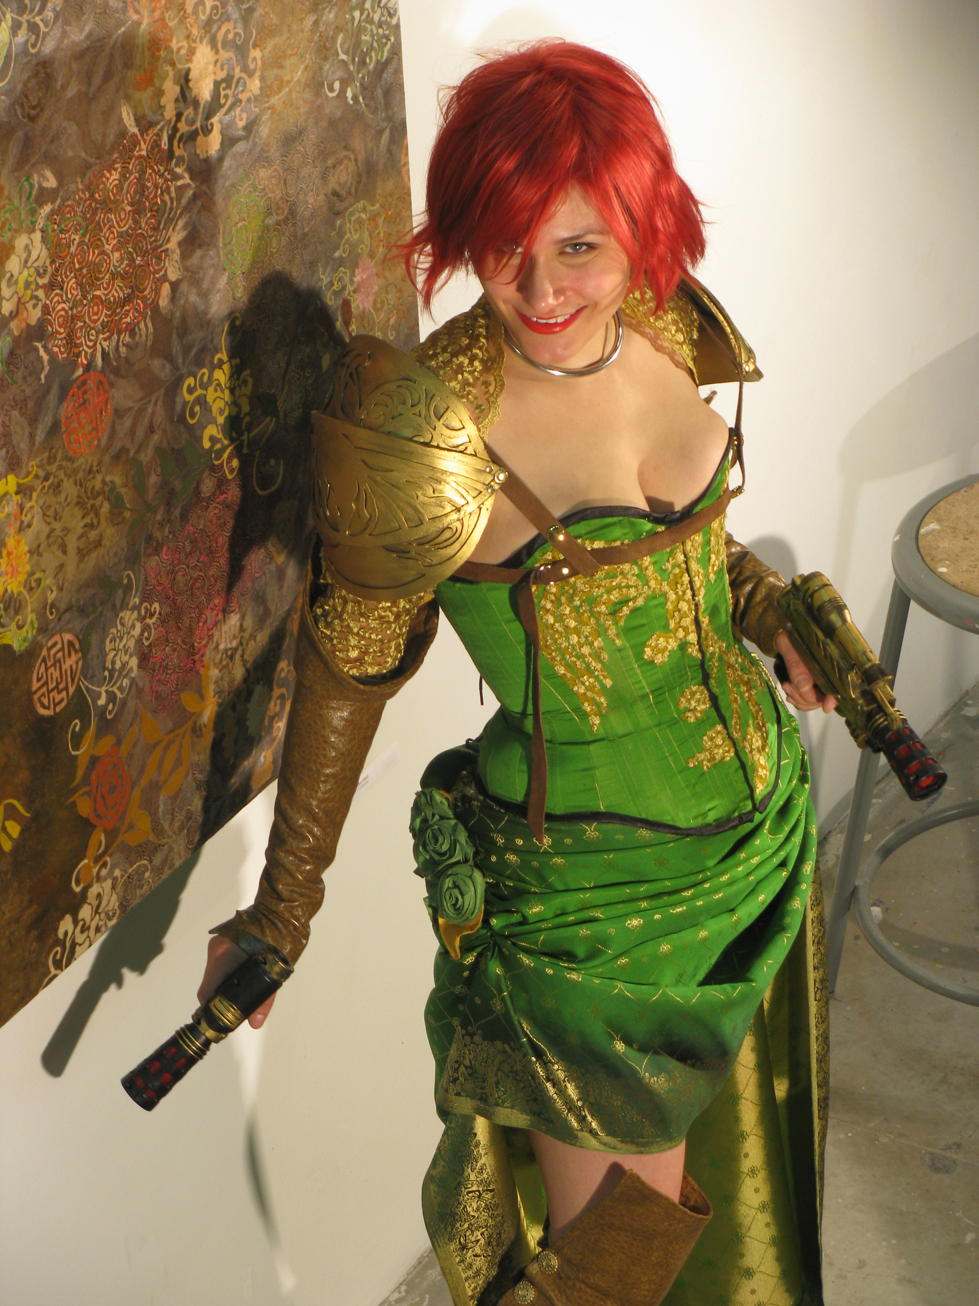
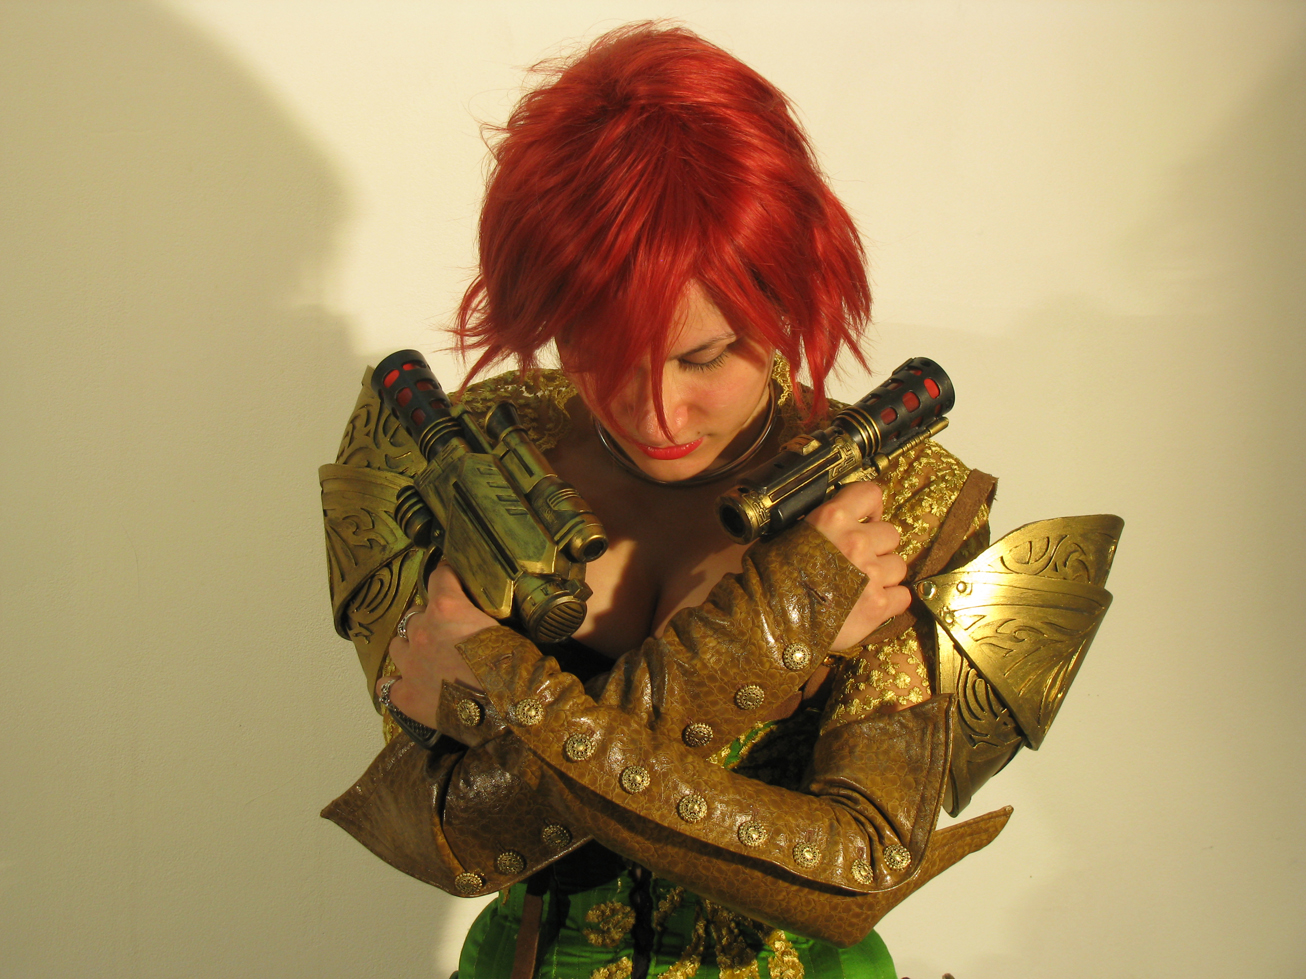
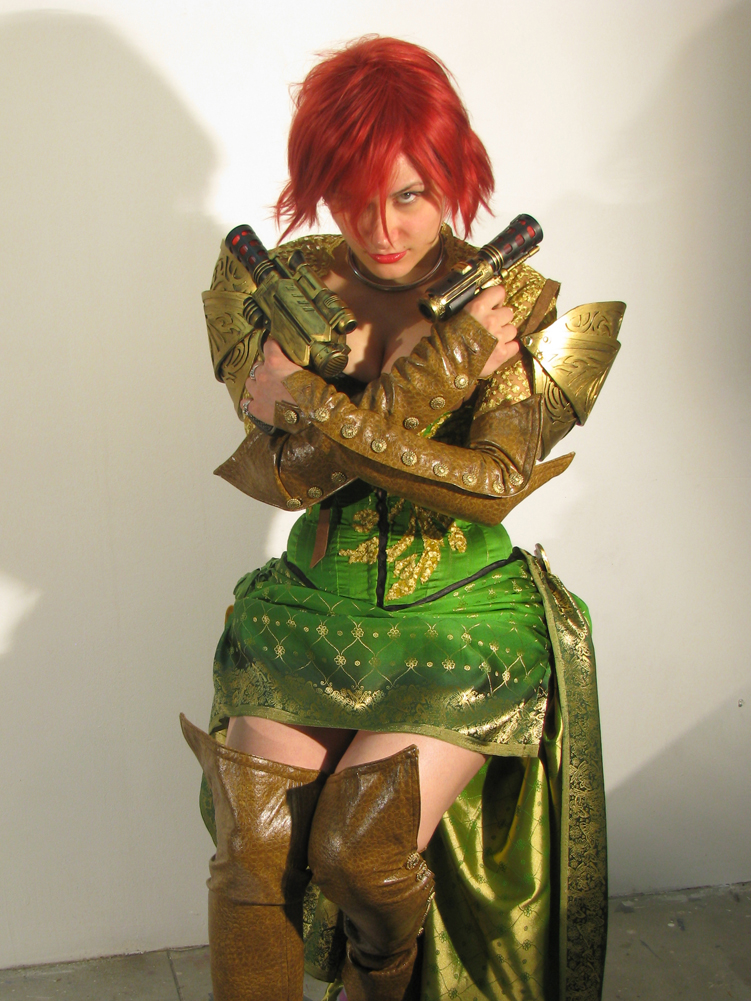
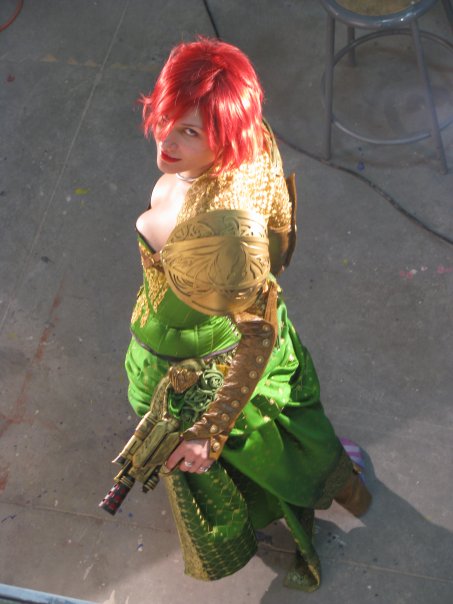
The Gunslinger
 |
 |
 |
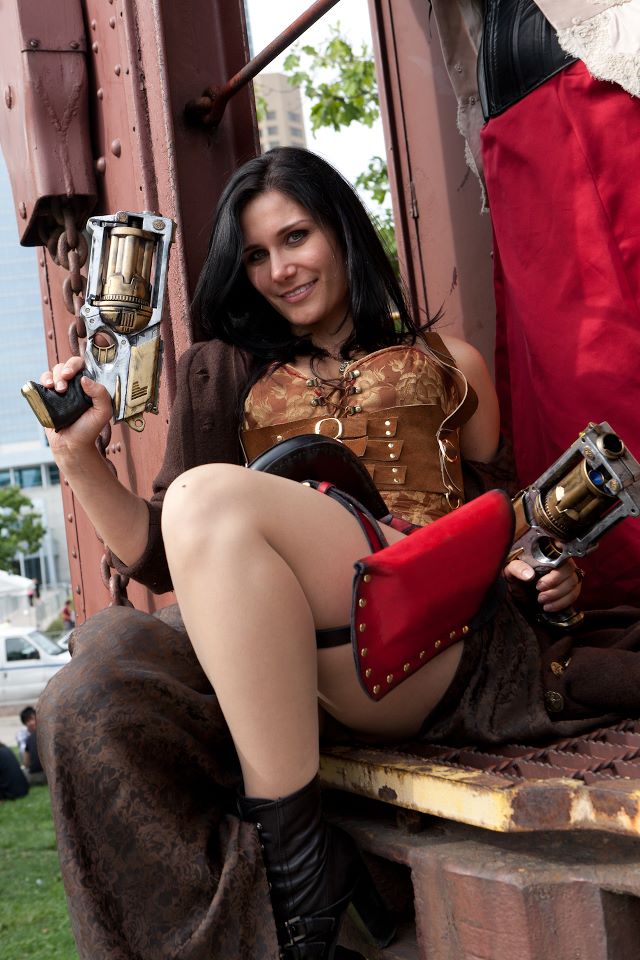 |
 |
 |
 |
 |
 |
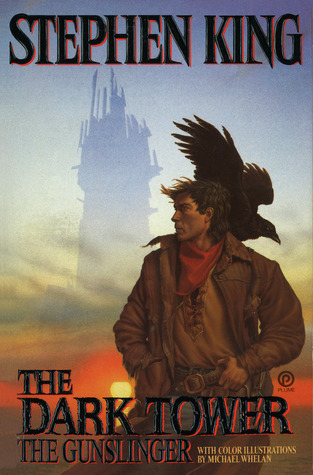 |
Inspiration: The Gunslinger (Stephen King) & Iron Kingdoms (Pistoleer)
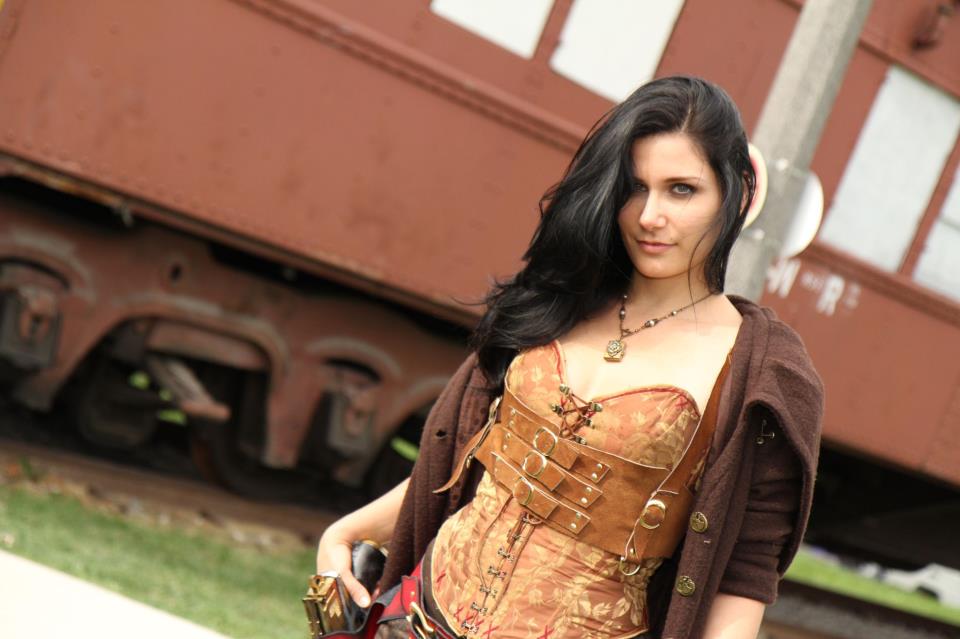
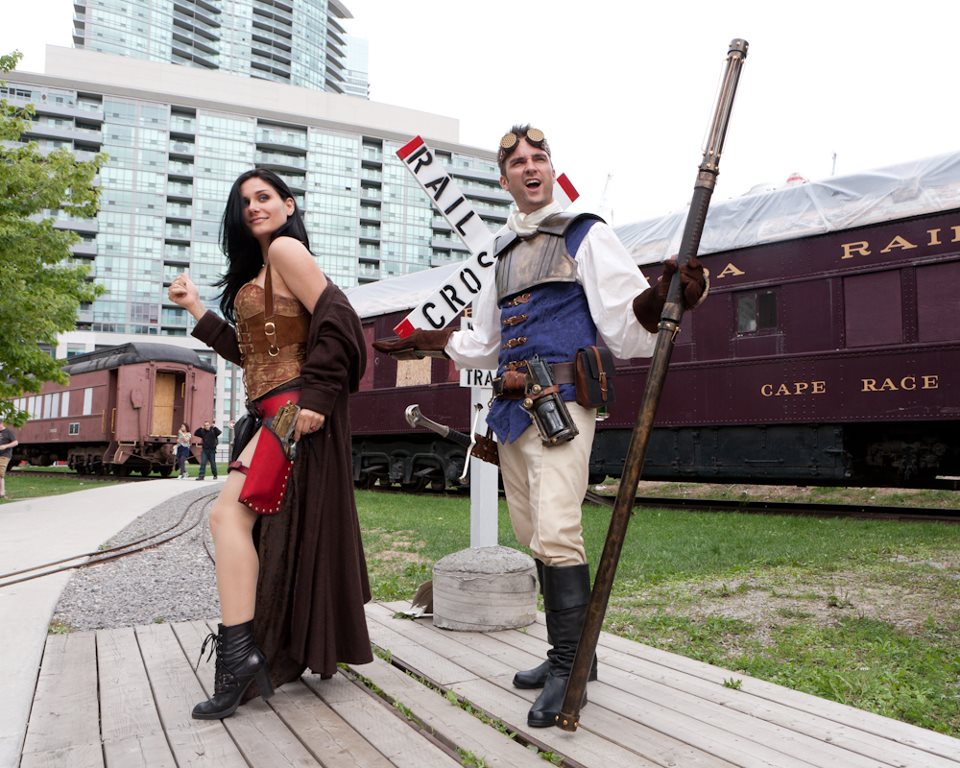
This costume was a lot of fun to make! Like the Dryad I just kept adding bits and pieces to make the costume more interesting.
The bodice is the same pattern as Catra's but finished in a completely different way. In the front it has a row of speed laces and large hooks that had to be sewn in individually. The harness worn over the bodice also has speed laces down the entire back and random buckles and rivets hold it together. It was made from a scrap piece of suede that I inherited from someone who didn't even know where it came from!
The coat has a massive hood that almost becomes a shawl when it's down. There is lacing at the shoulders and moulded brass buttons that look like watch movements. Its outer shell is boiled wool and the lining is patterned silk.
The holsters were made from a gun rig pattern I found that I altered to fit the Nerf Guns I has re-painted and embellished. They were dyed stages and dry brushed around the edges with black.
*side note: there are many places online that give tutorials on how to re-paint Nerf guns – don't forget to sand them down a little so the paint has something to adhere to. Also, remember to sand down the nerf Logos so you can put something else in their place. It looks cleaner in the end*
The skirt is a pattern from Harper's Bazaar.
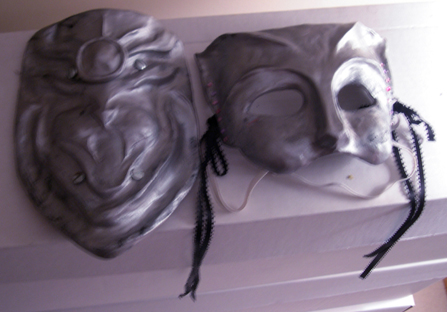
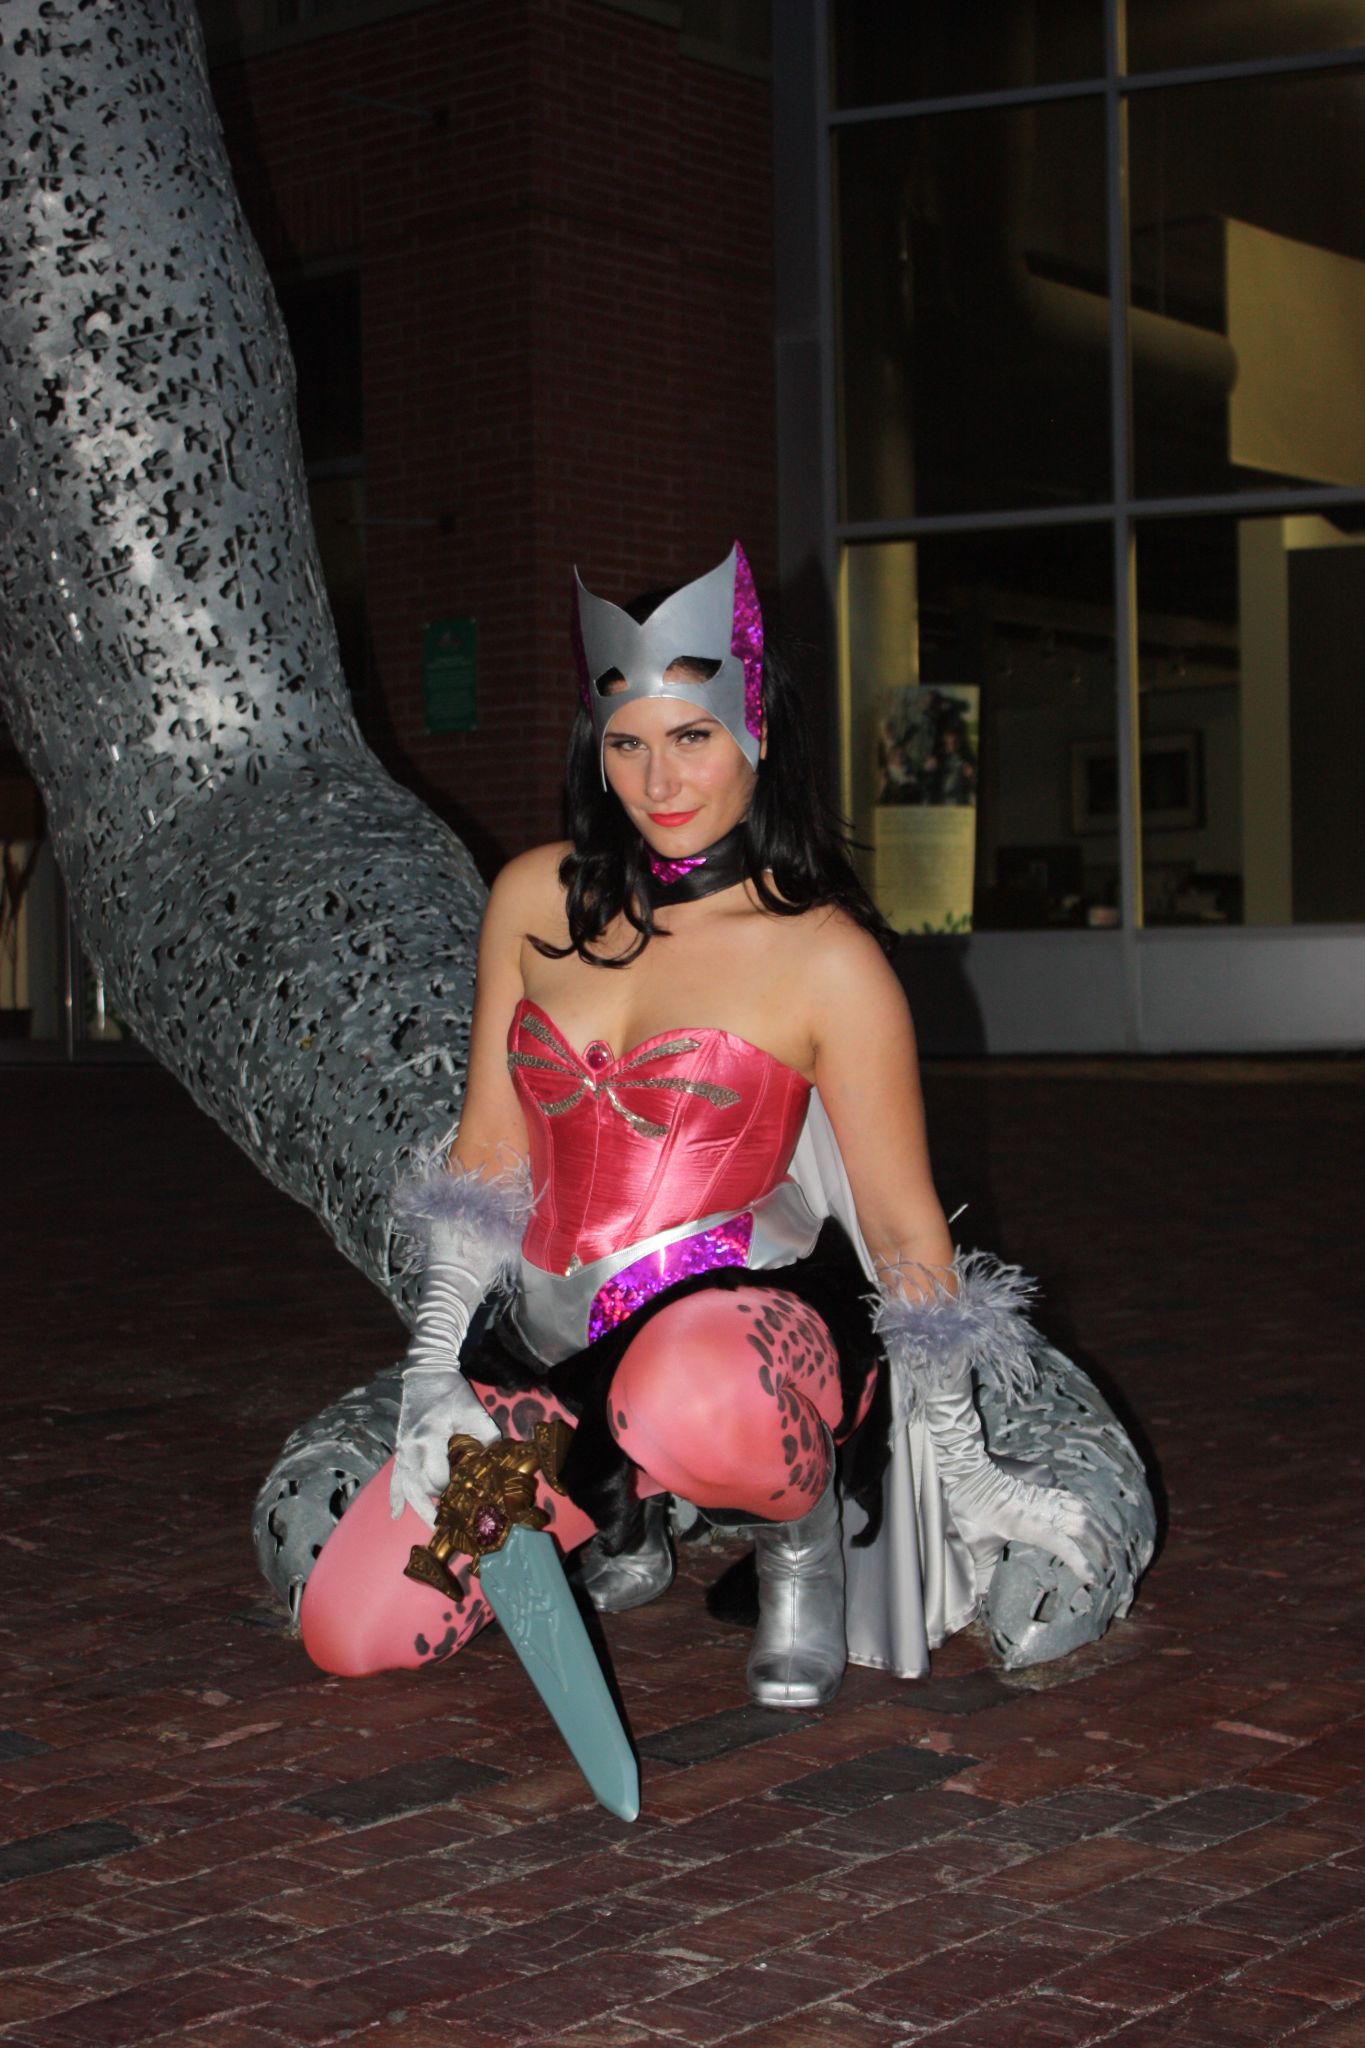
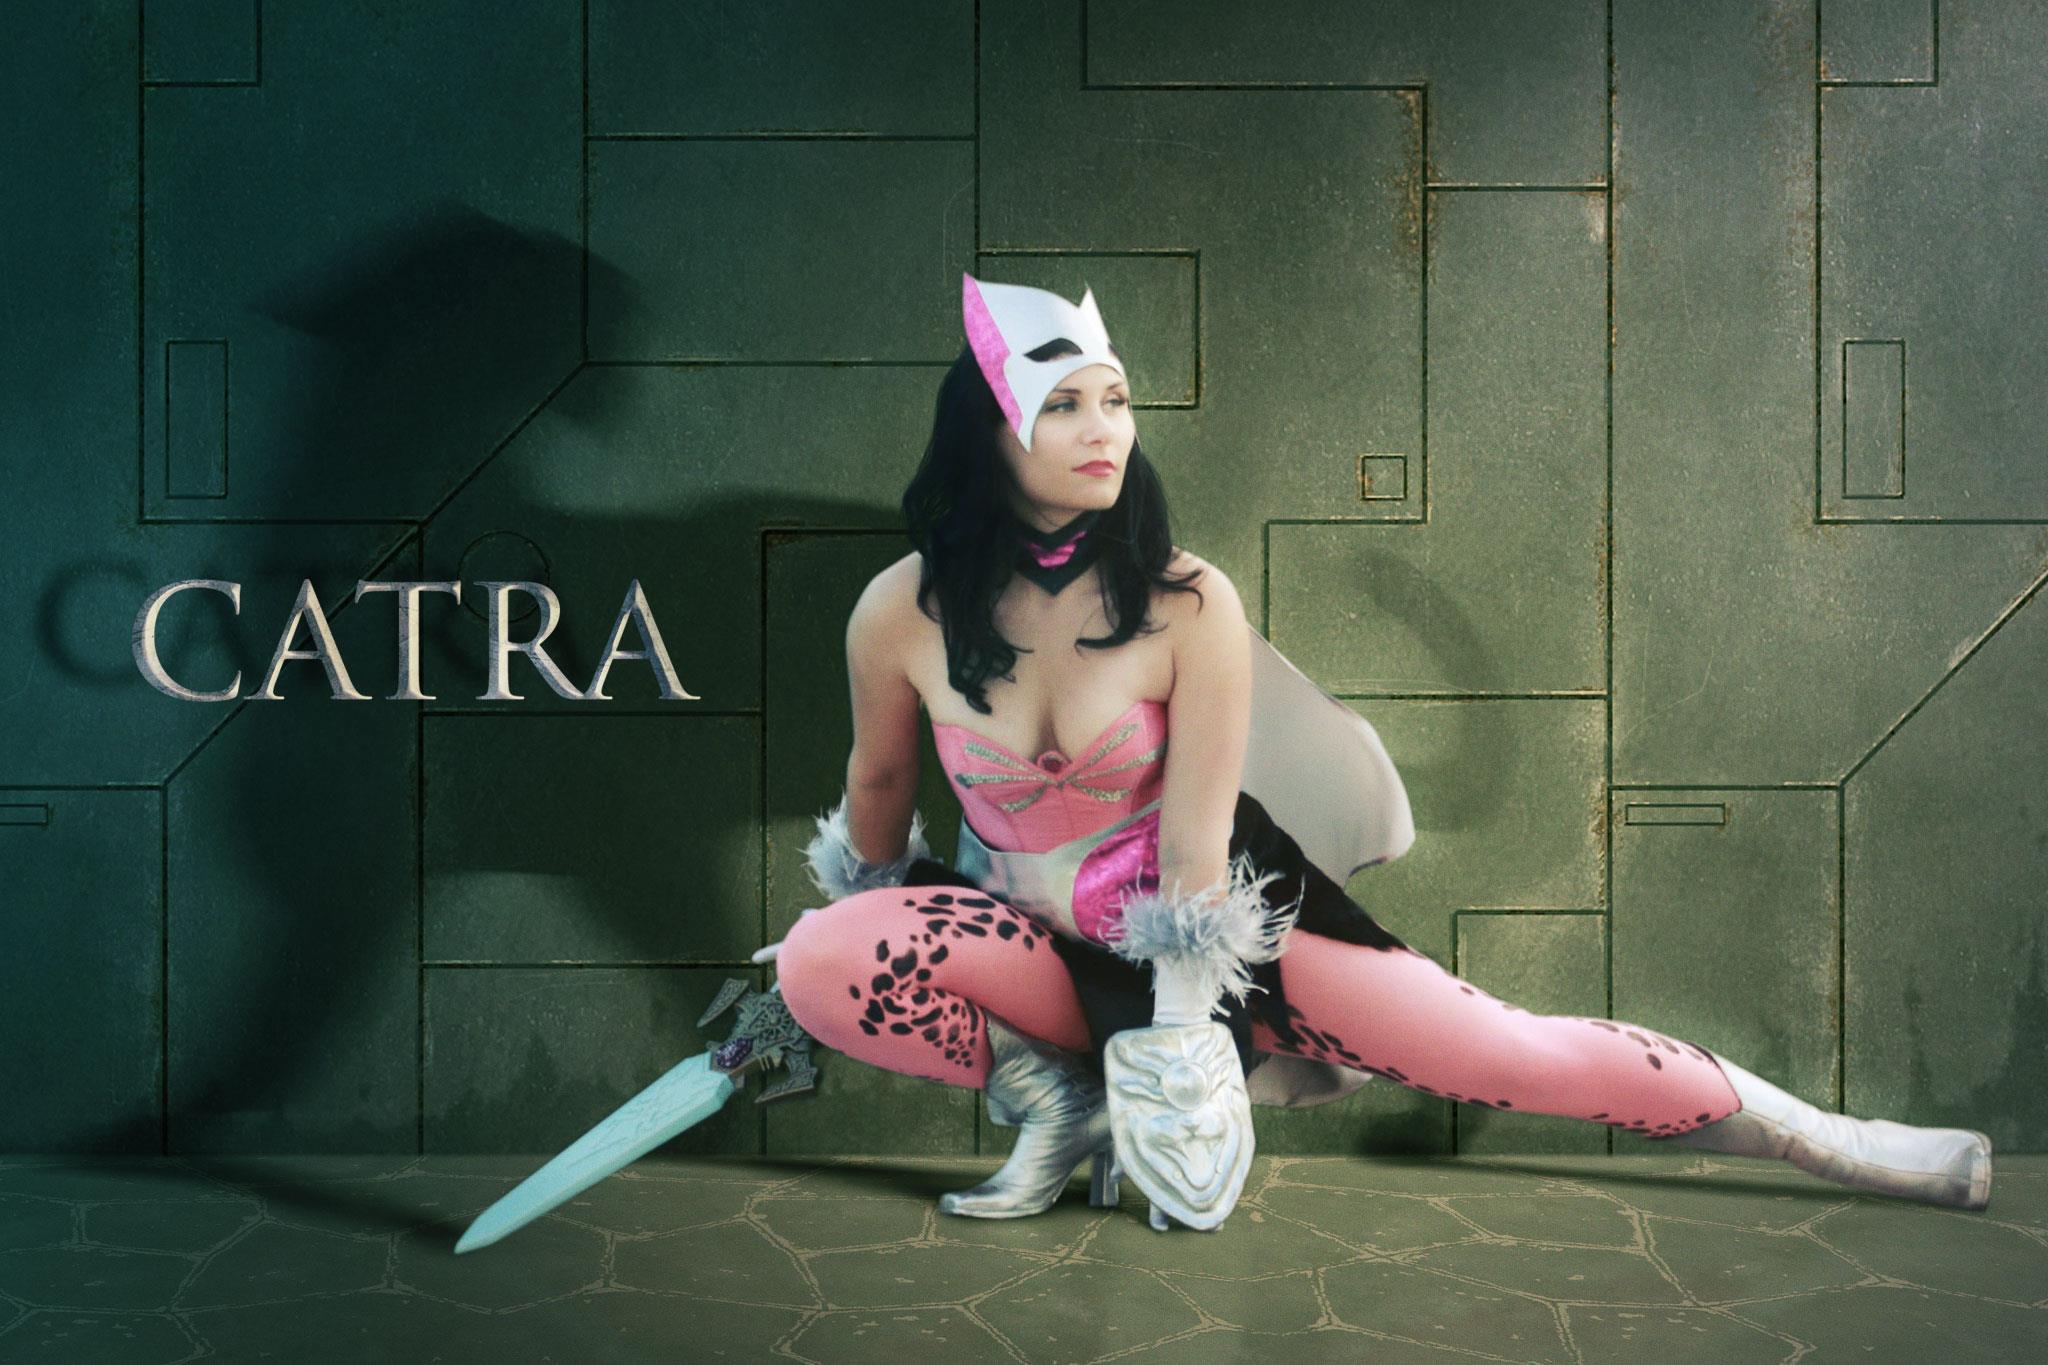
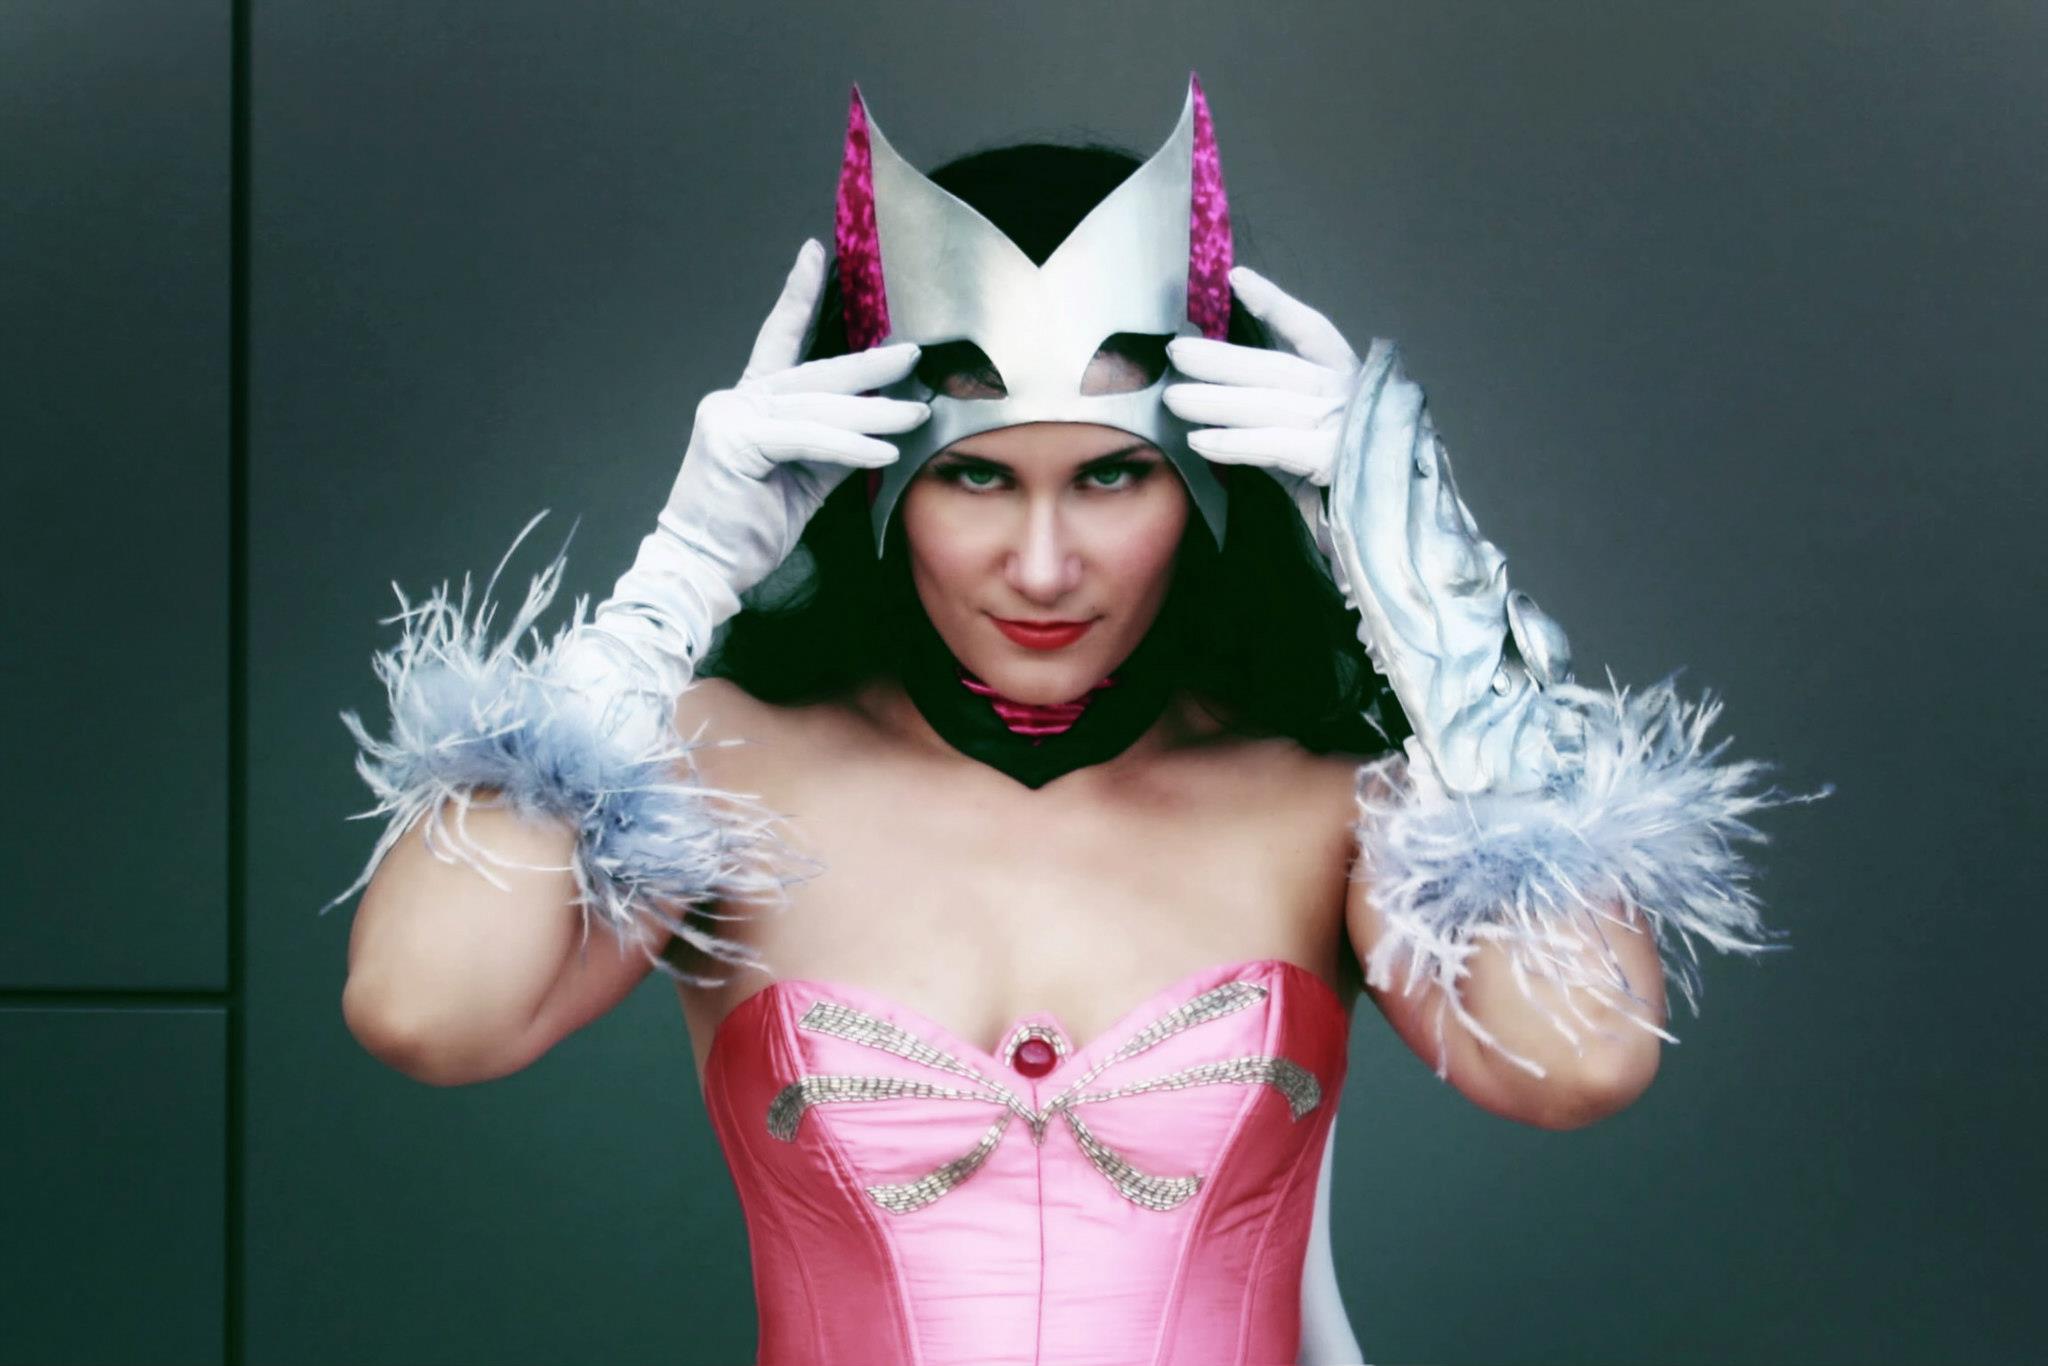
Shower Power Catra Mk2
 |
 |
 |
|
Source: She-ra: Princess of Power
2012: heman.org
I never thought this costume would again see the light of day but apparently the one picture of it on this site sparked a bit of a following on He-man.org ! They tracked me down and asked me if I would wear it again for a photoshoot for their website. How could I refuse?! The old costume wasn't up to my standards so I had to fix up/re-do a few things. I had always wanted to finish the costume and I had even found some holographic pink fabric that reminded me a lot of the toy.
The mask was made with two layers of heavy interfacing and one layer of metallic pvc all sprayed with copious adhesive and laminated together. I think the result looks a hell of a lot more like the toy.
The shield had broken pieces off over the years so it needed repairs and a better paint job.
The cape and skirt were created from patterns I found on heman.org. They actually have a section of patterns for clothing for some of the more rare figures – it was all kinds of helpful!
Photographer: John Atkin
Editor: Ali Roumani — with Needlegal and Ali Roumani.