 Annihilation
Tree of Life...of Death!
By Koala (Plantman)
The chapter starts off at school, with the gang discussing how Yai isn't back from the hospital after a week. They're off to go visit her while Lan stays and cleans the classroom. I guess being an N1 Grand Prix finalist doesn't mean he gets exempt from chores. After the cutscene he receives a news mail on how 3 chemical plants were recently destroyed by the other kinds of plants. Hmm, that sounds just unusual enough to be obvious foreshadowing.
Obligatory new chapter optional stuff: Drop by Higsby's to check out his new Chip Order system, a great way to get new codes for old chips, or any chip you got Library data for from a link with someone else's game. Nothing new at SciLab besides two new easy jobs on the Request Board. In the second area of the Zoo there's a boy that's lost his camera. Talk to him then check the Gorilla sign at the entrance of the area for the camera. Give it back to the kid and he gives you another one of those Error Codes. Go to Ura Inn and you can now jack into the lion's head waterspout in the bath to get a Fire+30. This comp is also involved in a few little mysteries.
1. First the water heater program and now a bath oil inserter? Yeah, it's not a real hot spring at all. Not much mystery there.
2. A curious amoeba-like virus known as ???? can be encountered here. You don't win anything except Zenny, but how curious!
3. A teleporter to that one spot in Yoka2 you couldn't reach before. You can now talk to the seemingly stranded navi at regular size. Turns out he's not too concerned about being stranded, moreso about hearing jokes...okay then.
On the second floor of the TV Station, there's a woman that'll trade you Recov120 S for the WideSword C that you got from a previous trade. Yep, it's one of those trading chains. She's the second of five steps that'll lead you to a much rarer chip. Just at the end of the hall there's also a panel you can jack into for a RegUp1, a locked pink Atk+1 NaviCust part, and another Gambling game with which you can win up to 40500Z and a StepSword H that's actually StepSword L if you can guess the correct of three panels four times in a row. The odds of that happening are 1/81, worse than the previous game's odds of 1/64, but when you consider both numbers work out to just over 1%, the difference doesn't seem that big after all...Inside the Editing Room, you can jack into the computer on the left, get an HPMemory and locked Jealousy J, and find a teleporter to a small portion of Undernet6 guarded by Bubbleman's Security Cube. Beat Bubbleman's ghost and you can find...an empty platform right now. Come back later. Finally, go back to Hades Isle. Inside the mountain you can find people with copies of all those folders you had to use during the N1. Up the mountain you can jack into the right gargoyle statue and pick up a WeaponLevel+1 NaviCust part and encounter more mysterious "????" enemies, then go through the teleporter to an isolated platform of Undernet2 with a Bug Trader. This guy has a Giga Chip on sale for 200 bugs. Start saving because you're going to need that bad boy eventually. Man, what's with all the jackins that unexpectedly connect to the net all of a sudden?
That's the real world rounds, an on the net? Well, new message board posts as usual. Desertman's ghost can be found in Beach1 on the large central platform, to the right of the patch blocked by the hospital security cube (hard to explain, just check the map from last chapter). After you beat him there, his beta version can be encountered in the sandy old TV set in the room at the Inn.
 |
| Lifting it out makes about as much sense as putting it in the hospital to begin with. |
Talk to the receptionist to find out where Yai is, then head to the elevator. She's on the 2nd, but go to the 3rd floor to find an HPMemory hidden in the tree. Then it's down to the 2nd floor and through the last door down the hall to meet with Yai. She's fine, but thirsty, so after jacking in to her bed to grab a RegUp2, get some tea from the vending machine downstairs.
While at the vending machine, a nurse will ask Lan to help look for a kid in a wheelchair named Mamoru. Head outside to the beach to meet the kid, who turns out to be a fan of our heroes. Talk to him for a bit and he'll return. Now go back to Yai's room and deliver her tea. She sets it aside for later so she apparently wasn't that thirsty after all. Why that little... Well after a little bit more talking Dex leaves awkwardly, almost like he's hiding something dramatic, and then Lan heads off as well.
Now return home to find that Lan has a guest waiting in his room; Tora from the N1. Tora's living the dream, seeing the world, studying up and getting stronger, but he's going to need some funds and figures Lan is the perfect mark to hit up for "donations" as he's bumming across Electopia. Lan isn't quite so generous as to help this mooch he's barely just met for nothing, but Tora has an interesting proposition: he will reveal the secret of Chaud's awesome NetBattling prowess. Now technically Lan has beaten Chaud several times already over the course of the first two games (and Network Transmission) and has no reason to feel threatened by him any more, but according to the character descriptions Chaud is still the main rival that Lan tries desperately to prove himself against, so all those victories didn't count and he really wants those secrets! So Lan'll have to do a few jobs for Tora.
The next morning Lan gets a message from Dex to meet him in the park for something important, but after Tora butts in for a battle with Gutsman, Dex just leaves awkwardly again. That was pointless. Now to help Tora. Go to SciLab and check the Request Board. You need to do the four jobs that are marked for Tora in any order. All four should be easy and you'll get some okay rewards from most of them.
Friendster: The client is at ACDC Park. He needs to find an old friend and gives Lan a stub. Go find the "hey" navi past the first compression rail in Yoka1 to learn the op's location, then head to the zoo and talk to the first scientist you see beyond the gate. Turns out the stub is part of a map they buried as kids...buried a map? Hope they marked down the spot they buried it on another map. Now tell the client and receive a RegUp3 and Tora's money.
Bring in the Double: Head to Beach1 and talk to the Official Navi in the lower area. You'll have to do 5 virus battles in a row - shouldn't be too tough.
| White Version | Blue Version |
|
|
After the battles Tora gets paid and MM gets an HP Memory.
Riot Act: Talk to the Scilab guy in the DNN lobby. Some pissed N1 losers are spreading viruses all over the station and you need to stop them. They're Heel navis in 1.the van outside, 2.the board at the end of the second floor hall, and 3.the Netbattle console on the stage. They each release viruses when you get near them.
| White Version | Blue Version |
|
|
In the white version, try to take out the viruses before the Tuby messes things up. In the blue version, pack close range chips or ground-breakers to deal with the mole. Return to the client to receive Tora's payment and a Tally, which is needed later for breaking into the Undernet (or you could go explore it right now...).
*Title deleted because of crappy reward*: The client is in the Teacher's Lounge and needs to get some insurance data returned. Head to SciLab1 and talk to the Prog in front of the skull gate, turns out he dropped it in ACDC. Head to the school gate part of ACDC2 and talk to the purple navi there. He'll cough up the data for a Yo-Yo1 G. If you need one of those, go fight some Yorts in Beach Area. Once you have the insurance data, return to the client for Tora's pay and a SlowGauge *. Yep, crappy reward.
 |
| Just when you start to think he's NOT a jerk, he brings out the "your mom" jokes. |
Now it's time to head home and get some sleep. Though didn't you just get a Tally that opens up the Undernet for you? Plotwise, you don't need to be there for another chapter, so we'll post the maps there, but in case you want to explore the Undernet early, you can find 1200Z in Under1, a RegUp2 in Under2 (as well as a BlackBomb2 S behind a security cube if you've deleted Flashmanβ), and an HPMemory in Under3. Everywhere else is blocked off for now.
The next morning starts with Megaman waking up Lan, who is late for school again. Head for the classroom and talk to everybody...except Dex who is mysteriously absent. Once class starts, Ms.Mari finally unravels the mystery for you - Dex is moving. Everybody is shocked and Lan bolts off. Head over to Dex's house for an emotional scene. Despite everything Dex leaves, supposedly forever, but we never forget him...who was I talking about again? Well however you feel about Dex on a personal level, he took some important conveniences with him as well. Dex's house is locked so you can't jack in there. Bummer. Those missing Gutsman chips will be a problem too. Wouldn't it be sad if this really were the last goodbye? From a gameplay standpoint, that is.
Read the email from Mamoru asking for another visit then return to the Beach. If you go into the TV Station, you can fight Kingman's second version in the same spot you fought Tora the first time and win the Kingman chip.
Next, the hospital. Mamoru's hanging out on the beach again. He reveals that he's been living in that hospital pretty much his whole life due to a heart condition known as HBD (!!). Lan asks Mamoru if there's a battlechip he'd like, and the kid responds as you might expect if you'd talked to an NPC or read a BBS this chapter. He wants an ultra-rare IceBall M. When Lan offers to get one for him as a token of friendship, Mamoru rejoices himself up a heart attack. Megaman knows exactly what to do though, because years ago Hub died of HBD (!!).
Head to the third floor of the hospital, talk to the doctor at the end of the hall, and then return to Mamoru. They make it in time and soon Mamoru is doing better, but he'll need surgery. He refuses out of hopelessness, so it's up to our heroes to give him hope in the form of that chip he's been asking for.
 |
| Mamoru, you'll get your chip when hell freezes over. |
Once you get a couple (at least one for yourself as well as the one for Mamoru), reset your NaviCust how you like it and go back to the hospital to talk to the sick kid. After the touching scene of hope and courage, leave the room, go home, and go to bed.
Three days later and an email from the hospital informs us that Mamoru's condition has worsened and surgery begins right away. Go to Mamoru's room in the hospital and talk to him. The nurse will take him into the Operating Room on the third floor where you should follow suit. Walk up to the O.R. door and the tense waiting begins.
Lan's getting a bit impatient so you'll have to leave for a while. What's the worst that can happen? How about vines suddenly ensnaring the building? Go back to the 3rd floor and check the vines there. The nurse says the big tree (that really has no business growing in the middle of a hospital in the first place) is malfunctioning and the maintenance system is in the basement. Lan tries to go down further but the elevator's not budging. The last option the nurse offers is the emergency exits which are locked electronically. Locked emergency exits? Doesn't that defeat the purpose of emergency exits? Time to Jack In.
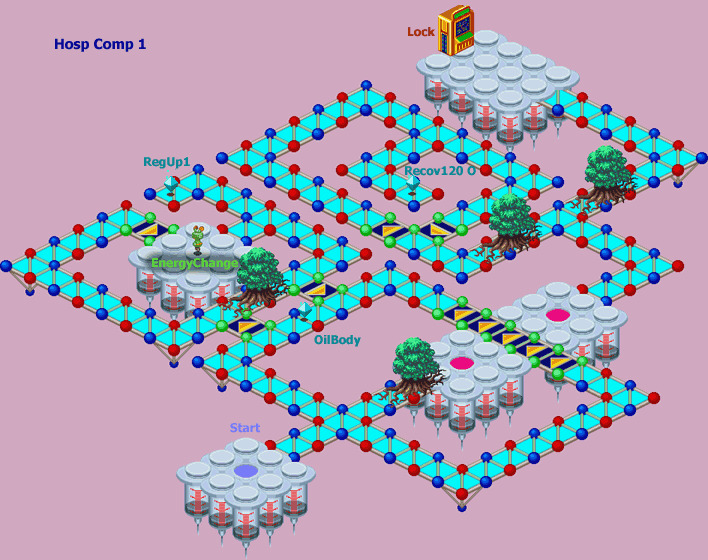
Looks like trees are making it hard to move around in the cyberworld too. Take the first left and access the OilBody Customizer part. You'll need it here as you'll discover shortly. Take the conveyer left and keep going until you find the Prog and the RegUp1 nearby. Talk to the Prog to get the EnergyChange Customizer part which is mandatory for this stage. Re-organize your NaviCust to fit in both of your new acquisitions. Now you can use your fire-elemental chips to burn down any trees that stand in your way like the one you saw at the start. In case you run short on fire chips, the Totem viruses here attracted by your OilBody will make sure you have an unending supply as long as you can bust them right and get their chips. You'll also occasionally get free throwaway fire chips throughout the stage. Now go burn that first tree, take the teleporter beyond, and follow the path to a fork. The left leads to a Recov120 O while the right leads to a terminal. Fight the Viney virus inside the terminal to fix the locks.
Take the emergency exit down to the second floor, the first floor is still covered in vines. Go to the room where Yai was staying and look out the window. Yep, he's going to have to jump. Lan dives into the ocean and swims his way to shore in a dramatic, action-packed sequence that can only be expressed via black screen with text. Once onshore, approach the basement door to find it's locked. The nurse still inside the lobby has it so talk to her. Now enter the door and proceed to the tree system.
At that moment, the culprit behind all this reveals herself. Anetta proves herself to be right off her rocker believing Lan to be a spy and that the hospital deserves to be destroyed. She's pretty much under the green thumb of her navi Plantman though. As she heads off to look for the TetraCode again, Lan stays so he can stop the runaway vines.
First take a left to find a GutStraight Q. Then go right and talk to the Prog and take the warp. Keep going up to grab an HPMemory. Go back and take a left. You'll notice that there is a locked door and another left and right alternating branch, those branches each have three patches of vines that you can burn with EnergyChange just like the trees by pressing A while standing on them. You could go gung-ho and burn all six, but to conserve chips burn only the top-right for a HeatShot I, the bottom-right for a healing panel that heals you for 100 HP, top-left for the lock trigger, and bottom-left for more HeatShots. The middle-left contains a virus battle.
By the way, there are a lot of HeatShot chips to be uncovered in this stage for EnergyChange fodder, all with the "I" code.
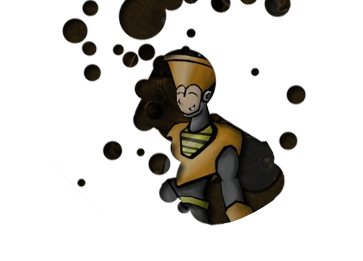
The door opens and Mega encounters Plantman. He announces his intentions to grab the TetraCode from the O.R. system, spelling certain doom for Mamoru. When Megaman tries to stop him, Plant attacks with a Goofball virus on a grassy stage. Delete it with some HeatShots, or other chips that can get through, over, or around its mask.
Plantman retreats and the tree system returns to normal, but we're far from finished. Take the elevator back to the 3rd floor and jack into the panel next to the Operating Room door.

Take a right for a HeatSide T. Collect some more Totem chips than proceed to start burning things. Burn the tree to the left and take a northwest to earn 1600 Zenny. Then head south and burn the three vines that'll give you HeatShots, themiddle-left for a Virus Battle, and the center for a healing panel. On the other side of the area, burn the vines on the right for the HeatShots and a Geddon2 W, then the vine with the warp point, and probably not the virus-infested vines surrounding it.
Now take the warp point. Of the six new vines on your left and right, the middle-left contains a virus battle, the lower contains three HeatShots, the upper-right contains two HeatShots, and the lower-right contains one last HeatShot. Burn the tree on the left for a SubMemory, and burn the tree on right to advance to the next area.

Here you'll have to get the switch on the left to open the door to the right half of the area. Only one virus vine to worry about and a bunch more with free HeatShots. That warp leads to an isolated platform with nothing there. What's the point of that? Who knows, maybe it will become significant later on.
Follow the new open path and burn down the next tree. Now you are on an eight-vine line. Head past the end and follow the path for a Barrier100 E. Burn the first from the left for three HeatShots, third from the left for a healing panel, fifth from the left for a virus battle, sixth from the left for two HeatShots, then the second-last for the warp to the next platform. Follow the path for a FullEnergy, then through the next warp to move on to the last area.
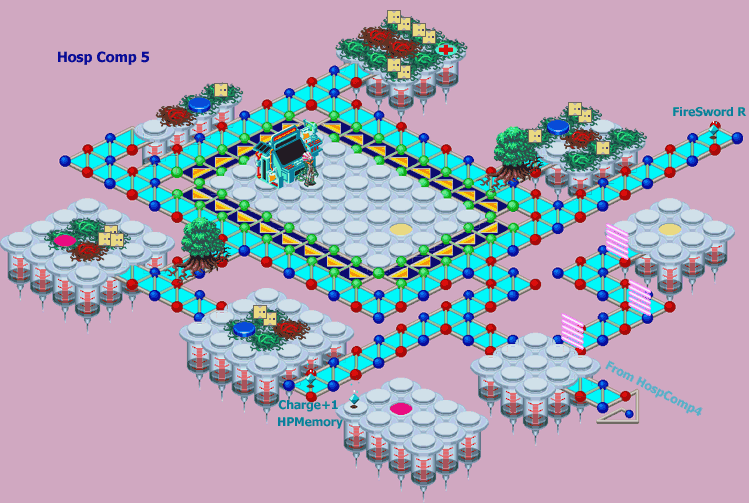
Now there are three doors all guarding the warp that leads directly to the central platform where Plantman awaits. Take the first left for the Charge+1 and then head far east for the FireSword R. Use the map to find and hit all the switches and grab all the free HeatShots. This time the hidden warp leads to an isolated platform that does have something useful on it: an HPMemory. Avoid the virus vines, or hit them too if you want the chance to win another fire chip. Heck, just burn them all. BURN THEM ALL!!...ahem.
With everything opened up at last, take the newly accessible warp to reach Plantman. The evil navi tells the heroes that there are four TetraCodes the WWW are after and he's just taken one of them. Now he will proceed to take Megaman out unless you delete him first.
WWW Navi Battle: Plantman.exe
HP= 1000
Speed= medium
Defense= normal
Movement= random teleport
Objects= Vine(40 HP), Flower(80 HP)
Attacks= Rose Thorns(50), Plant Weed(40+30x2), Red Pollen(confusion), Yellow Pollen(paralysis)
 | You probably have enough fire chips by this point to burn him to a crisp real fast...unless you used them all up to burn vines in this stage. His strategy mainly consists of firing thorns over and over, and occasionally sending a vine after you. The vines are basically the same as when you dealt with the Viney viruses, only now you're likely going to get pelted by thorns as soon as you're snared. When his health is low, he'll start summoning flowers which can make moving around difficult, so you should destory them if at all possible (they might be placed in the leftmost column, making the destorying complicated). Both the vines and the flowers can be nullified with strong enough attacks, so if you can clear them away, then you're just dealing with the thorn shots, and those are pretty easy to dodge. 3000Z for winning. |
Plantman goes down and tells Megaman they need just one more TetraCode. Once they have it, Alpha shall arise. Once Plantman goes boom, Megaman pulls a despearte gambit to recharge and fix the Operating Room system and long story short, Mamoru is saved. To Save A Life indeed.
Meanwhile, at Casa de Wily, our favorite criminal mastermind is in contact with a mysterious ally who could only be...HIM. HE apparently does not like humans though, which probably means HE is not human HIMself. How curious. We'll find out soon enough, as Wily is planning to pull out all the stops to get the final TetraCode and implement Cybergeddon.
See you then.
~Koala and Raijin