WALK THROUGH


Welcome to the Walk through Section. Here, some basic information can be seen about the game. Basically a step by step play through the game. It's not 100% accurate as I can't explain the levels perfectly. After all...they don't really exist. 0_o. But I tried to get into detail as much as I can. Anyways, enjoy!
POWER UPS
There are several different kind of power ups that can be gotten by Treasure Chests or by defeating bosses or certain enemies. Here they are.
Super Attack: A blue orb will be added to your Super Attacks. A full Super Attack will deplete one Orb. A regular attack will use up 1/4 of the orb. Remember a Super Attack requires one orb, and a regular attack will use a quarter of an Orb.
Health: The green crosses will add health to your life meter. A small green cross will refill a small amount of health, while a big one will refill about half.
Shield: A yellow icon will protect you from damage for about 30 seconds.
Team Attack: A purple icon will allow two Sinister Six Members to unleash a team attack. It usually combines two Super Attacks into one and does signifigant damage.
LEVEL CONTENTS
1. Level 1: The City
2. Level 2: The Forest
3. Level 3: Hardman's Bar
4. Level 4: The Warehouse
5. Level 5: The Factory
6. Level 6: The Cave
7. Level 7: The Trap
8. Level 8: The Base
9. Credits
STORY
Roll has been kidnapped by a mysterious villain, who plans on world domination. His army of dangerous robots are slaughtering the human race. Dr. Wily is in Jail. So who in the world could be behind such deeds. Play the game and find out!
WALK THROUGH
1. Level 1: The Streets
The city streets is a rather small level, and fairly easy. The
place to learn about everything, and you may as well
learn quickly, because if you don't, you're going to
get punished in the levels to come. Know your enemies,
too. It'll help a bundle.
First off, there's the regular sniper joes, which simply
come at you and try to punch you. They're not much of
a threat, usually. Then there's the gun-toting cannons.
The bubble bats will swoop down on you, while metools have at you with laser power. Most of these guys
are easy to despose of. The Green Sniper Joes will fire straight
shots at you. Approach these guys from above or below.
Never come straight at them.
Now, to start the level, you get a few of the lackeys
described above thrown at you. Simply pound them and
move on to the next screen. The first major place
you'll come up to is when the regular robots float
down with big pieces of rock. What you want to do is
get in their line of sight for about a second, then
dodge it by moving up or down. Get the rocks out of
their hands quickly, they know how to throw those
suckers. Beat them and continue on, destroying more
robots and you'll come to the second major point in
the level. There will be yellow Sniper Joes who will shoot their boomerangs at you from the right side
of the level. As soon as you see them, go straight to
the bottom of the screen as far as you can go. Once
you get close to them, they'll be easy pickens. Beware, as they'll still throw
their bommerangs at you if they're far away. Beat them, and
you don't have far to go to reach the boss...
Boss

Level 1 Boss: City Garage
Real Name:
First Appearance: Sinister Six: Lost Episode (1995)
Brief History:
In the Game: City Garage is by and large the weakest boss. He has some impressive
attacks, espcially when he morphs into the robot thing, but he'll fall pretty quick. He'll re-appear, apparently cloned, in
the second to last major stage, where a number of City Garages will attack as the mid-
stage boss.
Do NOT under any circumstances get close to the middle
of the wall at the end of the level, unless you want
your character to be roasted. City Garage will come out, and
taunt you. During his first form he jumps around a lot, and swings
his staff. What you do is you come at him from above or below, nail him with
a couple of attacks and back away before he swings. During his 2nd form he
transforms into a robot riding a wierd device. Hit him then get out of Dodge City
before he shoots plasma shots at you. Once he's done that, go
in and pummel him again. Back away when he's sucking you towards him. Wash, rinse, and repeat! It's
pretty simple to trounce him, onto the next
level, Sinister Six!
2. Level 2: The Forest
Ah, yes. This is the forest where these darned robots
are seen invading! Well, I guess it'd be time to
investigate this place further.
Starting off, some guys will come out from behind trees, and robot chimps will jump down and attack you. Hit them as they apppear and
what-not. Beat them around until you get to the first
teleportation hatch in the level. You'll go down the sewers.
Watch out for any of the yellow sniper joes on the line. Jumper Frog
bots will jump out of the water, so keep on your toes here. Rabbits are
also common down here.
They'll fire lasers at you with no remorse, but one
hit sends them to the scrapyard. Around the end of the
second section, you'll start dealing with flames
spewing out of some robot things in the ground. They'll
hurt your attackers, but they don't do much damage,
nor do they actually hit frequently, so don't rely on
them to defeat your enemies for you. Continue on until
you get to your next major point. Remember the yellow
sniper joes that were around earlier in the level?
Well, they're back...only they're blue, and armed with Water Cannons! Roam
freely, and take more hits. These things are a royal
pain in the ass, as they can easily and cheaply hit
you with a timed water move, knocking off two bars of health.
Soon after beating these guys, you'll come across a mini boss.

Miniboss: Bubble Bot. That Bubble machine from Megaman 1 is back. And it's ready to rumble.
The bubble surrounding it protects the machine from harm. You'll have to attack the bubble repeatedly
to make it go away. And then the machine is defenseless against your attacks. The Bubble Bot is pretty easy to
beat since all it does is bounce around the area and shoot lasers at you. The lasers are slow and predictable.
KO it to move on.
After your first mini boss fight, you'll encounter a ton of Snailers and
missile-spewing machines on the wall of the next
teleport hatch. Hit the Snailers from the front. Their backs are indestructable.
My best tip for the turrents is to get to the very bottom,
and jump-kick toward the turret at the very bottom. If
you miss, punch it once or twice and you'll knock it
out. Now, just sit in the spot where you blew up the
turret. No missiles will spew forth. There's a Treasure Chest here. But
it's desquised as a monster. Don't touch it unless you want to fight it.
You'll go up to the forest now. Those Chimps are back. Wipe them
out like before. Pretty soon, you'll get to a door, and
what is behind it? A few green and yellow Sniper Joes and two more of the
blue ones. Kill them all, and then move on
to the boss.
Boss
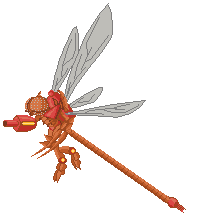
Level 2 Boss: Cyro Mantis
Real Name:
First Appearance: This Game
Brief History:
In the Game: The Insect Beast is simply what I've always called him,
until I realized he was yelling "Cyro Mantis!" instead of
a bunch of random roaring and unintelligable shiznit.
Well, this guy you should treat just like City Garage,
but keep in mind that this guy doesn't fall on his
butt and leave himself open. He tends to fly around a lot
and fires machine gun shots at you. So back off when he's
blowing off shots like a mad man. Jump kicks work, but only if
he doesn't open fire on you. For the 2nd boss, he's quite difficult
to take down, if you don't see his pattern. But he does indeed have one. Unlike City Garge, never play a
hit and run game. You can hit, but he'll hit you
before you get a chance to do anything to run. Just
use your Super Attacks a bunch of time to beat him.
It's not worth it most of the time to start a slugfest
with him.
3. Level 3: Hardman's Bar
OK, so we have to go to the Bar. Alrighty Dr. Light
we'll do it! Well, we have to anyway. The bar
isn't exactly a peaceful place, as you should expect.
It's mainly a big pain. This is most likely the first
point in the game you'll be having trouble with.
The main thing to know in this level is that the Sniper Joe have been replaced with more newer models. Fire Joes will spew fireballs at you from long range,
or they'll shoot a close range flame thrower. It's hard to
tell which they'll do. Either way it causes a fair amount of damage. To avoid
this, NEVER get in a direct line with these enemies.
Always come at them from above or below.
Now that that's been said, there isn't really a whole
lot to this level, really. The first major point in
this level are the fire metools that attack you. They're the
only ones in the game, and they're easily beaten if
you get up there and beat them down before they get
the chance to attack you. The second major point is
the midboss.

Midboss: Torchman. The robot master's mouth will open up, and
you'll get a bunch of fireballs, along with the attacking Torchman.
What you want to try and do is try to get close to the
Torch and pummel him. The little fireballs are a major
annoyance, but sadly, you can't do anything about
them. Occasionally Torchman will shoot balls of fire
from his arm cannon. They come suddenly, so it's hard to
dodge. After Torch is dead, the little fireballs will
go bye-bye as well.
Continue on until you beat all the
enemies near the exit of the bar. A cliff. Don't worry, you won't fall
off this cliff....That is, until Scorpion makes a
surprise visit and blows it up. You'll fall onto a frozen
place where some "snow men" (As I call them) will
attack. About three or four hits each will take them
out. Now, here comes the big bad dude....
Boss
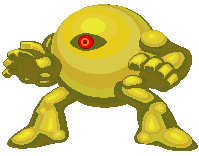
Level 3 Boss: Super Chaos
Real Name: Yellow Devil, Cyclops, Rock Monster
First Appearance: Megaman 1 (1987)
In Game: Don't go into the upper-right corner until the
lightning stops. Hey, who's that? It's Super Chaos! And he's
saying "Nothing can break me!". Oh, yeah. He can shoot huge annoying
lasers from his 'eye'. As if his fists aren't handy enough!
Well, if nothing BREAKS Super Chaos, then I guess
something can knock him down. Use your Super Attack
for the first time, and knock him down on his flabby
ass. Now, get up close and perform a few combos on
him. When he falls down, get away from him. Repeat
this about three or four times and he's history. If
you get low on life, try to hit him and run, but he's
tough to do that with, as he either hits you or throws
you before you can escape, and he can do some good
amounts of damage to you. Watch his morphing hands as they
can morph into various types of weapons. Ouch! Don't get comfortable,
this match was easier than the last one. But He'll be back...
4. Level 4: The Warehouse
Now it's on to some broken down old warehouse. Yippie. The fun just'
keeps on coming. Those annoying Rabbits are back again. And they are
accompanied with Spit Bot things. They walk slowly but fire deadly acid
from their heads. Despose of them and move onto a tricky part of the level
Traps have been set, and they fire off beams of hot, thick electricity. There
are no enemies here. Not suprised as this is a death trap! You'll have to navigate those
beams very carefully or you'll get fried. Keep in mind that some of them have set patterns, so
take note. After you pass those annoying things, you'll come across yet another new Sniper Joe. He's purple and he's packing some heavy artillary. Bombs. So watch
where he tosses them, they explode after different times. So be careful.
During the Sniper Joe onslaught, you'll be confronted with train-like robots that race
towards you at super speeds. If you get hit by one, you'll be sent rearing backwards, so
be sure to remember where they pop out. They tend to come out from the same areas, so they
can be pretty predictable.
Now it's time for more traps. This time Gator Traps are set all over 3rd area to note. They
appear from their holes and snap quickly, so don't stand on their traps for to long, or you'll get
a nasty bite. They inflict quite a bit of damage. These traps thankfully aren't as difficult to
navigate.
More Pepi's, and more Runners will appear, followed by more Bomb Joes. Bubblebats seem to love hiding
out here, and Stealth Metools are clever enough to attack you in swarms. Be on your toes as this is
a heavy enemy infested area. Before you get to the boss you have to fight a new enemy. Laser Eyes. These guys
can be a pain as they have a lot of HP, and their lasers are thick and very damaging. Using your
Super Attacks can prevail though. And now it's time for the boss...
Boss

Level 4 Boss: Buster Rod G.
Real Name:
First Appearance: Wily Wars ( )
In Game: Really annoying. Well, that's what always pops into my head when I see
him. This guy can either be sort-of simple, or a pain
in the neck. Buster Rod G. has a couple of long range and close range
moves, so that's not good. However, you can't really
hit and run him either, as he'll thwack you away with his staff. Think the
first form of City Garage, only faster, can create clones of himself, and he can teleport! You got your work
cut out for you here. Your
best bet would be to try to get in close and pound
him, since he doesn't seem to teleport all the time,
and may let you knock him down. If it gets too
troublesome, and his doubles throw you for a loop, let your Super Attack do your dirty work
for you. Eventually, he'll explode into nothingness. Roll is free! Now, time to find who that
mystery villian is!
Continue on to the 2nd page!
Back to the Arcade Page!
|